 entrance
Four ways: how to check drivers on Windows. Using the Windows Driver Verifier Bsod which drivers do you need on your computer
We have already talked about. But how to install a driver for old equipment if it does not support PnP technology? And how can you diagnose the work of the drivers? Consider these topics in this article.
Installing old equipment
If you do not have software for hardware from the manufacturer (in other words -) and the device does not support, open Device Manager, right-click on the computer name at the very beginning of the list and select Install old hardware, Then Further... Then you can go one of two ways: either the computer will try to recognize the connected device itself, or you yourself choose the class of the device and hopefully in your heart you will look for your equipment in the list of available ones. And if you find it, then you are in luck. If not, then you need to follow the instructions
Diagnostics of driver operation
Equipment conflicts
Driver conflicts are less and less common these days. But they do. Typically, conflicts arise when two actors require the same resources. And all the wars on Earth were for the sake of possessing some resources! So do not be surprised that this weakness is also present in computer components. To find out if the device has any conflicts, you need to diagnose the driver's operation. To do this, go to Device Manager, select Devices. Next, in the context menu, select Properties and open the tab Resources... Below you will find a field List of conflicting devices, where and you can find out if there are conflicts or not. If available, the "Change" button is activated, where you, in the role of a judge, will divide resources between conflicting ones.
System information
Also, to diagnose the operation of drivers, the utility is used System information, which you can open if you enter in the Run menu msinfo32.
In it you will see three nodes. You can use the following to diagnose drivers:
- The first node has a parameter Conflict and sharing. In it you will see which equipment uses the same resources. Which in turn is a possible cause of the problem.
- In the second node you can find detailed information about the required equipment. And in order to diagnose drivers, it is best to use the parameter Devices with problems.
- In the third node, expanding the option System Drivers You can check the status of the kernel drivers. This is a very important parameter because it is targeted specifically at the operating system kernel drivers. And restoring a kernel driver is much more difficult than restoring a printer driver. And therefore it is better to diagnose such cases, otherwise you may stumble upon one of the fatal errors.
Driver Verifier Manager
Another tool for diagnosing drivers is Driver Verifier Manager... It allows you to put drivers under load, simulate a lack of resources, in general, put drivers in conditions that are unrealistically difficult for them, in order to identify possible failures. You can call this tool using the menu Execute if you enter there and execute the command verifier.
To be honest, this utility has a rather vague interface. It's my opinion. Yes, and she does not really interest me, since even with a running virtual machine and a bunch of programs I cannot load the hardware above 60%. Therefore, I did not deign attention to this utility. But according to the described functionality, this utility is a very good tool.
DirectX Diagnostics
If you type in the Run menu dxdiag then you run Diagnostic tool... In the window that opens, there will be 4 tabs: the second about the screen, the third about the sound and the fourth about the input system. Each of them has a note at the bottom indicating the presence or absence of problems. As you can see, this tool only diagnoses these three hardware classes. Why? Because the main use of DirectX is when creating games. What does the game need? A screen to see what we're playing! Sound to hear the roar of a motor or a gunshot in the back. And an input system to steer or shoot. And do not care what your printer does not print. So that's it.
So good luck with the drivers, and if you need driver diagnostics, then feel free to use any of the above tools. The article is also partly related to the topic of this article, because drivers are software products.
Using the Driver Verifier Manager system utility bundled with Windows Vista / 7, you can carry out a comprehensive diagnosis of the drivers installed in the system and find problematic components that disrupt the stable operation of the computer and the equipment connected to it.
To run the mentioned tool, you need to register in Windows with administrator rights, then enter the verifier.exe command in the address bar of the Start -> Run menu and press the OK button. As a result, a window of the driver verification manager will open, in which you will need to scratch your head and decide on the appropriate option for launching the utility. You can perform both selective and full testing of all drivers without exception.
After setting the operating mode of the program and pressing the "Finish" button, you will need to restart the computer and wait for the operating system to load. If a faulty driver is detected, Windows will fall into the so-called "Blue Screen Of Death" (BSOD) and report a critical error containing information about the problematic component, which must be taken in pencil.
The next step is to delete the files of the defective driver. To do this, hold down the F8 key while starting the computer, start the system in Safe Mode and then eliminate the faulty component using standard Windows tools. After that, you need to reopen the console and enter the verifier.exe / reset instruction to deactivate the Driver Verifier Manager application. It is important to note that entering the last command is required even if the computer successfully boots, indicating that there are no problem drivers.
For additional reference information on this matter, visit the Microsoft Support site in the article “Using the Driver Verifier to Identify Windows Driver Problems (Advanced)”.
8022One of the most likely causes of a blue screen of death is incorrectly working drivers. You can determine the exact cause of the failure by analyzing the dump file after BSOD, but this is not always the case. In some cases, it is not possible to determine the source of the problem even with the most thorough analysis of the dumps. In such situations, a standard Windows utility designed for advanced driver testing can help.
Working in the background, it not only monitors the operation of drivers, but also simulates various "Stressful" situations, for example, lack of RAM. Information obtained during testing "Added to" to dump file DMP... Driver Verifier allows you to analyze I / O errors, control buffer overflows, identify errors in the mechanism IRQL etc. In a word, the program allows you to identify situations in which a driver can lead to a system crash from BSOD.
The specificity of the utility does not at all preclude its use by ordinary users. Anyone can create a report with its help; it is quite another matter to deal with its decoding. But no one requires this from ordinary users, as for the resulting dump, then its analysis can be left on the shoulders of professionals by asking for help at some well-known computer forum.
Important note: before using the utility it is highly recommended create a system restore point or a full backup. In Windows 8 and 8.1, you will also need to activate the mode secure boot... This is necessary in case of unexpected errors during the operation of Driver Verifier. This will allow you to boot, disable test mode, and roll back the system.
You can run the utility with the command verifier.


In the next window of the Manager, mark the parameters for testing (you can select all for completeness).

You can leave nothing in the third window.

In the fourth window, the utility will offer to select a group of drivers for testing.

By default, all unsigned drivers are selected as belonging to the risk group, but you can also specify the drivers yourself by ticking them in the fifth window of the Scan Manager.


It's all. After restarting the computer, the driver check mode will be activated. All this time, the computer can be used as usual, until the moment it appears BSOD... After that, copy the dump file from the directory C: / Windows / Minidump and send it for analysis. It may take a little longer to boot a PC with driver testing enabled, so don't be alarmed. This is normal. After receiving all the data, the debug mode must be disabled manually by selecting the item "Delete existing parameters".
Utility Driver Verifier is included in all versions of Windows, starting with Windows XP, and allows you to check drivers, identify problem drivers that cause blue screen of death (BSOD- Blue Screen of Death) and write detailed information about the problem driver into a memory dump for further analysis. The utility exposes the checked drivers to different " stress tests”, Simulating various extreme conditions: lack of memory, I / O control, IRQL, deadlocks, DMA checks, IRP checks, etc. situations that rarely occur on productive systems are simulated, and the behavior of the driver in them is monitored. The purpose of the utility is to identify situations in which the driver can lead to an abnormal termination of the system with BSOD.
The executable file of the Driver Verifier utility is called Verifier.exe and is located in the% windir% \ system32 directory. There are two options for using the utility: from the command line or using the graphical interface.
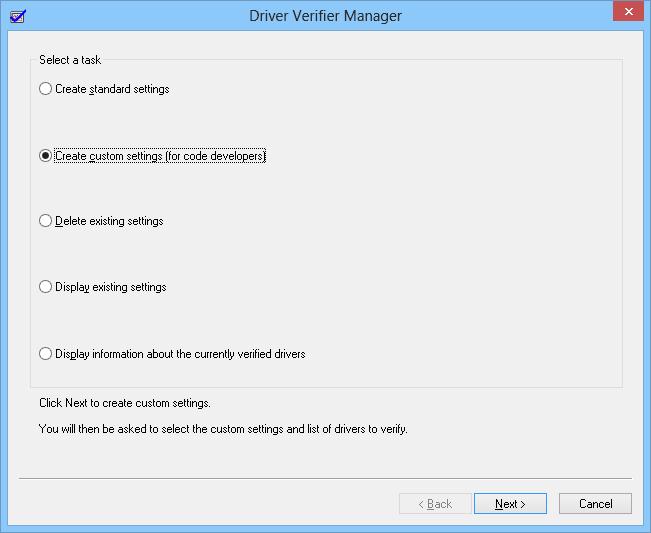
To enable Driver Verifier mode in Windows 8, launch Driver Verifier by typing
Verifier
In the task list, select Create custom settings (for code developers) and press Next.
 Make sure the options are selected Standard settings, Force pending I / O requests and IRP Logging... Click on Next.
 Next select.
 Sort the contents of the table by clicking on the "Provider" column heading and select the drivers you want to test from the list of drivers. In our example, we will run a check for all drivers that are not a developer MicrosoftCorporation... We selected drivers: e1g6032e.sys (Intel) and lsi_sas.sys (LSI).

Note... The presence of a Microsoft digital signature in the driver indicates that the driver has been tested in a certain way for stability and its code has not been modified after that. That is why it is not recommended or used.
It remains to press Finish and an informational window will appear stating that you need to reboot the system for the changes to take effect.

Advice... You can also enable driver check mode from the command line. For example, to run Driver Verifier with default settings for the myPCDriver.sys driver, the command would look like this:
Verifier / standard / driver myPCDriver.sys
After rebooting, the system boots in driver check mode. Driver Verifier runs in the background, performing various types of error testing on selected drivers. Use your computer as usual and wait for the BSOD to appear. If you know what actions previously led to an abnormal system shutdown, repeat them. In the event of a BSOD, it is necessary to copy a memory dump file (by default, they are saved in the C: \ Windows \ Minidump \ *. Dmp directory) and or an equivalent.
Important! After activating the driver debugging mode using Driver Verifier, this mode will work until it is forcibly disabled.
In the event that the problem has not recurred within 1-2 days, then with a certain degree of reliability it can be concluded that the drivers being checked are not the cause of the system crash and the check mode can be disabled for them.
Advice... Using the Windows Driver Verifier significantly slows down Windows, so it is not recommended to use this mode all the time.
You can disable Driver Verifier from the command line:
Verifier / reset
Or from the graphical interface by selecting the item Delete existing settings.
 If you cannot log in to the system in normal mode, you can also disable debug mode from safe mode.
In the event that the system does not boot in safe mode, try deleting the following keys in the registry by booting from the boot disk:
- HKEY_LOCAL_MACHINE \ SYSTEM \ CurrentControlSet \ Control \ Session Manager \ Memory Management \ VerifyDrivers
- HKEY_LOCAL_MACHINE \ SYSTEM \ CurrentControlSet \ Control \ Session Manager \ Memory Management \ VerifyDriverLevel
You can check the current status of Driver Verifier as follows.
The Driver Verifier utility (verifier.exe) is designed to analyze problem drivers, when analysis of memory dumps after BSOD does not allow finding a problem driver. Driver Verifier is a “lifesaver” in the most problematic situations.
With Driver Verifier, you can:
driver stress test (conditions of lack of resources are simulated);
buffer overflow control;
control over errors that occur during incorrect operation at a given IRQL;
analysis of input-output errors;
detection of deadlock situations, etc.
Driver Verifier comes in handy when:
the administrator (user) has suspicions that it is this driver that is causing the system to crash and he wants to additionally check whether this is actually the case;
driver developers who want to test their driver;
When analyzing a dump after a BSOD, you cannot find a problematic driver.
One of the most difficult cases of analyzing memory dumps is when a driver erroneously overwrites data before or after the end of the buffer allocated by it. In such cases, errors occur in the OS kernel (for example, analysis of the dump after BSOD shows that the error occurred in ntoskrnl.exe).
Let's see a similar case with a specific example. Using the NotMyfault utility, we call BSOD - “Buffer overflow”.
The result of dump analysis using windbg is in the attachment below.
According to the analysis of the dump, we get.
1. Arg1: 00000007, Attempt to free pool which was already freed (there was an attempt to free an already freed pool)
2. IMAGE_NAME: ntkrpamp.exe (the very core of the system has to do with this)
It is with such errors that verifier comes to the rescue.
Run verifier.
We select "Create non-standard parameters". Next, select “Select parameters from the list”.
We select everything except “Imitation of lack of resources”.
Then we select “Select unloaded drivers to this list” and specify the path to the myfault.sys driver, which is located in the same directory as the NotMyfault.exe program.
Then we mark the driver and click “Finish”. After that, we need to restart the computer.
We carry out all the same actions as in the beginning. Run NotMyfault.exe, select “Buffer overflow” and press “Crash”. As you have noticed, the crash may not occur immediately, since it is not known in advance who and when will try to work with this memory. As you can see in the image below, thanks to the verifier, the system can identify the problem driver.
Let me give you an analysis using! Analyze –v in windbg.exe to dump memory after BSOD.
The verifier program makes it so that the driver being checked, instead of the usual memory available in the kernel, uses a special pool designed to detect such an error. Thanks to this, you can find the driver that leads to the BSOD.
If we look at the results of the analysis, we see the following.
1. DRIVER_PAGE_FAULT_BEYOND_END_OF_ALLOCATION (d6) - this is one of the errors that verifier generates
2. IMAGE_NAME: myfault.sys - the driver that led to the problem.
Thus, if the analysis of the memory dump after BSOD does not allow you to find the “guilty driver”, use the verifier.exe program (install all checks, except for insufficient memory).
The easiest way to use Driver Verifier (verifier.exe) is to run it with the following parameters:
verifier / standard / driver driver filename
Post Views: 1,042