 entrance
HDDScan does not start Windows 10. How to check the hard disk without loading Windows
The HDDSCAN program is designed to test drives with SATA, IDE, SCSI, USB, FireWire interfaces (IEEE 1394). Allows you to read the SMART parameters for some external drives (USB, FireWire), view information about defects from SCSI disks, contains a built-in disk temperature monitor, allows you to control the additional drive parameters such as AAM, APM, PM, and, of course, check the disk on Reading and writing surface.
Working with the program
The application of the program will be considered on the example of testing the SAMSUNG HM502JX drive - this is a 2.5 "format disk and USB 2.0 interface and JM20329 USB controller. And so, our disk is connected to a computer. We run HDDScan, select our disc in the SELECT DRIVE list.
When you press the SMART button below the disk selection window, the program reads S.M.A.R.T. report. from the disk. Let's look at it.

At first view, Smart is normal - only two threatened parameters: 199 UDMA CRC Errosr (transmission errors) and 197 Current Pending Error Count (number of candidate sectors) and the parameter 005 Reallyocation Sector Count (the number of reassigned sectors) is 0. On It is worth paying special attention, why - clarify further.
It's time to check the surface of the disk. When you click on the round button with a disk image, a menu appears with tests and additional features of the program.

We might briefly at the items of this menu.
- Surface Test - Disc Surface Tests
- S.M.A.R.T. - reads a smart report, can be seen in the illustration above
- S.M.A.R.T. Offline Tests - Starting the tests built into the drive; Contains sub-plugs Short, Extended, Conveyance
- Temperature Monitor - reads the temperature of the disk
- Features - allows you to manage additional disk parameters as the time energy consumption, noise work, consider this item later
- Identity Info - Displays information about the supported parameters of the ATA standard
- Skin Selection - allows you to change the appearance of the program
- Build Command Line - allows you to create a command prompt to start the program in the background and setting the required parameters of the selected drive
- About - Information about the program

Select the Surface Test, the surface test window appears.
- Start LBA - the initial address of the test
- END LBA - end address of the test, if you need to check only a part of the disk surface
- Block Size - the number of sectors recorded or readable, can be 256, 16384 or 65536 sectors
- Verify - check sector without reading data from it
- Read - Check sector with reading its contents
- Erase - record of data blocks filled with sector number (erases custom data fully)
- Butterfly Read - reads blocks with pairs: one first, one from the end of the test area - block 0, unit N, block 1, block N-1, etc.

This displays the name of the test, the device being checked, the time starting time, approximate end time and test status. Double click on a row with a test causes additional information about the progress and test results.

The MAP tab displays the reading time of the current block of sectors in milliseconds. Installed dawkey Disable Map Dynamic Update Disables the Real Time Card Update. Dynamic map mapping may adversely affect the accuracy of measuring the response time of the block on computers with a weak processor. Unreadable sectors are marked in blue. Here at the beginning of the test there were already three BAD-Block, although, as we remember, there are no reassigned sectors in Smart, there are only candidates. Those. If you repelly only from S.M.A.R.T.t., without checking the surface, it can be concluded that it will be incorrect and can lead to the unavailability of information on the disk.
The Report tab contains information about the current test, the addresses of the Bad blocks and blocks with the read time more than 50ms.

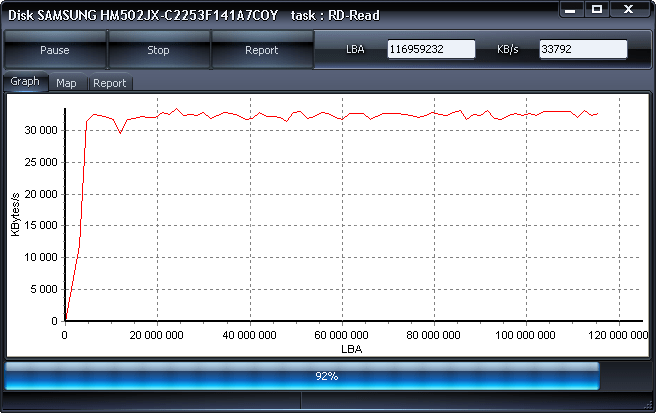
The Graph tab contains a graph of reading speed depending on the block address.
SMART Offline Tests allows you to run the following tests:
- short - scans a small part of the surface, sectors in Pending-List (candidates for substitution), the main disk nodes. Lasts about one to two minutes
- extended - checks the main nodes and completely scans the surface, can last from half-hour to several hours depending on the disk capacity
- conveyance - checks the main assembly nodes and logs that may indicate the incorrect operation of the drive.

Temperature Monitor - Shows a window with a temperature of the test disc. Also, the temperature is displayed in the system tray.

Features looks like this.
- Automatic Acoustic Management - allows you to adjust the noise of the drive due to the speed of the head positioning, the reduction of the speed reduces the noise, but slightly reduces the performance; 0 - Maximum speed, 254 - minimum
- Advanced Power Management - allows you to reduce the speed of rotation of the disk or fully stop it in the absence of appeals, reducing this power consumption
- Power Management - Disk Stop Timer In the absence of appeals, set in seconds, after this time, the plate stops and spinned again when accessing the disk
- Spindown / Spinup - Forced stop / promotion disk.

Unlike the Victoria program, the HDDSCAN program cannot hide damaged sectors (BAD blocks).
Each user knows and necessarily got into such situations when something broke into the computer, it was wrong or poorly worked. There is nothing whiter annoying than a badly converging technique, which also hangs or for incomprehensible reasons, manages itself. Of course, all the details may break, but are particularly susceptible to the mechanical parts still preserved in modern computers. It belongs to the hard disk.
In this review, not only the theory will be considered. The authors at hand turned out to be a failed disk, the operating system of which was loaded for 20 minutes. It was decided to fix it and quite successfully!
What can go wrong
In order to warn the breakdown and repair a hard disk or at least save the desired information, you need to regularly monitor the condition. To do this, it is recommended to carefully observe the "health" of your computer. Here are the moments to pay close attention to:
- watch for errors. Technique, like a person, has a property to make mistakes. There was one incident with a hard disk - nothing terrible, but if the errors appear constantly, you need to urgently turn to the master.
- friction or beating. Since reading occurs with the head, there is a chance that it will shift and start spoil the main disk with information. If you hear a suspicious knock in the system unit, it may well mean that there is a problem with a hard disk.
- analyze work. If your computer has not saved the file or suddenly disappeared the recently saved document, you need to go to the master. If the computer's long-term memory is not working - a hard disk is guilty.
- recognition. The computer did not see the disk? Poor, most likely, this is a problem with a disk, and not with software, although it can be. Try to put the item in another system unit. If it works, everything is in order.
- failures. Are you trying to download a document, and the technique does not want to do this? Problems with downloading long-term memory files are taken from breakdowns of the same part.
- long loading. If you open every photo half an hour, you can not remove a little weighing text document, then this is also a problem of a hard disk.
Optionally, all the time of the computer is able to sit at the system unit and listen to how there is a problem detail. It is enough just to periodically listen and carefully follow the status of the entire computer, then everything will be fine.
How to check the hard disk for bugs of table of contents
In general, if your hard disk is in order and he does not need emergency assistance, you can conduct a preventive check for errors. It will speed up the computer and save your nerves. Let's consider the actions algorithm for this useful procedure under the Windows 7 operating system.
- in order for the computer to not simply find problems, but also corrected them to note the checkbox "Automatically correct system errors".
- if you want to try to restore the physical disk structure itself, you need to select the "Check and restore damaged sectors" function. Note that such a procedure will take a lot of time.
- there are doubts? Select both parameters and make prevention.
Another little advice. If you decide to "pay" a disk, which is a system for a computer, do it immediately before shutting down.
So that any technique worked well, and it was easy for you to manage it, you need to follow and care. Moreover, when it comes to a device that is much more complicated by the stove and understand it on its own sometimes quite difficult. Conduct preventive work, and if necessary, call the masters and then with your computer, and, it means that your data will be all good.
HDD Regenerator.
This program is best downloaded from the portal (Softportal.com). Run the installer.
If you leave a daw in the last window, the program will immediately start. Let's not postpone and start.

And what is this menu Full Version? It turns out that the program is paid, and our compatriot requires 90 dollars per key. In addition, when deleting, it behaves worse than the virus. Requires rebooting the operating system and thinks for a long time.


R.tester.
- Click PCM on any logical disk you want to check.
- In the menu that opens, click on the "Properties" string.
- At the top of the properties window, click LKM on the "Service" tab.
- Click on the "Check" button.
- Here, place both ticks in Chekboxes and click on the "Start" inscription.

If the selected partition is not systemic, checking the disk for errors will start immediately. If you want to check the C:, OS drive will display a notification on the screen that the operation cannot be fulfilled at present. Do not consider such behavior of the OS climb. Since the section contains all system data, it is not possible to disable it while Windows.
Just click the "Check Schedule" button and restart the computer. After turning on the PC, the disk check for errors will begin before the operating system is loaded.
Command line

To start the chkdsk utility from the command line, do the following sequence of actions.
- Click the PCM on the desktop and select "Create a shortcut" in the context menu.
- In the window that appears, a proposal will appear select the executable file, but the easiest way to just enter into the "CMD" input line and click OK.
- Now click on the PCM on the newly created label and select the "Run from the administrator" line. The command line opens.
- Enter: CHKDSK [section): / f / r.
As with the start of the graphics shell, checking the disk for errors will notify that the program is not possible if you specify the system partition. At the same time, a question appears on the screen: "Does the task after rebooting the PC?" Press the Y key to respond to affirmatively, or n, if you do not want to check HDD.
If the OS is not loaded
If, due to the troubleshooting file system, Windows refuses to start, checking the hard disk on errors can be run from the recovery console. Open the BIOS by clicking on the DEL key on the initial computer boot screen. Install as a boot device (First boot device). Laser disk drive. Insert the Windows Installer disk.

After downloading from the DVD, the Language Parameter Selection window will open. At the bottom of it will be located "Recovery System". Remember that when errors on the HDD occur to the early recovery points meaninglessly, data rewriting can lead to even greater problems.
In the window that offers selection of recovery options, click the "Command Line" button. The command syntax remains unchanged - CHKDSK [Disc Letter]: / F / R. In this case, the disc check will begin immediately without rebooting.
Third-party
If the chkdsk utility has not led to a positive result, and critical errors due to HDD continue to occur, more thorough checks should be performed using. Hard drive manufacturers themselves produce special tools for testing their equipment. In addition to this software, you can use Victoria and MHDD applications.
Be pretended! Checking the disk on errors by third-party application should be performed only after creating backups of all important data. And you need to save copies of the data in the external storage.
Let's make an explanation. "Bied sectors" are a disk area, read the data from which it does not work. Their very appearance is a bad sign, but permissible, but a constant increase in their number indicates that the disk is most likely already "not a tenant". We must think about replacing it, and the decision for a long time does not delay.
So, the CHKDSK program will check the disc, the check time depends on the volume of the disk and the number of files on it. The system disk will be checked only after rebooting. We will have to gain patience and wait for the end of work. At the end, the report will be displayed.
If you cannot log in, you will need to use the recovery tools and run the program from there.
Standard Windows check
Another way to check the disk is to use the built-in check. To do this, it is necessary:


If the selected hard drive is used by any program, then it must be stopped to stop it. Click the "Disable" button and check will continue. The check time depends on the volume of the disk and its completion.
In order to check the system partition, the system will display a message that testing will continue after rebooting. Agree with this, after restarting the computer, wait for the end of the test.
With all due respect to Microsoft, only third-party programs can give detailed information about the health of the disc. If you need repair of laptops, in Lyubertsy There is a good workshop where you can check and your hard drive. Moreover, it will make it using third-party programs, which will also tell me further.
Ashampoo HDD Control 2
This program is paid, but the trial free period will give the ability to check the drive. The program is multifunctional, with its help you can perform a lot of actions with a disk, including defragmentation, disc cleaning, etc. Now we are interested in testing modes and checking the surface.
To start checking, you must:

To determine which state is the surface of the disc, you need to go to the "Control" tab and click on the Surface Test section.

On the progress of testing can be observed in the window that opens. To refer to the status of the disk surface, the color marking is used:
- Blue - the sector is not verified.
- Green - no errors.
- Red - Fablement Sector.
If a large volume disk, then checking may take a long time.
HDDScan.
Popular program for information on disk, it is verified and correcting errors. To start testing it is necessary:

To view the disk status, go to the "MAP" tab, where all information about the surface of the disk will be. Sectors are marked with squares of different colors. They mean:

Victoria.
Perhaps the most popular utility to determine the health of the hard disk. It can be launched both from Windows and from the bootable media if it is not possible to start the operating system. Consider working with a program with running from Windows.
After starting in the main window of the program you will see several tabs, the most important of them:

In order to start the check, you need to click the "Start" button and wait for the end of work. First of all, you need to pay attention to the column of multi-colored rectangles with numbers near them. Using color coding, information about the read speed from the disk sectors is displayed. Ideally, the values \u200b\u200bmust be near rectangles with various shades of gray.

The numbers near the green or orange rectangles show the number of sectors, which have to spend more time. A red rectangle shows that there are sectors on the disk, read information from which you can, but for this you have to spend a lot of time.
Most likely, these "red" sectors are candidates for failed. Their number should be remembered, and after some time to re-scan. An increase in their number indicates the degradation of the disk surface. Moreover, they can soon appear areas that are marked with blue.
You can try to restore these "broken" sectors. To do this, set the "Remap" mode and start checking over. If possible, the program will restore these disk areas. If the "blue" blocks remained, you should think about replacing the hard disk.
Each user knows and necessarily got into such situations when something broke into the computer, it was wrong or poorly worked. There is nothing whiter annoying than the evolving ...
In this manual for beginners to steps, it is shown how to check the hard disk on errors and damaged sectors in Windows 7, 8.1 and Windows 10 via the command line or in the Explorer interface. Also described additional HDD and SSD checking tools present in the OS. Installing any additional programs is not required.
The easiest way to check the HDD in Windows is to use the conductor. In it, right-click on the desired hard disk, select "Properties", and then open the "Service" tab and click "Check". In Windows 8.1 and Windows 10, you will most likely see a message that now checking this disk is not required. However, you can launch it forcibly.

In Windows 7, there is an additional ability to enable verification and correction of damaged sectors, noting the relevant items. You can still find a verification report on Windows Application Events.
You can check the hard disk on errors not only using the command line, but also in Windows PowerShell.
In order to do this procedure, run PowerShell on behalf of the administrator (you can start typing PowerShell in the search for the Windows 10 taskbar or in the Startup menu of the previous OS, then click right-click on the found item and select the "Start from the administrator name" .
In Windows PowerShell, use the following REPAIR-VOLUME commands to check the hard disk partition:

If, as a result of the execution of the command, you will see a message NoerrorsFound, which means that the disk errors were not found.
Additional disk checking options in Windows 10
In addition to the above options, you can use some additional funds built into the OS. In Windows 10 and 8, the maintenance of disks, including their check and defragmentation occur automatically on schedule, while you do not use a computer or laptop.
To view information about whether any problems with disks were found, go to the "Control Panel" (you can do this by right-clicking on the start and selecting the desired item of the context menu) - "Security and Service Center". Open the "Maintenance" section and in the "Disk Status" item you will see the information resulting from the latest automatic verification.

Another feature that appeared in Windows 10 is a storage diagnostic utility (Storage Diagnostic Tool). To use the utility, run the command prompt on behalf of the administrator, then use the following command:
Stordiag.exe -CollectWetw -CheckfSconsistency -OUut Path_K_Papka_Text
The execution of the command will take some time (it may seem that the process is hung), while all connected discs will be checked.

And after completing the execution of the command, a report on the identified problems will be saved in the location you specified.

The report includes individual files containing:
- Check information CHKDSK and error information collected FSUTIL in text files.
- Windows 10 registry files containing all current registry values \u200b\u200brelated to connected drives.
- Windows event view log files (events are collected within 30 seconds when using the Collectetw key in the Disk Diagnostic Team).
For an ordinary user, the collected data may not be of interest, but in some cases it may be useful to diagnose the problems of work of drives by a system administrator or other specialist.
If, when checking, you have any problems or require advice, write in the comments, and I, in turn, will try to help you.
Comments (113) to checking the hard disk on Windows errors
05/21/2017 at 08:14
06/29/2017 at 10:12
07/27/2017 at 08:36.
09/23/2017 at 08:04.
11/01/2017 at 00:56.
11/01/2017 at 11:44.
11/01/2017 at 11:17
- 005 Reallyocation Sector Count talks about the number of reassigned disc sectors. Overwriting the sector is performed in the case when the system considered the sector is irreversible damaged, that is, failure. In this case, this sector is disabled and replaced by the sector from the backup area, and the system fixes overwriting. If the value of the RAW field is non-zero - it means that failed sectors are. And this, as we found out above, very bad.
- 011 Calibration Retry Counts (Recalibration Retries) indicates the number of errors when trying to reset the drive. Nanuel significance often talks about problems.
- 184 End-to-Error talks about the number of errors when transmitting data through the cache of a hard disk. The non-zero value also means the sad state of affairs.
- 187 Reported Uncorrected Sector Count (UNC Error) reports how many sectors were candidates for reassignment. Accordingly, a value that is not equal to 0 also indicates an abnormal state.
- 188 Command Timeout counts how many times the command has not been completed due to exceeding the waiting time of the disk response. It can talk about problems with the disk, but not only with it: sometimes time-outs occur due to poor cable states or poor compatibility of controllers.
- 196 Reallyocation Event Count - another important parameter, reports the number of reassignment operations. From 005 is characterized by the fact that, besides the failed sectors, the delay sectors and sectors, who are rejected by the error, are also included here, which system can also reassign. The difference is that the failed sectors remain reassigned and continue to be displayed at 005, and the delay sectors and erroneously rejected regularly "treated" by the system as possible and returned to the place. In any case, the value other than zero must make it fill.
- 197 Current Pending Error Count reflects the number of sectors on which the system still doubts: reassign them or not. If there are such sectors, it can speak either about the problems with the disk, or about the problems with something else (because the sectors are mistakenly entered into the "broken", too, do not just occur).
- The 198 Offline Uncorrectable Sector Count means almost the same as 197, but with one condition: only those reassignment candidates are recorded here, which are detected by offline testing (one of the methods used by the system for diagnostics).
- 200 WRITE ERROR RATE Speaks about errors when writing. Indicates problems (most often - with writer heads of the hard drive).
- The utility is controlled from the console, so the first thing we go to it. To do this, either we write in the "Search" field in the "Start" menu CMD keyword, or click the "Start" key with the right mouse button and click on the menu item "Command Line (Administrator)".
- In the COMMAND-window that appears, you type Chkdsk<имя диска> And a few keys after it: / F - To scan the disk on file system errors, / r - to find and try to restore damaged sectors, / b - to re-evaluate damage. It is recommended to use all three keys. If you do not enter the disk name, the system will select the C drive: automatically.
- If the disk is currently used by the system, the console will report this to this and will offer to reboot. Click Y: Windows will restart and scan disc.
- To help him, the first thing you need to apply check and treatment with the chkdsk utility. We have already managed to consider how it is done.
- If Chkdsk did not have the results, it is necessary to use the utility for the "treatment" of the disk with the possibility of remap (Victoria, MHDD, HDDSCAN, etc.). Detailed instructions for each program, but the essence does not change: the surface scanning should be launched with the reassignment of problem sectors. We illustrate the process on the example of MHDD, a program running from under MS-DOS. Attention! When applying this method, you can lose all data on the hard drive, and if it is very bad - then the disc itself!Be careful with manual reassignments and preserve the important data from it to another place.
- Create a bootable flash drive via Windows USB / DVD Download Tool or its analog. Install MS-DOS on the USB flash drive and connect MHDD there.
To the disk connected to the first channel, it is accurately displayed, you must edit the config MHDD.CFG, which lies in the CFG: Primary_Enabled \u003d True folder
Alexey Pankratov
https://xakep.ru/2016/11/08/mhdd/
- Insert the bootable USB flash drive into the computer, you set the download from the flash drive through the BIOS, go to MS-DOS and load the program. MHDD will display a list of disks found in the system and asks how to continue work. Choose the desired one.
- To start the scan, we type in the SCAN console or simply click the F4 key. A window will be displayed, where you need to configure the future scanning. The initial default sector is zero, the final is the end of the disk, and these values \u200b\u200bcan only be changed if you want to check not all the disk, but only some part it is. Additional features (erasing failure sectors, Remap) are disabled by default. The Timeout field indicates, after which maximum delay, the sector should mark as a failure, Spindown After SCAN stops the disk after scanning, and LOOP TEST / REPAIR loops scanning. All this is not necessary for us. Press F4 again to start scanning.
- A simple scan is looking for failed sectors and delay sectors, without doing anything. Some "green" sectors are quite normal, brown and red - not good, but also not a reason for panic. Files Program defines differently depending on their type (software Bad sectors that can be restored, or physical, which can only be blocked, and it is impossible to fix it). If a lot of "broken" sectors, a lot or program crashes with a hard drive - then he is most likely not to help. Further intervention can not only "cure" it, but also to destroy finally.
- If the program has found problem sectors (they are marked with a cross, an exclamation mark or a letter, depending on what is not so with this sector), we have two options. You can walk across the disk again with the Erase Delays option (erases the problem sectors, after which the recording becomes impossible in them). This must be done if you feel sorry for information on the device and you do not want to reinstall the system. If the system is not sorry, it is recommended to use a more efficient method: formatting the entire disk with the Erase command. After that, errors that are not related to the "gland" will disappear. Together with all data on the computer.
- After erasure, we definitely recheck the disk. If on a nine clean hard drive still detects failure sectors - it's bad. This means that errors are hardware, and now only Remap will help us. Run the scan again by turning on the REMAP function, and reassign all sectors with errors. It must be done to slow down damage. If there is a lot of hardware page sectors, it means that the disk is already "refrigerated", and Remap only derete inevitable. Be very neat with further work with such a disk. Do not save important data on it and remember that it can refuse at any time.
- diagnostics of disc and "treatment" of failed sectors;
- view S.A.A.R.T.-Attributes;
- disk formatting;
- restriction of the volume of the disk;
- disc lock using a password;
- manual reading and record sectors;
- and etc.
- view "Disc passports", i.e. major information about it;
- view report S.M.R.T.;
- program discharge of the disk (stop its internal work);
- scanning the surface of the disk in several modes with different reading algorithms;
- construction of the charts of the disk surface;
- measurement of the speed of rotation of the disk;
- functions discussed above, such as setting the password or volume limit;
- and etc.
05/20/2017 at 13:56.
06/12/2017 at 20:02.
06/29/2017 at 09:32.
07/27/2017 at 08:03.
08/19/2017 at 17:01
09/17/2017 at 21:25
hayter23566325.
09/22/2017 at 19:35
11/01/2017 at 11:09.
The hard disk of the computer is one of the most vulnerable parts, and when drops, inactive use, or simply from old age, failure sectors may appear, provoking errors, and other damage. Consider how to conduct an inspection and correct these problems in the Windows 10 system.
Causes of computer hard disk errors and ways to diagnose their availability
Despite the relative fragility, the Winchester does not immediately show the errors that arose on it. Thanks to the built-in disk protection mechanisms, failure sectors are automatically overwritten in order not to lose important information and not provoke errors by software. Therefore, sometimes when problems are manifested in all its glory, it is already late to correct them. It would seem that timely diagnosis will correct the case; but no. Just to test the surface of the disk surface is also not recommended: excessive load on the sector can accelerate its aging. Therefore, the test is shown in cases where problems are seen, albeit minor. And here to postpone the diagnosis in a long box is no longer worth it.
Slow Disc Work
If the disk begins to work slowly - this is a bell. For example, the pictures or films open slowly, we are not talking about downloading from the Internet, but about files already downloaded to the computer. Completely normal files begin to issue a read error ... In this case, it makes sense to say that on the computer may have failed sectors or the delay sector.
Delay sectors are those areas of the surface of the Winchester, which, due to wear or physical damage, begin to work slower than usual. The delay can be both small, less than 10 ms and tremendous - up to 500 and higher. The presence of such sectors on the old disk is normal, but if there are too many of them - this is the reason to think about it. And surely you should be alarming if the Bad sectors appeared on the surface, they are failed or "broken" sectors: these are sites that have been damaged so much that they stopped working at all. They are dangerous not only to what can destroy the system (if the Bad sector has arisen in the system section), but also that they have an unpleasant property to grow: today on the Winchester one failure sector, and in a month there will be ten years later. It is completely impossible to cure them - it can only be blocked to slow down the growing, but after some time the disk will still come to the disc.
You can digitize errors in two ways: either to check the surface using a special utility, or view the report of the built-in self-control technology S.M.R.T. It is advisable to use both ways, but start recommended from S.M.A.R.T.
Diagnostics on the report of S.M.A.R.T.
This utility system of self-diagnosis is responsible for detecting and rewriting broken sectors, finding and correcting disk errors. Report s.m.a.r.t. You can open with one of the numerous programs for the treatment of hard drive.
It looks like this report approximately as in the screenshot below. For discs of different firms, the number of check items may vary (in the way, there are no fairly important points 184 and 187 in the screenshot). Not all of its fields are talking about "Health" of the device: some reflect random errors or even simply physical characteristics.
It makes no sense to go into the details of the diagnostics, let's just say that the real number of errors is not reflected in the Value field and not even in the Worst field, but in the Raw field (hex). The fact is that the default value is set to nonzero, and even if there was no error for the entire life of the computer, it still can show the result of several hundred failures.
Now, what items should pay attention to when analyzing the disk status:
As you can see, from S.m.a.r.t. You can learn not only information about the condition of the surface of the Winchester, but also data about many other problems. Therefore, when diagnosing the report of this system is indispensable.
But to check, for example, the number of delay sectors, it is recommended to use surface diagnostic utilities.
Diagnostics of disc surface
Check usually happens like this: a special program in turns makes requests to each sector of the hard disk, analyzes the sector's response and on the basis of this analysis decides what happens to this sector. Windows does not have normal built-in utilities that allow the hard drive to propagately in a similar way, so you have to use third-party programs. We will talk about them in more detail just below.
As a rule, the diagnostic window looks like this: in one part of the interface, the sectors are displayed in the form of squares (if something is wrong with them, the squares are highlighted), the test data in text and numeric form is displayed. It lasts such a check for a long time, the longer, the greater the size of the hard disk, and does not always give accurate results when testing from under Windows. Therefore, for a more accurate result, you need a loading flash drive with MS-DOS and the testing utility installed on it.
An example of how the diagnostic window in a specialized program looks like (Victoria is used here), - in the screenshot below. Here, dark gray, green, orange and red indicates the delay sectors (color means the criticalness of the delay), bright blue - failed sectors. The program also includes the Repair function - reassigning erroneous sectors and sectors with a very large delay, if any.
Abuse this type of diagnosis, especially from under Windows, is not worth it. Too frequent application of the scan of the disk sectors leads to its premature aging, and therefore, to increase the number of damage and increase the likelihood of obtaining the BED sector.
Hard disk error in Windows 10
If the Windows 10 system encounters this error, it reports to the user in a timely manner and recommends that it is urgently to create a backup (recovery point in the case of the "death" system), or continue working with Windows at your own risk. It looks like this.
If there is a possibility, best, as the system offers, make a backup so that the data can then be restored, and only after that proceed to identifying problems.
The problems seen by the system may occur due to the reasons described above. Therefore, when this window appears, it is recommended to take the same actions: Check S.M.A.R.T. And the diagnosis of the surface (so as not to destroy the system is finally, it is extremely recommended not to do this from under Windows!). But before going into the course of "heavy artillery", you can check the CHKDSK integrated utility disk.
CHKDSK Disk Check
The CHKDSK program (CHECK DISK) program is practically useless when errors occur due to physical problems with the hard drive, but the file system errors this utility finds and corrects "with a bang." In versions of Windows, starting with XP, the utility can also find and "treat" failed sectors, but its effectiveness in this complex business remains in question.
So, we will work with CHKDSK.
If the use of the utility did not help, it's time to move to the measures more seriously: to use third-party diagnostic utilities with the treatment function or, in the worst case, to backup files and replacing the disk.
Treatment of Winchester
Sad fact: if the cause of a hard disk failure is physical (failed sectors, problems with recording heads, etc.), you cannot fully cure it. You can slow down the destruction using the remap (the reassignment of the BAD sectors, i.e. their blocking and subsequent replacement sectors from the backup area), but the damaged sectors will not restore it, and the Winchester will continue to "raise". At some point, the only way out will be replaced. And if the problem is not in the sectors, then it is not possible to do anything programmatically. The physical restoration of the hard drive at home is impossible, and even in the repair center for such a task, it is unlikely to take.
Nevertheless, program errors can be eliminated using special utilities, and Remap of failed sectors will allow to extend the service life of even the destroying device.
If the physical errors of the hard drive are not related to the BED sectors, the only acceptable output will be the purchase of a new disk.
Sometimes the Windows system displays the message "Restart to fix the disk errors ...". If this happens regularly, but no diagnostic methods show the presence of errors, it means that the problem is either in the system itself, or in the disk firmware. It is recommended to update the disc firmware, and if the problem does not disappear, use special utilities to diagnose Windows errors. In extreme cases will help reinstall the system.
How to disable disc check when booting Windows 10
If every time you boot Windows you turn on the CHKDSK utility and begins to check the disc, it means that the system considers the disc is unreliable. This is not necessarily a consequence of disk errors: a constant check of the disk may occur after an incorrect reboot or troubleshooting in the file system. To disable the scan, use the instructions.

Treatment Utilities for Winchester
Some programs designed to search and correct disk errors, we already considered indirectly. It is necessary to talk about the most popular of them in more detail.
MHDD and working with it: video instruction
Very old and very reliable utility, working from under DOS and old versions of Windows, has managed to prove well over the years of work. Works with all kinds of drives, the interaction with them is realized at a low level. It applies to a free license.
The program includes:
Learn more about how to work with MHDD will tell a video.
About Victoria: Video
Victoria is another popular utility for working with a hard disk. It works from under the DOS or Windows (the launch is required on behalf of the administrator), designed to find physical hard drive defects. The interaction with it is implemented at a low level (through the controller ports). The program is distributed free of charge.
What is Victoria:
The video below provides instructions for working with the Victoria program from under Windows.
HDDScan: Video Review
HDDScan will replenish a list of popular programs for diagnosing and "treatment" of a hard disk. It works with both HDD and SSD, it also covers free. The functions of her a little poorer: only works from under Windows and is designed to a greater degree for diagnosis than for treatment. Nevertheless, for an ordinary user is quite convenient.
Video reviews of the program:
HDDREGENERATOR.
Complete the list of an interesting program, which in the people darted "MHDD of a new generation". It is interesting because, in addition to standard functions, characteristic of MHDD and Victoria, has a recovery function, that is, may try to restore the damaged part of the disk surface physically using certain signals. It works such an extreme method not always and with imperative handling can only harm, but with competent use is able to significantly extend the life of the hard disk.
The only minus is the price: the HDDREgenerator is distributed by a paid license and costs $ 90. Pretty tangible value, especially if you consider that no one promises the guaranteed result.
See how to work with HDDREGENERATOR, you can see the following video:
With the help of timely diagnostics, it is possible to significantly extend the life of the hard disk started to spoil, but much better not allow damage initially. Be careful with the hard drives: do not drop them, do not knock on them, do not overheat and do not quack, but turn off the computer only by regular methods. Keep track of your hard drives, and you will not have to resort to Repair still a long time.