 Entrance
How to use the word program. Competent work in Word
With this article, I plan to open a series of lessons on the Microsoft Word text editor. Previously, I often had to do tutoring, that is, teaching how to work with a computer and application programs. The level of training for people is different, so there were often cases when it was necessary to train a person from scratch, including various programs from the Microsoft Office package, which also includes Word.
And I think that it worked out for me quite successfully, judging by the reviews. At least, my clients continued to quite successfully keep in touch with me and consulted on various issues. In teaching any program, I tried, first of all, to imagine myself in the place of the user and explain it precisely taking into account all those nuances that may be incomprehensible. In the case of the Word program, you must also take into account and know what and what keys are on the keyboard for. Therefore, I will also take this point into account, and in this lesson such an aspect as learning to work with the keyboard will even be consecrated. There is no way without this, since these are the very basics that you need to know.
And I think it's normal when a person does not understand something. The reasons may be different. Some didn't have computer science at school, others had it, but they didn't explain exactly what was needed. So, for example, I had computer science at school, but we basically did what we drew in the Paint program. That is, not even in Photoshop, which in life could really come in handy. However, this topic can be discussed for a very long time.
All examples will be considered on the example of the Microsoft Office 2010 package. But everything said is also true for Office 2007 and newer packages. Since from version 2007, which differed from previous versions in a redesigned interface, in the future from the release of software products of this family, the interface remained essentially the same.
Beginning of work.
Actually, after starting the Microsoft Word program, you can already start typing. What may be incomprehensible to a novice and inexperienced user who is not familiar with a computer? Here are some nuances:
To capitalize a letter, hold down the Shift key and press the letter you want to capitalize.
To switch the language from Russian to English and vice versa, the Alt + Shift key combination is usually used. What does such a designation mean? While holding down one of these 2 keys, press the other.
If you want to end a paragraph, then the Enter key is used for this. When typing, in order to transfer a line, you do not need to press anything on purpose. Because the transition is carried out independently.
If you want to make a red line in the text (paragraph indent), then the Tab key is used for this.
At the very top of the main program window is the main menu. There are tabs File, Home, Insert, Page Layout, Links, Mailings, Review, View, Settings. You, depending on the version of the package used, the tabs may be located differently. But the essence of this in any case does not change.
We are now on the Home tab.

If we want to change the typeface and font size, then we specify the appropriate values (in the figure they are highlighted in red). After that, if you suddenly want to cancel the selected style, it will be enough to press the key combination Ctrl + Space.
If, when choosing a font, you get a krakozyabra when typing, then keep in mind that this only means that there are no Russian letters in the font you have chosen.

To make the typed text bold, you need to select the button Zh, K on the toolbar - the text will be printed in italics, H - underlined.
You started typing, but then decided to return to the usual style, press Ctrl + Space. I recommend that you remember this combination in the future. It saves time, reduces unnecessary movements and generally makes life easier.
What else can be useful in the future? Well, these are primarily ways to highlight text. And it is selected either by moving the mouse over the selection area with the left mouse button pressed. Or using the Shift key and arrows. Well, or another very universal way. Holding down the Shift key, click the area where the selection begins, and then all the same, clicking the left mouse button - where the selection area should end.
Word 2010 is a text editor that allows you to create various types of documents such as letters, papers, flyers, faxes, and more. In this lesson, you'll learn about the main menu ribbon and the new pop-up menu, learn how to create new documents and open existing ones.
Word 2010 is slightly different from previous versions. The toolbar is the same as in word 2007 and includes the Main Menu Ribbon and the Quick Access Toolbar. Unlike word 2007, commands like "open" And "seal" located in a pop-up menu that replaces the Microsoft Office button.
Ribbon
The new main menu ribbon was first introduced in word 2007 to replace the traditional menu. The ribbon contains everything you need to run common commands. It contains numerous tabs, each containing several groups of commands. You can also add custom tabs that contain your preferred commands. Some groups have an arrow in the lower right corner, through which you can open more commands.
Some programs, such as Adobe Acrobat Reader, may add a separate tab to the ribbon. These tabs are called "inline items".
To collapse and expand the ribbon
The ribbon is designed to suit your current needs and be easy to use. However, you can minimize it if it takes up too much screen space.
- Click the arrow in the upper right corner of the ribbon to collapse it.
- To expand the ribbon, click the arrow again.

When the ribbon is collapsed, you can temporarily bring it up by clicking on any tab. The ribbon will disappear again if you don't use it.
Customize the main menu ribbon.
You can customize the ribbon by creating your own tabs with any commands. Commands are always placed within a group, and you can create as many groups as you like to organize your tabs. Optionally, you can even add commands to any standard tab by creating a custom command.

- Right-click on the main menu ribbon and select Customize Ribbon. A dialog box will appear.
- Click Create Tab. A New Tab will appear with a new group.
- Make sure you have selected a new group.
- Select a command from the list on the left, then select Add. You can also drag commands directly from the group.
- When you're done adding commands, click OK.

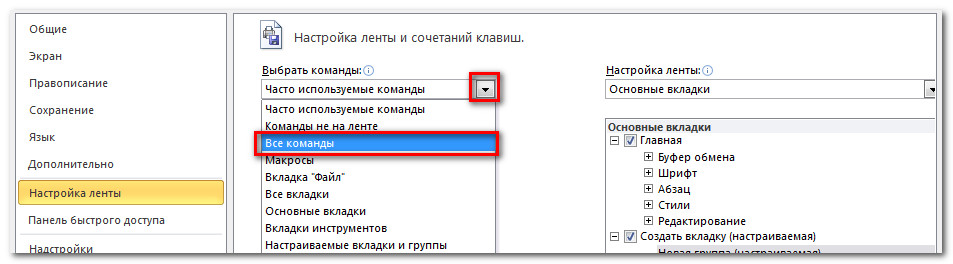
If you don't see the command you need, click Select Commands and select All Commands from the menu that appears.
The pop-up menu contains various options through which you can save, create, print, and share documents. It is similar to the Word 2007 button menu and the file menu of previous versions. However, unlike a regular menu, it has a full-page view, making it easy to work with.
To bring up the popup menu:
- Click on the File tab.
- The options are on the left side of the page.
- To return to the document, click on any tab on the ribbon.

The Quick Access Toolbar sits above the Ribbon and lets you quickly access common commands no matter what tab you're on. By default, it shows the Save, Edit, and Redo commands. You can add other commands to make it convenient for you to work.
To add commands to the Quick Access Toolbar:
- Click on the arrow on the right side of the menu
- Select the team you want to add. The command will appear in the shortcut menu.

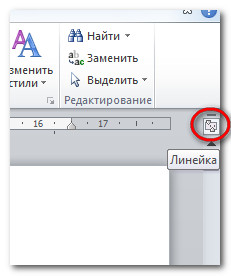
Ruler
The ruler is located at the top and left of the document. It allows you to accurately align your document. You can optionally hide the ruler to free up more screen space.

To hide or show the ruler:
- Click the Rulers icon in the scroll bar.
- To show the ruler, click the icon again.
Creating and opening documents
Word files are called documents. To start a new project in word, you first need to create a new document, which can be either blank or template. You also need to know how to open an existing document.
To create a new document:
- Click on the file tab. A pop-up menu will open.
- Select create.
- Choose a new document from the available templates. It will be highlighted by default.
- Click create. A new document will appear in the word window.

To save time, you can create a document from existing templates that you can select from the New Document window. We will talk about templates in the next lessons.
To open an existing document:
- Click the "File" tab. A pop-up menu will open.
- Select "open". A dialog box will appear.
- Select your document and click open.

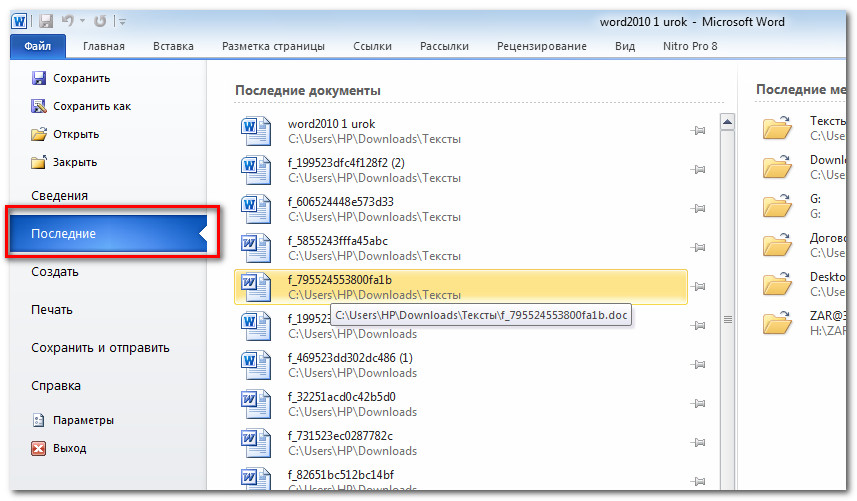
If you have opened a document recently, you can open it from the Recent Documents list. Just click on the file tab and select recent.
Compatibility Mode
Sometimes you will need to work with documents that were created in earlier versions of the Word program, such as Word 2007 and Word 2003. When you open such documents, they will open in compatibility mode.
Compatibility mode has certain restrictions, so that you will only have access to commands that were in the programs in which they were created. For example, if you open a document created in Word 2007, you can use Word 2007 tabs and commands.
Microsoft Word is the most important and necessary tool for any office work. And the number of functions that it has will shock any person. We have selected 20 tips that will help you simplify your work with Word and automate some routine tasks. You can read similar material for Excel.
Insert date and time
You can quickly insert a date using the key combination Shift + Alt + D. The date will be inserted in the format DD.MM.YY. The same operation can be done over time using the combination Shift + Alt + T.
Fast register change

If you do not yet own the blind typing method, then CAPS LOCK can play a trick on you. By accidentally turning it on and not looking at the screen, you can type a mountain of text that will have to be deleted and rewritten from scratch due to one pressed button. But by selecting the desired text and pressing Shift + F3, you will change the case from uppercase to lowercase.
Cursor acceleration
Usually, if you move the cursor with the arrows, it moves one letter at a time. To speed up its movement, hold down the Ctrl key together with the arrow.
Selecting fragments of text located in different places

A very useful feature that allows you to highlight inconsistent pieces of text. Hold Ctrl and select the pieces of text you need.
Clipboard

If you use copy and paste (and you probably use them), then most likely you know about the extended clipboard in Word. If not, then it is called by pressing the button of the same name and shows everything that you copied to the buffer during the work.
Quick screenshots

If you are doing a manual, a service review, or you just need to paste a screenshot into Word, this can be done very simply using the appropriate tool. Click the Snapshot button and Word will show all active windows. By clicking on any of them, you will get a screenshot of this window.
Hyphenation

Turning on hyphens can improve the readability of your text, as well as getting rid of long blank spaces between words. You can arrange them yourself or entrust it to the computer. The button is located in the menu "Page layout" - "Hyphenation".
Watermark

You can add a watermark to your document for added protection. To do this, go to the "Design" menu and select "Underlay". Word has four standard templates, you can also create your own.
Repeat previous command
A very useful feature that allows you to duplicate the last command. If you press F4, then Word will repeat the last command you made. This can be text input, consecutive deletion of several lines, applying styles to different sections of text, and much more.
Stress setting

Putting emphasis in Word is easy. To do this, place the cursor after the letter that should be accented, and hold down the key combination Alt + 769. Important: the numbers must be pressed on the numeric keypad on the right.
Ribbon customization

The top ribbon with buttons can be very flexibly customized. To do this, go to the menu "File" - "Options" - "Customize Ribbon". Here you can add features that were not there before, and remove those that are not needed. Moreover, you can delete or create your own tabs with features.
Quick selection of a large piece of text
To quickly select a large piece of text, place the cursor at its beginning and click with the mouse while holding Shift at the end of the fragment. It will save time and nerves in situations where you have to select several sheets at once.
Fast document navigation
There are several combinations that greatly speed up document navigation:
- Ctrl + Alt + Page Down - next page;
- Ctrl + Alt + Page Up - previous page;
- Ctrl + Home - move to the top of the document;
- Ctrl + End - guess for yourself. :)
Inserting a new page
How I hate myself for not knowing this combination before. Ctrl + Enter allows you to instantly create a new leaf, rather than holding Enter with one hand while brewing tea with the other.
Changing the default save folder

By default, Word saves all files to the Documents folder. In order to change this, go to the menu "File" - "Options" - "Save". In the line "Location of local files by default" select the folder you need. In the same menu, you can set the default document format, autosave, and more.
Source Formatting

In order to return the text to its original formatting, you need to press the key combination Ctrl + Spacebar.
Word as a task manager

If you're a big fan of Microsoft and Word in particular, you can even use it as a task manager. True, to begin with, you have to try a little. Right-click on the features ribbon at the top and select Customize Ribbon. In the right column, enable the only disabled Developer tab.
Go to the "Developer" tab that appears and find the "Checkbox" element, which shows a checkmark (why not). Now, by clicking on the checkbox, you can create lists of tasks and mark them as completed.
Vertical selection of text

If you accidentally mess up your list, you can highlight the text vertically. To do this, hold Alt and use the mouse cursor to select.
Protecting a document with a password

It doesn't even need to be said why. In our age, when information has become the main weapon, it never hurts to have additional protection. To protect a document with a password, go to the "File" tab and select the "Protect Document" option. Now feel free to create a password, but remember that if you forget it, you will not be able to recover it.
The fastest way to open Word

Rounding out our list is an incredible hack. If before, in order to open Word, you created a new document or searched for it in the Start menu, now this is a thing of the past. Press the key combination Windows + R and enter in the window that appears winword. If you don't use the command line for other commands, then the next time you press Windows + R, the command to start Word will automatically load and you just need to press Enter.
Do you have ways to make working with Word easier? I'm sure there is. Share them in the comments!
Today's article I want to devote entirely to working in the Microsoft Word editor. It will be especially useful for novice users to get acquainted with it. At first glance, the methods of work described here may turn out to be simple and do not require study, but they form the basis, without which further study of the editor is impossible. We will understand using the example of Microsoft Word 2010.
How to change the font in Word?
Font changes on the tab home in Group Font.

Here you can change, in fact, the font itself, its size, color, make it bold, italic, underlined or strikethrough.
Aligning text in Word
To align text to the left, center, right, or justify, click the corresponding buttons on the tab home in Group Paragraph, after selecting the text to be formatted.

How to insert a table into a Word document?
You can insert a table from the menu Insert/Table by clicking on the drop down list and selecting the number of rows and columns.

You can also use ready-made formatted table templates by calling the menu item Express tables.
How to change line spacing in Word and indent?
You can change the spacing between lines on the tab Page layout, group Paragraph.

To do this, you need to place the cursor on the line, Before or After which you want to change the interval and set the desired value. In the same way, indents are made from the right or left edge.
Inserting a picture into a Word document
To insert a picture into a document, select the tab Insert, group Illustrations and press Drawing.

A window will appear where you need to find the file on your hard drive that we are going to insert into the document. Click on it, click on the button Open and enjoy the drawing in the document.
If you want to learn how to put footnotes in a document, then read here.