 entrance
Automatic screenshots of windows 7. Screen capture program
Hello.
Which of us did not want to capture any episode on the computer screen? Yes, almost every novice user! You can, of course, take a picture of the screen (but this is too much!), Or you can take a picture programmatically - that is, as it is correctly called, a screenshot (the word came to us from English - ScreenShot) ...
You can, of course, create screenshots (by the way, they are also called “screenshots” in another way) and in “manual mode” (as described in this article:), but you can set up one of the programs presented in the list below once and get screenshots by pressing only one key on the keyboard!
Here about such programs (more precisely about the best of them), I wanted to tell in this article. I will try to bring some of the most comfortable and multifunctional programs of a kind…
F astStone Capture

Window fastStone programs Capture
One of top programs to create screenshots! Not once helped me out and will help me out again :). Works in all versions of Windows: XP, 7, 8, 10 (32/64 bits). Allows you to take screenshots from any windows in Windows: whether it be a video player, website or some kind of program.
I will list the main advantages (in my opinion):
- the ability to make a screen screen by setting hot keys: i.e. press the button - select the area that you want to screen, and voila - the screen is ready! Moreover, the hot keys can be configured to save to the screen the entire screen, a separate window, or select an arbitrary area (i.e., very convenient);
- after you have made the screen, it will open in a convenient editor where you can process it. For example, change the size, add some arrows, icons and other elements (which will explain to others where to look :));
- support for all popular image formats: bmp, jpg, png, gif;
- the ability to auto-boot when Windows starts - thanks to which, you can immediately (after turning on the PC) take screenshots without being distracted by launching and configuring the application.
S nagit
![]()
A very popular screen capture program. Possesses a huge amount settings and various options, for example:
- the ability to take screenshots of a specific area, the entire screen, a separate screen, scrollable screens (i.e. very large tall screenshots 1-2-3 pages high);
- converting one format of pictures to others;
- there is a convenient editor that allows you to accurately crop the screen (for example, make it with jagged edges), make overlays of arrows, watermarks, change the size of the screen, etc .;
- support for the Russian language, all windows versions: XP, 7, 8, 10;
- there is an option that allows you to take screenshots, for example, every second (well, or after that time interval that you set);
- the ability to save screenshots in a folder (each screen will have its own unique name. The template for setting the name can be customized);
- the ability to configure hot keys: for example, you configured the buttons, clicked on one of them - and the screen is already in the folder, or opened in front of you in the editor. Convenient and fast!

Options for creating screenshots in Snagit
The program also deserves the highest rating, I recommend it to absolutely everyone! Perhaps the only negative - a fully functional program costs a certain amount of money ...
G reenshot
Another cool program that allows you to quickly get a screen of any site (in almost 1 second! :)). Perhaps it is inferior to the previous one only in that it does not have such a large number of options and settings (although, perhaps, for someone it will be a plus). Nevertheless, even those that are available will allow you to quickly and without problems make completely high-quality screenshots.
In the arsenal of the program:
- a simple and convenient editor, which defaults to screenshots (you can save automatically immediately to a folder, bypassing the editor). In the editor you can resize the image, crop it nicely, resize and resolution, put arrows and icons on the screen. All in all, very comfortable;
- the program supports almost all popular image formats;
- practically does not load your computer;
- made in the style of minimalism - i.e. there is nothing superfluous.
By the way, the view of the editor is presented in the screenshot below (such a tautology :)).

F raps
(Note: special program to create screenshots in the GAMES)
This program is designed specifically for creating screenshots in games. And not every program can make a screen in the game, especially since if the program is not intended for this, your game may freeze, or brakes and friezes will appear.
Using Fraps is very easy: after installation, launch the utility, then open the ScreenShot section and select the hotkey (by which screenshots will be taken and sent to the selected folder. For example, the photo below shows that the F10 hot button and screenshots will be saved in the “C: \\ Fraps \\ ScreenShots” folder).
The screen format is also set in the same window: the most popular are bmp and jpg (the latter allows you to get screenshots of a very small size, however, they are slightly inferior in quality bmp).

Fraps: ScreenShot settings window
An example of the program is presented below.

Screen from a computer game Far cry (small copy).
By the way, so that screenshots are saved on your desktop, and not downloaded to the Internet - you need to fix only one switch in the program settings. Click on the program icon in the lower right corner of the screen and select the “where to save” option.

Where to load screenshots - ScreenCapture
In addition, if you save pictures to your desktop - you can choose the format in which they will be saved: “jpg”, “bmp”, “png”. Sorry, "gif" is not enough ...

How to save screenshots: format selection
Generally, great program, Suitable even for very novice users. All basic settings are prominently displayed and can be easily changed. In addition, it is completely in Russian!
Among the shortcomings: I will highlight a rather large installer - 28 mb * (* for this kind of programs - this is a lot). As well as the lack of support for the gif format.
L ight shot
(Support for Russian language + mini-editor)
A small and simple utility for creating and easily editing screenshots. After installing and running the utility, to create a screenshot, just click on the “Preent Screen” button, and the program will offer you to select the area on the screen, as well as where you will save this image: on the Internet, on your hard drive, in social network.
Light Shot - select an area for the screen.
In general, the program is so simple that there is nothing more to add :). By the way, I noticed that with the help of it it is not always possible to screen some windows: for example, with a video file (sometimes, instead of a screen - just a black screen).
J Shot
Developer's site: http://jshot.info/
A simple and functional program for creating screenshots. What is especially pleasing, in the arsenal of this program there is the ability to edit the picture. Those. after you take a screenshot of the screen area, you are offered a choice of several actions: you can immediately save the picture - “Save”, or you can transfer it to the editor - “Edit”.

This is what the editor looks like - see photo below

S creenshot creator
Very "light" (weighs only: 0.5 MB) program for creating screenshots. Using it is very simple: select the "hot" key in the settings, then click on it and the program offers you to save or refuse the screenshot.

Screenshot Creator - screenshot taken
If you click save: a window will open in which you will need to specify the folder and file name. In general, everything is quite simple and convenient. The program works very quickly (even if the entire desktop is captured), in addition, there is the possibility of capturing part of the screen.
P icPick (in Russian)
Very handy screenshot editing program. After starting, it offers several actions at once: create an image, open it, determine the color under the cursor of your mouse, and capture the screen. Moreover, which pleases especially - the program is in Russian!

Picpick image editor
How do you act when you need to take a screenshot and then edit it? First, skryte, then open some editor (Photoshop for example), and then save. And imagine that all these actions can be done with one button: the picture from the desktop will automatically be loaded into a good editor that can handle most of the most popular tasks!

PicPick image editor with added screenshot.
S hotnes
(With the ability to automatically post screenshots on the Internet)
A very good utility for capturing the screen. After take off desired area, the program will offer several actions to choose from:
- save picture to hDD your computer
- save the picture on the Internet (by the way, it will automatically place the link to this picture on the clipboard).
There are small editing options: for example, highlight some area in red, paint on the arrow, etc.

Shotnes Tools - Shotnes Tools
For those involved in the development of sites - a pleasant surprise: the program has the ability to automatically translate any color on the screen into code. Just left-click on the square area, and without releasing the mouse, move to the desired location on the screen, then release the mouse button - and the color is defined in the line "web".

Identify color
S creen presso
(screenshots with the ability to scroll the page, to create screenshots of large height)
A unique program for creating screenshots of great height (for example, 2-3 pages high!). At least, this function, which is in this program, rarely seen, and not every program can boast of similar functionality!
I add that the screenshot can be made very large, the program allows you to scroll the page several times and capture everything completely!

Screenpresso workspace
The rest is a standard program of this kind. It works in all major operating systems: Windows: XP, Vista, 7, 8, 10.
By the way, for those who like to record video from the monitor screen - there is such an opportunity. True, there are more convenient programs (I wrote about them in this note:).
Video recording / Snapshot of the selected area.
S uper Screen
(Note: minimalism + Russian language)
A very small screen capture program. To work, you need the installed package Net Framework 3.5. Allows you to perform only 3 actions: save the entire screen to a picture, or a pre-selected area, or an active window. The program does not fully justify its name ...

SuperScreen - program window.
E asy capture
But this program fully justifies its name: in it screenshots are taken easily and quickly, with just the click of a button.
By the way, which pleases, her arsenal immediately has a mini-editor that resembles a regular paint - i.e. you can easily edit your screenshot before putting it on public display ...
Otherwise, the functions are standard for programs of this kind: capturing the entire screen, active window, selected area, etc.
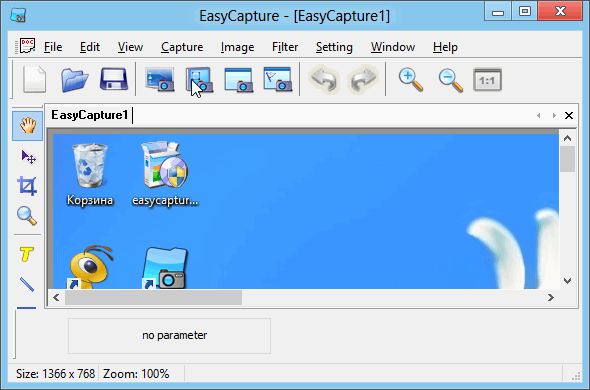
EasyCapture: main window.
C lip2Net
(Note: easy and quick adding screenshots to the Internet + getting a short link to the screen)
Pretty popular screenshot tool! I’ll probably say a banality, but “it’s better to try once than to see or hear 100 times”. Therefore, I recommend you to launch it at least once and try to work with it.
After starting the program, first select the function to capture part of the screen, then select it, and the program will open this screenshot in the editor window. See below picture.

Clip2Net - screenshot of a part of the desktop is made.

The results of publishing the screen on the Internet.
-----------------------
On this review of the best programs (in my opinion) to capture the screen and create screenshots came to an end. I hope that at least one program for working with graphics is useful to you. For additions on the topic - I will be grateful.
Often you need to be aware of what is happening at the computer in your absence. There can be many reasons: from ordinary curiosity to trying to track down random errors in the system, from parental control the child before tracking employees during working hours. In general, there are many similar examples, and all of them are related to the need covert surveillance for computer users.
It’s better to see something clearly than to dig into text reports for a long and tedious time. We are talking about the possibility of creating hidden screenshots (screenshots, screenshots). ScreenMaster's covert surveillance program will help you solve this problem.
The main interface of ScreenMaster is extremely simple and consists of several tabs, of which we need the “Main window” and “Settings”:

ScreenMaster allows you to take hidden screenshots with a specified frequency and image quality. Screenshot files are saved to the hard drive or to a network shared folder. Pictures can include the whole screen or only the active window. When taking a screenshot, it is possible to capture the mouse pointer, as well as add the date and time of the screenshot to the screenshot.
IN stealth mode the program does not appear in the Windows taskbar, and its icon is missing in the system tray.
Consider the ScreenMaster settings necessary for full hidden tracking of the computer.
On the Settings tab, we configure how to launch and control the program:

With these settings, ScreenMaster should start in stealth mode with the operating system, and immediately after launch, start covert screen capture. If the computer is idle for more than 60 seconds, you can stop taking pictures of the screen, because nothing changes on the desktop and the pictures will be the same.
Also, do not forget to configure the key combination to switch the program between visible and hidden modes.

Go to the tab "Main window". In the following figure, the optimal settings for covert surveillance of the computer are marked in red:

Hidden screenshots will be saved to files with the shooting date / time added to the name (an example of the file name is “Screen_20120505_141045.png”). It is advisable to capture the entire screen, the mouse pointer and put the date / time on the picture itself. The shooting interval is adjustable from 1 second to 1 hour.
When using the program in corporate networks it makes sense to save screenshots on remote computer to the shared folder.
After all the settings, close the program. Then we launch ScreenMaster again, and the program screen does not appear, because she is already doing her job in stealth mode. We open the folder with screenshots and see that screenshot files appear there:

To switch the program screen between visible and hidden modes, you need to press a key combination ("hot button"). The default is a combination of Alt + F2.
In conclusion, I want to say that such spyware can be applied for not very noble purposes. In most cases, everyone has the right to know that they are being monitored. To avoid abuse in the trial version of ScreenMaster, the duration of the hidden mode is limited to 1 minute. After acquisition and input registration key stealth mode starts working without restrictions. For residents of the CIS countries, the cost of a full ScreenMaster license is only about 200 rubles.
We hope you will use the program only for positive reasons.
ScreenMaster official website - http://seasoft24.com
Russian section on the site -
ScreenMaster Features
Often, computer users have a question - how to take screenshots from the screen? To do this, click the PrintScreen button on the keyboard and paste the picture into the MS Paint editor. However, the mouse cursor will not be displayed in the screenshot. Also, this method is inconvenient if many screenshots need to be taken, without being distracted by unnecessary actions: opening the editor, inserting a screenshot, cutting out the desired portion of the screen, entering a file name when saving.
For these reasons, to create quick screenshots screen, we suggest using program for taking screenshots ScreenMaster.
Functions Screenmaster :
 Screen Capture Automatically with a given frequency
Screenshot files (serial number or date-time)
Take a screenshot from a specific area, active window or entire screen
Multi monitor support - taking screenshots from one or all monitors for multi-monitor systems
Convenient menu from the system tray
Capture quick screenshots by hotkey, including - with the button " Printscreen"
Support for saving to network shared folders
Option to create folders for screenshots with the name specified by the template
Ability to manually select the path and name of the screenshot after each screenshot ("Save As .." dialog)
Auto function opening the created screenshot in MS Paint
Automatically start shooting after starting the program
Pause auto-capture when the computer is idle
Saving to BMP, JPEG, PNG, with setting the compression ratio of the image
Single settings for all users or personal settings for each user
Logging events in a text file
Unregistered version has limitations
Automatically take screenshots of a screen at a specified time interval
ScreenMaster can carry auto screen capture after given periods of time. Depending on the settings, screenshots are automatically saved in the folder you specify with the names corresponding to the time of their creation or with the additionsequence number of the screenshot. It is possible to save to one file with overwriting.
Interval for periodically taking screenshots from 1 second to 1 hour.
During automatic shooting, a ruler of the countdown to the next shot is displayed in the program window:

Automatic naming of screenshots

Automatic naming of screenshots allows you to quickly take screenshots, not distracted by manual selection of the path and file name.
The directory for saving screenshots and the prefix of file names are set in the following fields:

You can assign screenshot numbers in the format of up to six significant digits or the date and time the screenshot was taken.
Examples:
screen_000002.jpg
screen_20141107_163350.jpg
Taking screenshots from a rectangular area, an active window or the entire screen
 The option "Selected area" allows you to take a rectangular screenshot from a specified area of \u200b\u200bthe screen. To do this, hold left button mouse, you need to select the area of \u200b\u200bthe picture. After selection, you need to press the OK or Enter button and the image, depending on the settings, will be saved to a file or copied to the clipboard.
Auto clear screenshots
Two functions for automatically cleaning screenshots:


) - a program for auto create screenshots (screenshots) and save them to a file jPEG format, BMP, TGA, TIFF, GIF, PNG to the specified folder. That is, press the Print Screen button on the keyboard and calmly work / play further, as the picture was saved without any effort on your part. No need to minimize the program, open another program, etc., etc ... Now all this is done automatically, without wasting valuable user time and not loading the computer! By the way, the program was specially developed for games
Opportunities:
- save to most popular formats
- overlay up to nine effects
- watermark overlay
- multilingualism, there is a Russian interface
- work on keyboards where there is no Print Screen key (see Settings)
- you can open the last screenshot taken in an external editor
- there is a built-in Screenshot Overview - convenient for quick viewing of pictures
- flexible settings for naming the screenshot file - determining the title of the current window, substituting time and date, etc. (for example: 8. Crysis - 16.40.32)
- you can take pictures of the cursor when removing a separate window (convenient for indicating something)
- scoring of events
- automatic multiple shots in a row
- applying effects and saving the resulting image to the clipboard
System requirements:
Computer with 32-bit Windows 98 / ME / 2000 / XP / 2003 / Vista and established .NET Framework version 2.0 or higher. Unfortunately, there are no versions for 64-bit systems and are not expected in the near future.
Frequently asked Questions:
Question: Where is the Print Screen button?
Answer: On the right side of the keyboard, look at the Delete, Insert keys - the button above is called PrtScr - this is it.
Question: I do not have this button on the keyboard. What to do?
Answer: Partially, the situation can be corrected by calling the main AutoScreen .NET window and on the Settings tab check the box “Take a screenshot also on F12”. Unfortunately, the auto-capture function of several screenshots in a row will not work.
Question: How to make the program take a few pictures in a row automatically?
Answer: Open the main program window, Settings tab - Customize auto-capture of screenshots. There, configure the settings for yourself. To remove, press Ctrl + Print Screen, to stop, click this combination again.
Question: How do I know if I have the .NET Framework installed?
Answer: Just run the setup_autoscreen.exe installer - if the welcome window appears immediately, then everything is in order. Otherwise, the installer will ask you to download the .NET Framework and even direct you to the desired download page.
Question: When installing the program, a window appears saying that I do not have the .NET Framework. But I'm sure that I have it installed! What to do?
Answer: The installer checks for the availability of the Framework version - if version 1.0 or 1.1 is installed, the installation cannot be continued, because AutoScreen .NET will not start on these frameworks. Download new version The framework.
Question: Your program does not know how to take a video! Instead of the video in the screenshot, a black square!
Answer: It’s not true, my program can take a video. To take a picture of a video, do the following (applies to Windows Media player):
Program menu -\u003e Services -\u003e Parameters -\u003e Performance -\u003e “Accelerate video” to the left to stop
In other players, you can “play around” with the image output settings (look in the overlay settings (overlay, video rendering or something like that))