 entrance
Linux livecd in Russian. Making a USB stick with Live Ubuntu in Windows
Introduction
A live CD can be used for a quick demo or test of Ubuntu. Try Ubuntu without any changes to your machine! Windows or whatever you use normally is unaffected after trying this and then rebooting.
The standard Ubuntu Cd can be used as a LiveCd as well as an installer. Live mode is the default option when booting from CD. Only some of the non-standard downloads (such as the "Alternate Cd") lack this functionality. Windows users might be familiar with the term "boot CD" or "bootable CD" or "Recovery / Restore Media". A "LiveCD" is more than that because it gives the option of running a normal desktop environment with all the normal programs and some extras. A LiveCD usually finds your wired internet connection and Firefox should be able to surf the internet into here.
This guide has screen-shots of the 8.04 and 10.04 Desktop Edition of Ubuntu. However, Lubuntu, Xubuntu, Kubuntu and even unofficial Ubuntu-based distros as well as other versions all tend to have similar screens & menus.
Most distributions (versions or "distros" of Linux) have this LiveCd functionality on their installer CD, a few have a separate Cd to download. It is rare to find a distro that has no LiveCd session at all. Ubuntu tries to make their LiveCD the easiest to use. Although a LiveCD session is a good way to demo Ubuntu without making changes to a machine, a LiveCD will always be slower than a proper installation to the hard-drive. Cd-drives & Dvd-drives are physically slower than hard drives.
You can use a persistent image to keep data & settings safe after shut-down. This does go against many reasons for using a LiveCd session (rather than an installation) but it can be useful for multi-user machines, such as offices or in third world education projects.
Reasons for Using a LiveCD Session
LiveCD sessions are good to:
- give a "demo" session on a machine before installing or upgrading
- checks hardware works as expected
check the look & feel of the distro
- repair or preparation for awkward installations
repair / replace / install grub perhaps after (re) installing Windows
fix Windows problems on a machine that doesn "t have a dual-boot
anti-virus problems on a Windows system
data recovery
resizing partitions to give Ubuntu more (or less) room
adding a new partition (s) to your hard-drive for other distros or for a new Windows
- preparing a machine for installing Ubuntu, if you are shy of using default or automatic settings or if the hardware is too unique or awkward
- "showing off" Ubuntu to people on their own machine
- using on a random computer where access is limited
- a familiar desktop environment on an unfamiliar machine
safely using a computer which seems to have poor security or lacks privacy. This is particularly good if you have a Usb stick or something to save your data and settings on (see "persistent image")
Other Ways to Try Ubuntu
LiveCDs are designed for people that want to use Ubuntu on a computer for a few hours. If you want to carry a LiveCD around with you, a persistent image lets you customize your live session. If you want to use Ubuntu on a computer for a few weeks or months, Wubi lets you install Ubuntu inside Windows. If you want to use Linux on a computer permanently, dual-booting lets you install Window and Ubuntu (or which-ever distro) side-by-side on the same computer.
Because Wubi needs Windows and Ubuntu to co-operate, you have to deal with all the problems of both systems. For example, it "s not easy to completely uninstall Wubi. An experienced linux user or someone with considerable technical knowledge about Windows might find it better to try Wubi in some certain circumstances where dual-booting is infeasible or inadvisable. See the Wubi guide for more information about Wubi, particularly how to uninstall it cleanly.
Dual-booting can be daunting at first, but tends to work better once you "ve got it set up. This allows Window & Ubuntu to work without relying on the other for anything, except the boot-loader. As you get more comfortable with Ubuntu, you can just forget about your Windows partition. Reinstalling Windows is quite tricky, so it "s best to leave your Windows partition in place unless you" re absolutely sure you "ll never use Windows again.
How-To LiveCD Ubuntu
Preparing your LiveCD
You need to create, borrow, buy or request an Ubuntu CD or Usb-stick. Once you have an Ubuntu Cd or Usb it should work as an installer and as a! LiveCD or LiveUsb. There are some downloads, such as the Alternate Cd that cannot be used as! LiveCd / Usb.
To create a LiveCd
Download Ubuntu. For a live CD, avoid the "alternate CD" & the Server Edition because it has no desktop. For installing, using the alternate CD is a good idea, if installing using the standard CD does not work.
Make your own CD. Cheap "write once" CDs in packs of 10 or more are usually best. You could burn a new CD once every 6 months to get the latest version but all version are supported for 18 months and long time support releases for 3 years. You could also use the remaining CDs for trying out other distros Having a quick demo of other distros can help you understand Linux in general a LOT better a LOT faster, which helps you understand Ubuntu better.
To create a LiveUsb
The Usb stick needs to be 1Gb or more and there are 2 different pages giving advice. I prefer the first; Installation / FromUSBStick, Installation / FromImgFiles
To buy an Ubuntu Cd
The official Cannonical store, OnDisc, OSDisc or your local Ubuntu team might be able to help you find somewhere in your country from which to buy Ubuntu CDs. Also see GettingUbuntu for more information.
Using your LiveCD
Put the Ubuntu CD into the CD / DVD-drive and reboot the computer. You should see a menu with "Try Ubuntu without any change to your computer" at the top. If you don "t get this menu, read the booting From the CD guide for more information.
Figure 1: The first thing you will see when you boot from your Ubuntu CD |
|

Choose "Try Ubuntu without any change to your computer". You should get a desktop which we call a "LiveCD session". If you don "t see a desktop, or need safe graphics mode, read the boot options for more information.
|

The Firefox icon on the top panel should let you surf the internet. Other normal programs are available in the menus.
After you have finished, shut the computer down and remove the CD. At this point anything you saved to the desktop or Documents folders and such will vanish - only things you saved into folders on the hard-drive will remain. This means that there won "t be any trace of your personal data (e-mails, passwords etc.) left on the machine, which can be quite useful if you don" t trust the Windows installation on the computer.
If you have troubles getting the working desktop but if it is still not behaving then try asking for help in Launchpad or use Signpost Help, or both.
Installing Programs or Other Packages
You can install programs to a LiveCD session in the normal way, although these will be forgotten as soon as you switch the machine off. For example, you might install antivirus or data-recovery tools to fix the system installed on the computer "s hard drive. Because space is limited on a LiveCD, you should limit the number of packages you install or consider using a persistent image.
Making a Customized LiveCD
If you want to make custom Ubuntu-based Live CD, you should read the LiveCD Customization HowTo. Without even starting from an existing Ubuntu CD you can make a customized live system, see
While linux systems are more secure than Windows, LiveCD sessions are not meant for long-term use nor for sessions lasting several days. Because LiveCDs can "t easily be updated, they may well be vulnerable to security issues discovered in the months since their release. They also can" t protect you against scams such as phishing. If a criminal broke in to your live session, any changes he made to your session would be reset along with everything else when you reboot, although he could make permanent changes to the computer "s hard drive.
A persistent image can be updated as new security issues emerge, but also lets any damage done to your computer persist across sessions.
The Ubuntu operating system can be run from a CD / DVD disc or from a USB drive (flash drive) without installing on a hard drive. This is called starting from a bootable disk - LiveCD. This will give you the opportunity to familiarize yourself with the system before installing it, check the functionality in advance, just look at the system and "play" with it. Also, the Live CD can be used to restore a damaged system or to access files on the hard drive. Note that Ubuntu with a LiveCD is several times slower than if it was installed on your computer.
Insert your CD / DVD disc into a floppy drive or USB media (flash drive) into a USB port.
Running Ubuntu Live CD (Live USB)
If you press any key during this splash screen, the following menu will appear (if you do not press the keys, then the menu will not be displayed, but the boot from the disk will immediately start). In the menu, I advise you to first select the item " Check CD for errors". To start downloading the Live CD, select " Start Ubuntu without installing"And press Enter. 
The process of starting the LiveCD system will begin. The process is quite long, so sometimes it may seem that something is frozen. 
During the startup process, a window will appear in which you must select the language of your system. In fact, the Live CD system will be almost entirely in English. Select your language from the list and click the " Try Ubuntu». 
If all goes well, you will be presented with the Ubuntu desktop. Ubuntu 11.10 Live CD uses the Unity desktop environment (a distinctive feature is the panel with application launch buttons on the left of the screen). Ubuntu 11.04 and below use the Gnome desktop (two panels at the top and bottom of the screen). 
Using the Live CD system, you can launch some programs, access the Internet, view the contents of your computer's hard drive.
p.s. Ubuntu may not boot from the LiveCD. There may be several reasons for this. One of the main ones is the lack of the necessary driver for any device (for example, a video card). But this does not mean that the system will not work if you install it on your computer.
p.s.s. This article walked through the process of running Live CD Ubuntu version 11.10. Previous versions of Ubuntu boot similarly.
It may sound like a blasphemy, but it is not: Ubuntu Linux can be useful even if you are a Windows user. Because there is no way to boot a complete Windows system from a USB stick, troubleshoot a PC, no Enterprise version and Windows Windows To Go-but anyone can make free Ubuntu to USB stick, CD or DVD. Ubuntu live disk can be used as a disk to fix all sorts of problems related to any PC, whether you need to recover files from a malfunctioning computer, diagnose hardware problems, perform a deep scan for viruses from the window, or even reset a forgotten Windows password.
We'll be working by hand, with some Linux terminal commands here, but don't worry, the Linux terminal doesn't bite. You can even copy-paste most of these commands directly in the terminal.
Create Ubuntu Live media
To get started, you need a Linux live USB stick, CD or DVD. You can use any Linux distribution for this, but we focus on Ubuntu to keep things simple. Visit the Ubuntu site and download Ubuntu Desktop - we used 12.04 LTS for this, but any available versions will do the same. Download the Universal USB Installer tool, then select the USB drive and ISO file and the utility will create a bootable USB drive. You can also burn the ISO file to a CD or DVD, but spinning discs will run slower than a USB stick.
Just insert the live disk into your computer and reboot. After reboot, you will boot directly into Ubuntu, if not, you will need to change the boot order in your computer's BIOS. Once you boot, troubleshooting begins.
Recover files from a failed drive
We have all been in a situation where your computer may not boot Windows and may show errors and blue screens, or even worse - you may hear a terrible mechanical hard disk cut. Even if you cannot boot into Windows, there is a good chance. that you can read the disk in Linux and recover some files before the hard disk dies completely. Or, if the Windows system is damaged and the disk itself is thin, you can recover all files from outside Windows.
The Linux terminal is not involved here. Just click on the folder icon in the Ubuntu launcher to open the file manager. You will see your Windows drive under Devices in the sidebar; click on not` and you will see your Windows file system. If you have multiple partitions or hard drives, you will see multiple devices.
Connect an external drive or USB drive to your computer and it will appear in the Devices list. Copy and paste the files you want to back up your Windows system to an external drive, just like you would on Windows. You can even launch a web browser and upload files directly to Dropbox or another cloud storage service, or open the Brasero Disc Burning app that comes with Ubuntu to burn them to disc.
Reset Windows password
Ubuntu can also edit Windows User Account and Password if you forget your Windows password. We tested this on modern Windows 8.1 and it worked great. We'll be changing the administrator account - after you've unlocked and cleared your password, you can log into Windows as an administrator and reset your other passwords.
Open a terminal by clicking on the Ubuntu logo in the upper left corner of the launcher by typing Terminal and hitting Enter. Run the following commands to install the password change utility that you need. (If you've already executed the first two commands, you don't need to run them again - just run the third one.)
sudo apt-get update
sudo apt-get install chntpw
Be sure to open the file manager from the launcher and click on your Windows drive under Devices to view its contents if you haven't already. These commands will “Mount” the drive and make it available in Terminal ...
Now, click on the key Tab twice. You will see an alphanumeric label that corresponds to your hard drive. Enter the first few letters and press Tab again to auto-fill the label. Now enter the type / Windows / System32 / config, you end up with a command that looks like this, and then finally hit the Enter key:
cd / media / 9A72A08872A06AA9 / Windows / System32 / config
Run the following command and press Enter to start editing the administrator account. SAM is the name of the Windows system file that contains the hashed passwords of user accounts.
sudo chntpw SAM
If your administrator account is locked and the default type is set 4 in the line, press the key Enter, to unlock it. Enter type y in the confirmation window and press Enter to confirm.
You have to run sudo chntpwSAM command again to return to the program. Enter the type 1 and press Enter on the command line to reset the admin password to blank. Enter type y in the line and press the Enter key to confirm again. Important: here not use the "change password" function as this may cause problems.
You can now log into Windows with the username "administrator" and a blank password. There, you can open Control Panel and reset passwords for user accounts. (Worried about other people doing this for your Windows system? Set a password on the BIOSto make sure they can't boot and fiddle with removable media.)
Scanning for malware
Rootkits are a nasty type of malware that burrows deep into the system and runs in the background when loaded, so they are invisible to antivirus programs and hidden even from the Windows Task Manager. Even if you have bog-standard malware, it is often easier to remove malware. from the side of the window. Antivirus companies often make antivirus boot disks that you can use to scan your system from the window side, but you can do it all from Ubuntu.
We'll use ClamAV here because it's open source and easy to install on Ubuntu. It's not the only option though; you might also want to take a look at commercial antiviruses such as BitDefender for Unix systems.
To install ClamAV, open a terminal and copy and paste or type the following commands into the terminal by pressing Enter after each command. (Again, if you've already executed the first two commands while doing other tasks, you don't have to run them again - start right away with the third command .)
sudo add-apt-repository "deb http://archive.ubuntu.com/ubuntu $ (lsb_release -sc) universe"
sudo apt-get update
sudo apt-get install clamtk
Enter type y and press Enter to confirm the installation.
Now you can run the command clamtk in the terminal or open ClamTk from the list of installed applications. Be sure to click on the Configure button and check the box for “Scan all files and subdirectories in a directory” after you complete.
To scan your Windows drive for malware, click the Scan button in the menu at the top of the ClamAV screen and select Recursive Search. Select the Windows drive in the sidebar and click the OK... ClamTk has to scan every file on the Windows drive with the ClamAV antivirus engine.
Hard disk check
Ubuntu can also check if there are any hardware related issues. SMART hard drive, system status allows you to identify faulty hard drives to alert you before it finally fails. To check the SMART hard drive status in Ubuntu, click on the Ubuntu logo icon in In the upper left corner of the screen, search for "Disk Utility" and press Enter. Select your Windows drive and see SMART Status to see the health status of the drive. You can click on the button SMART Data to view more details and perform self-diagnostic tests.
SMART test fails - the drive might be bad and the reporting you get is that everything is fine even when it screeches. Another drive can be a serious problem and continue to work fine for months. But if you see a serious warning, you should get your files off the disk and replace it as soon as possible.
RAM test
Ubuntu comes with the popular built-in test program memtest86. This utility will write data to the computer's RAM, read it back, and check if it is correct. If your RAM has problems, memtest86 + will notice when the RAM is returning different data. Under normal computer use, these problems can lead to application crashes, you can get file corruption, and even the dreaded blue screen of death.
This program must be selected at startup, so you will have to restart your computer if you are already on the Ubuntu desktop. When Ubuntu starts booting, press E again scape and you will see usually hidden boot menus, here select the option Memory Test to run memtest86 +.
Let memtest86 + run on the computer for a while after it starts the test. After one successful test suite known as "pass", you will see the message "Pass complete, no errors, press Esc to exit." You can exit memtest86 + when the message appears, or let it perform multiple passes. If you see an error, you probably need to replace one or more of the RAM in your computer.
But wait, there will be more!
Even if you didn't install it to your hard drive, Ubuntu live drive is a complete Linux system, so there is a lot you can do with it. Even if you download it to a computer that is infected with malware, it will be protected and isolated from any problems with the Windows software.
An overview and brief description of the most popular and most useful bootable disk assemblies (Live CD / DVD) based on Linux. They are indispensable and free tools that are always useful to have on hand. With the help of such Live CDs, you can encrypt and restore information, partition drives into partitions, use a working system without installation with a large set of free software, and much more. Distributions considered: Knoppix, Kali Linux, Tails, Ultimate Boot CD, AVG Rescue CD and others.
As an introduction
What is a Live CD-DVD disc or assembly? is a set of software that does not require installation on a local media (hard drive or other), but allows you to use the programs immediately after booting from a removable media with a Live distribution.
It is not difficult to remember that Live - from English means "life", "alive", that is, we booted from such a Live-carrier and the system came to life, immediately became suitable for use with all the software that comes with the kit.
Assemblies of popular distributions (not only Linux), as a rule, can be obtained as a file with the "iso" extension, which is immediately suitable for writing to a blank CD or DVD using programs such as K3B, Brasero, Nero (Windows) and others.
Also, such a file can be uploaded to a USB flash drive using a direct byte write, for example, using the "dd" command in Linux. Perhaps I'll tell you about uploading ISO to a USB flash drive in more detail at the end of the article ...
Now let's move on to an overview of useful distributions that can be loaded in Live mode and used for a variety of purposes. Let's start with the largest and most useful distribution - Knoppix.
Peculiarities:
- The size is about 4GB;
- More than 2GB of compressed software;
- It is based on Debian GNU Linux;
- LXDE graphical shell;
- Complete office suite LibreOffice;
- Low system requirements (Intel / AMD, 128MB + RAM, any video card).
A fairly large Linux distribution (about 4GB), a lot of the most diverse software for all occasions. This is one of the first Live-CD distributions built on top of Debian. Knoppix can be booted from DVD and Flash drives, and installed on your hard drive as needed. Developed by Klaus Knopper and the Knoppix community.
So, we boot, I want to warn you right away - when the system boots, do not be intimidated by the voice from the speakers, it is also present at the end of work (Power OFF).

I will not list all the programs that are included in the Knoppix DVD, I will give only a basic selection of what caught my eye during inspection so that you have an idea of what we are dealing with and what options are available:
ClamTK, Emacs, Kate, Gedit, KeePassX, KGpg, LeafPad, ownCloud desktop sync client, Time Tracker, GCompriss (interactive tutorial for kids, games), KAlgebra, KGeagraphy, KLetters, KStars, SciLab, 50+ games, Dia, Gimp, Inkscape, KRuler, KSnaphot, LibreCAD, Simple Scan, Okular, XSane, Chromium, Ekiga soft phone, IceDove, KGet, KTorrent, LinPhone, Pidgin, Remmina, Transmission, Vidalia, WPA GUI, XChat, GPRS / UMTS Connect, Knoppix Firewall, Samba Server, SSH Server, Tor Proxy, Bitcoin, Dictionary, KMail, KOrganizer, Libre Office Suite, BlueFish Editor, Eclipse, Geany, phpMyAdmin, QT4 studio, Amarok, Audacity, K3B, Me TV, Minitube, OpenShot video editor, SMPlayer, Sound Juicer, WinFF, VLC, Disk Usage Analyzer, KSysGuard, System Monitor, VIrtualBox, DosBox, Wine ...
Well, a lot of things, programs for working with a scanner, viewing and processing various documents and images, programming, working with network services, multimedia, system utilities, programs for security and encryption, storing passwords, virtual machines, regular and torrent downloads, several dozen a wide variety of games and this is only briefly ...
Official page in English: http://www.knopper.net/knoppix/index-en.html
Kali Linux (ex BackTrack)

Peculiarities:
- The size is about 3GB, there is also a mini-version;
- More than 600 programs and utilities;
- Based on Debian GNU Linux;
- The GNOME GUI.
A project created after the merger of tools such as WHAX and the Auditor Security Collection. The project was created by Mati Aharoni and Max Moser and is currently based on Debian GNU Linux.
Kali Linux is the Swiss knife of an information security specialist with a huge number of programs and utilities for testing, gathering information, detecting potential vulnerabilities, working with network services and resources, conducting software and technical expertise ...

Some of the common programs included in the distribution are: Gparted, TrueCrypt, Arduino IDE, Ettercap, Iceweasel (Firefox), SQLite Database Browser, VLC, Brasero Disk Burbner, Sound Recorder.
Basically, a large mass of programs and utilities concerns information security, network technologies and data processing. In the screenshot above, you can see the main sections of the software in kali Linux, here is a list of the most famous programs:
- Nmap (a very powerful and feature-rich network scanner)
- Wireshark (traffic and network protocol analyzer)
- THC Hydra (multifunctional cracker FTP, POP3, IMAP, Telnet, HTTP Auth, NNTP, VNC, ICQ, PCNFS, CISCO, Samba, LDAP)
- John The Ripper (brute force password hash calculation)
- Kismet (802.11b WLAN Network Analyzer)
- Ettercap (in simple words - breaking local networks, ARP-spoofing and other miracles)
- Metasploit (creating and debugging exploits)
- Sqlmap (tests using SQL injection)
- Aircrack-ng (wireless networks - discovery, analysis, penetration testing)
- Reaver-WPS (checking Wi-Fi routers for vulnerability in the WPS protocol, selection of 8 digits)
- OWASP (Powerful Penetration Testing Framework)
- Maltego (collecting and organizing information from various databases, Whois and other public resources and services)
A very powerful distribution kit for professionals and those interested in information security.
Tails (The Amnesic Incognito Live System)
Peculiarities:
- The size of the distribution is about 900MB;
- Based on Debian GNU Linux;
- GNOME graphical shell;
- Anonymization of traffic through TOR.
A very interesting distribution based on Debian GNU Linux. The main goal is to ensure privacy and anonymity when working on the network. Tails development is sponsored by the Tor project. The system works by booting from a disk or flash drive and does not leave any traces after work. The Tails operating system is recommended for use by the "Free Press Foundation" as a secure operating system in terms of communication and data processing.

Programs that can be found in Tails:
Archive manager, GTK Hash, gEdit, KeePassX, ScreenShot, GIMP, Inkscape, Libre Office suite, Document Viewer, Simple Scan, Claws Mail, Electrum Bitcoin wallet, Pidgin, Tor Browser, Audacity, Brasero Disc Burner, Movie Player, Pitivi Video Editor , Sound Recorder, Traverso (multitrack audio editor), MAT (metadata anonymization tool), virtual keyboard, PWGen and others.
Puppy Linux
![]()
Peculiarities:
- Small size of the distribution kit (100-150 MB);
- Low minimum system requirements (Pentium CPU, 32MB + RAM);
- There are builds based on Debian, Ubuntu, Slackware, Arch Linux;
- Quirky graphical environment (based on JWM, Openbox and Fbpane window managers).
Puppy Linux is a distribution developed by Australian professor Barry Cowler. Due to its small size, the distribution kit is fully loaded into memory (if there is more than 64MB) and works very quickly even on an old computer.
The distribution kit Puppy Linux got its name in honor of the pet, which the professor called "Puppy" (puppy). Considering the small size of the distribution kit, it can be recorded even on an "ancient" flash drive of 256-512MB in size or on a 3.5-inch CD-disk.

List of software that can be found in Lucid Puppy Linux (Lupu):
Gdmap Graphics Disk Usage, Inkscape lite, mtPaint, Gcolor2 color chooser, PupSnap screen capture, Xsane image scanner, AbiWord, Geany, NicoEdit, ePDFView, puppyPDFconvert, Bcrypt, PureFTPd, Uget, Linux Firewall, PMirroget, Psip) (VOIP Pwsget, Transmission, XChat, gFTP, FFConvert, Gnome Mplayer, AlsaMixer, Pmusic, XineDVD, mhWaveEdit, Pburn CD / DVD writer, pup Radio, Guvcview webcam viewer, Browser Installer (Firefox, Chromium, Opera ...), Sylpheed email. ..
Distribution official website: http://puppylinux.org
Finnix Linux
![]()
Peculiarities:
- Small size (about 100-160 MB)
- Based on Debian GNU Linux
- One of the freshest kernels to date is 4.0 (Finnix 111 version).
- No graphical shell, only console
- Minimum resources to run (32MB + RAM)
One of the oldest Live Linux distributions, development started back in 1999 (the first release of version 0.03 went public around 2000). Positions itself as a Live Linux distribution for system administrators.

At this time, the distribution is supported and developed, the latest version at the time of this writing is Finnix 111 (June 2015). A new version of the distribution is released approximately every 3 months. Boot from CD, Flash and network (PXE) is possible.
After loading, we get a greeting in the console and a brief information about the system:

The most necessary programs for administration are installed: mc, smartctl, nmap, bzip, perl, python and others. Everything else that is needed can be installed from the repository.
A big plus is the presence of a fresh 4.0 kernel - this is a guarantee that most of the new equipment will be correctly identified, and even on a brand new server with a new LAN, WLAN, SATA controller, and you will be able to make a backup over the network, sham the installed system and deal with the problems.

Peculiarities:
- Size approximately 600 MB
- Many utilities for working with hardware and peripherals
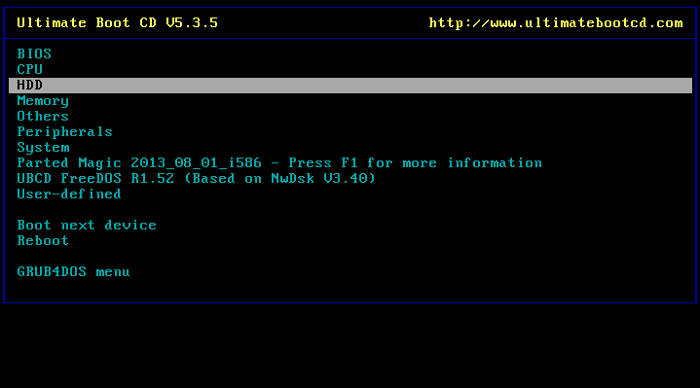
- Integrated image of free Parted Magic (2013_08_01)
A good set of utilities and software for working with BIOS, stress test and microprocessor information, diagnostics / repair / cloning / safe erasing / partitioning / recovering information from hard drives, diagnostics and collection of information about RAM and computer peripherals.
An even greater advantage of the distribution kit is that it integrates an image of the still free assembly Parted Magic, with which you can partition your hard drive, clone them, view and back up data from different file systems, including NTFS.
The list of all programs that are available in the assembly can be seen on the official website, I will say one thing - there are many of them for different occasions. The list of software that is integrated into Parted Magic also deserves special attention:
GParted, Clonezilla, TrueCrypt, SCite, SpaceFM, Leafpad, wxHexEditor, Document Viewer, Mirage Image Viewer, Asunder CD Ripper, Audacious, ISO MAster, Xfburn, Firefox, Firewall, FTP, gFTP, XChat, NetWag, Putty, pyNeighborhood, Remmina, SSHFS Network Directories, ELinks, VNCViewer, ZeNmap, Change Windows Password, ClamTK, Disk Erasing tools, grub-doctor, GSmartControl, Lilo Setup, LSHW, PCCMOS Cleaner, PCDiskEraser, PCLoginNow, PCRegedit, PhotoRec, Psensor, Resize, NTFS with System Stability Tester, TestDisk, UDPCast Disk Clonning, USB Flash Boot ...

A good set of programs that is useful to have with you. For each program in the list, you can write a separate article, the distribution kit's capabilities definitely deserve attention.
You can download the distribution kit on the site of the same name: https://www.ultimatebootcd.com/
CloneZilla Live (clone, backup, restore)
![]()
Peculiarities:
- The size is about 200MB;
- Backup to both local storage devices and network storages;
- Support for multiple file systems;
- The ability to split and encrypt the resulting backup image;
- Low system requirements (x86, x86-64 microprocessor, 192MB + RAM).
Software that allows you to clone disks, save images of both disks as a whole with the entire structure, and individual partitions on the disk. From the site you can download a Live image with CloneZilla for burning to CD or flash drive, so we get a powerful tool for backing up and restoring discs with multiple options.
CloneZilla was developed by Stephen Shiau at the National High Performance Computing Center. CloneZilla Live is a Linux image along with a program for launching from removable media.
The program supports creating backups and saving their data to local storage devices or to remote storages by transferring data via SSH, Samba or NFS protocols.
Supported file systems: FAT12, FAT16, FAT32, NTFS, ext2, ext3, ext4, reiserfs, reiser4, btrfs, f2fs, XFS, JFS, VMFS and HFS +, UFS, VMFS3, VMFS5. Nice list, isn't it?)

Perhaps, after reading the reviews above, you have a question: so CloneZilla is in other distributions, why another separate one for this program? - everything is simple, it is a very useful and self-sufficient program that is used at the right time and with great responsibility. In addition, a fresh Live-CD image will have a fresh kernel and nothing superfluous that could interfere or ruin the process of backing up or restoring important data.
![]()
Peculiarities:
- Small size of the distribution kit (about 160 MB);
- Treatment of the file system from viruses using AVG antivirus;
- As a bonus, there are additional useful utilities in the kit.
A small gift from the developers of AVG antivirus - a rescue disk based on GNU Linux. The work takes place in the console mode with a dialog interface - everything is simple and clear.

In addition to virus detection and cleaning tools, some useful programs are integrated into the image: TrueCrypt, MC, Win Reg Editor, DOS Fix MBR, TestDisk, Smartctl, PhotoRec, Ping, links.
In general, it will be possible to mount encrypted partitions, view and make changes in the file manager, edit some branches of the Windows registry, fix MBR, check file systems and disks for errors with subsequent correction, look at the table of SMART parameters for a hard drive, restore erased photos.
Caine (Computer Forensics Linux Live Distro)
CAINE (Computer Aided INvestigative Environment) is an Italian developer project, an image of a bootable operating system based on GNU / Linux for digital forensics.
As part of the image, you will receive:
- Graphical environment and console power;
- Fresh hardware support;
- A huge number of tools for conducting digital forensic research under Linux;
- A collection of programs for working with Windows systems (via Wine), for example, there are utilities from NirSoft;
- A set of programs that can be useful for encrypting, transferring and recovering data;
- Internet browser, audio / video players, file managers;
- and much more ...
The entire CAINE project is built on OpenSource software, the utilities included in the image for working with Windows are freeware.

A short list of programs:
- Analytics: Photorec, Autospy, NBTempo, TKDiff, Fred, XAll, Mixed scripts, Stegosuite, XDeview, RegRipper, QPhotorec, Ophcrack, RecuperaBit, TestDisk, BEView, Recoll, Log2Timeline, Afro, Brtfrsc, Mobius
- Database: Sqliteman, SqlParse, DB Browser for SQLite
- Disks: Guymager, XMount-GUI, ddrescueview, dvdisaster, TestDisk, Disk Image Mounter, DDRescue-GUI, XHFS, UnBlock, IMount, SafeCopy, VHDinfo, VHDIMount, RecuperaBit, APFS-FUSE
- Hashing: QuickHash, gtkhash, PDF Scanner, PEFrame, Yara, VolDiff
- Memory: Inception, Volatility, Memdump, VShot
- Mob devices: gMTP, LibMobileDevice, ADB, Blackberry scripts, ILoot
- Network tools: Remote File System Mounter, Wireshark, Zenmap, Netdiscovery
- OSINT: TinfoLeak, TheHarvester, Infoga, Carbon 14, OSINT-SPY
- Timeline: NB Tempo, NB TempoX, Log2Timeline, PSteal
- Accessories: Archive Manager, Backups, Character Map, Disks, Engrampa Archive Manager, MATE Calculator, MATE Font Viewer, MATE Search tool, Midnight COmmander editor, Passwords and Keys, Plank, Pluma text editor, Recoll, Redshift, Take screenshot, Vim, Xarchiver, Caja
- Graphics: Document Viewer, Eye of MATE Image Viewer, GIMP, LibreOffice Draw, MATE color selection, Mirage, Print Preview, Simple Scan, Stegosuite
- Internet: Mozilla Firefox, Oracle Java 8 WEB, Mozilla Thunderbird, Transmission (torrent), Network, PuTTY SSH Client, Remmins, RDP client, Wireshark, Shrew Soft VPN access manager, Zenmap, Gigolo
- Office: Atril Document Viewer, Document viewer, LibreOffice (Calc + Draw + Impress + Writer), MATE Dictionary, Print Preview
- Programming: Geany, CHex, Icon Browser, QT 5 Assistant, QT5 Linguist, QT5 Designer, wxHex Editor, GtkHash, Jeex, Sqliteman
- Sound and video: Audacity, Brasero, Cheese, Mediainfo, recordMyDesktop, Rhythmbox, Sound, VLC media player, Screenshot
- and many more, both graphical and console programs ...
Distribution website: http://livecdlist.com/
Burn ISO to USB flash drive in Linux
We figured out the distributions, now you need to figure out how you can quickly write this or that distribution to a flash drive for test and use.
In Linux, this process is very simple. First, we connect the USB flash drive and find out what name it got in the list of block devices. We run the command to display a list of these devices:
The output of the program will contain a list of all data storage devices, but we are looking for our Flash drive by size, for example, we inserted an 8GB flash drive into a free USB port:
Sdc 8:32 1 7.5G 0 disk └─sdc1 8:33 1 481M 0 part
We see that our drive is named "sdc". You can have "sdb" "sdd" or something else, it all depends on how many drives and disk partitions you currently have in the system. The size is displayed slightly less than 8GB, namely 7.5GB - this is normal, you can also see that there is only one partition on the disk - sdc1.
Let's say that you downloaded a distribution kit and saved it to yourself as an iso file in your home folder, for example: /home/user8/super_linux.iso.
Please note that the size of the Flash drive must be larger than the size of the downloaded ISO image file. For example, we downloaded an 810MB file and fill it with a 2GB or 8GB flash drive.
Recording is done with one command:
Dd if = / home / user8 / super_linux.iso of = / dev / sdc bs = 10M
We specified the "if" parameter (input file, where to get the data from) and assigned it the path to the downloaded iso file, and the "of" parameter (output file, where to write the data) assigned the path to the device file, which is our Flash drive ... The "bs" parameter - sets the size of the data chunks to write one by one.
Now it remains to wait until the recording is completed, the command does not output anything to the console until the process is completed, and the activity can be observed by the blinking indicator in the flash drive itself.
Attention!!! The dd command writes directly to the disk, confusing the value for the "of" parameter can accidentally overwrite the scratch disk. Be extremely careful.
Burn ISO to CD / DVD in Linux
You can use the GUI programs Brasero or K3B to burn a GNU / Linux disk image (ISO).
You can install these programs with the commands:
Apt-get install brasero apt-get install k3b
Burn ISO to Flash under Windows
To create a bootable flash drive based on GNU / Linux or another operating system under MS Windows (98, XP, 7, 8, 10), you will need a program that can correctly write an ISO image by sector.
There is a project called RUFUS with the slogan "Create bootable USB drives the easy way" - this is the program that will help you solve this problem under Windows.
RUFUS is free and open source software that can format and create bootable USB flash, SD cards.
How to test a distribution without writing to media
It is possible that before writing to a flash drive or disk, you will want to test and dig deeper into the contents of the distribution to make sure that this is what you need. For such purposes, it is convenient to use a virtual machine by mounting the downloaded iso image to it into a virtual CD drive.
- Oracle VirtualBox (www.virtualbox.org)
This software is free and cross-platform, you can use it freely on Linux, Windows, MacOS.
Conclusion
All distributions presented in the review are free software, you can use them completely freely for the benefit of yourself and other people. Thanks to the developers for such valuable and great Linux-based tools!
Review of the 5 best Linux Live distributions as of 2010
Linux is so cool you don't even need to install it for it to work. One of the popular applications of Linux is the creation of Live CDs containing a complete desktop environment or, for example, a set of utilities for administration and / or system recovery. Not sure which Live CD to choose? Don't panic! In this article, we'll take a look at what I think are five of the best Live CD distributions, and at least you should be able to start somewhere.
For a number of reasons, the popularity of Live CDs has declined slightly over the past few years. The main reason is that people opted for Live CDs because of the complexity of the installation process. Until recently, Linux was not that easy to install, much less it is now. And many users preferred to use the Live CD for a while before installing Linux with a second system, or even replacing Windows with it altogether.
Please note that although we are looking at Live CDs in this article, this does not mean that you are limited to using the CD. Many popular Live distributions have DVD versions with a huge amount of bundled software. Moreover, most Live distributions can boot from a USB stick without any problems. It is very useful if you, say, own a netbook or simply have nothing at hand except a flash drive.
What were the criteria for selecting distributions? I think you have already noticed that there is not a single popular distribution in the list (meaning Ubuntu, Debian, Fedora, OpenSUSE, Slackware, etc), while the distributions presented in this article are their direct descendants. Although Ubuntu, Linux Mint and others have their own Live CDs or DVDs, they are not meant to be used permanently as a Live system. I'm sure there will be people who manage to use such distributions for everyday work, but, be that as it may, they were originally intended specifically for installation on a hard disk, and not for work in live mode.
When I selected the best Live distributions out there, I considered the following criteria:
- development activity;
- performing useful and necessary tasks;
- “Useful and necessary tasks” should be those for a wide range of users.
I have not included in the article distributions that are "sharpened" for rather specific tasks and are unlikely to be of interest to 98% of Linux users. There is, for example, dyne: bolic, a distribution that is probably of great interest to those involved in multimedia production. Are there many such people? And besides, the frequency of its updates leaves much to be desired, so I would not consider it anyway.
In short, stop talking, let's take a look at these top five in my Live CD rankings!
Knoppix
It's impossible to imagine a Live CD list without Knoppix. Almost the very first Live CD, Knoppix is by far the most successful and actively developed Live distribution.
Based on Debian, Knoppix offers LXDE as its default desktop and contains almost all (if not all) of the software you need to get started. This distribution is updated very often, supports a huge variety of hardware. Knoppix was originally designed to work only from disk, but it became so popular that people started installing it on the hard disk.
Note that you will not see the same suite of applications in Knoppix as in Ubuntu, Fedora, OpenSUSE and the like. Knoppix is performance oriented and uses the default Debian applications. For example, you get Iceweasel instead of Firefox... If you are looking for a high performance Live CD, Knoppix is the place to be!
When downloading Knoppix, you can get a little confused when choosing a file to download. Find the latest version, but be careful when reading the filenames. The current release of Knoppix is 6.2.1. If, for example, you need an English-language release, download the file KNOPPIX_V6.2.1CD-2010-01-31-EN.iso... If you need a German release, then your file is - KNOPPIX_V6.2.1CD-2010-01-31-DE.iso... If you want the DVD version of Knoppix, go to the directory knoppix-dvd.
Among the downloads you will see Knoppix ADRIANE. This is a version with functionality for the blind or visually impaired. If you accidentally download this image, but you need a "regular" version of Knoppix, you don't have to re-download another image. With cheat codes, you can force Knoppix to boot into a traditional environment. Cheat codes are kernel options that are passed to the ISOLINUX bootloader. With these, you can specify the language, select the keyboard type, timezone and force Knoppix to ignore some hardware checks at boot time if there is any problem with it.
Puppy Linux
For older hardware or for users who prefer minimalism, there is Puppy Linux. The size of the Pupyy Linux image is less than 200 megabytes and can fit entirely in RAM if there is enough RAM. Puppy should work fine on almost any hardware.
Once you download Puppy Linux, you have a great desktop with a browser, media player, word processor, terminal emulator, file manager, drawing tools, and tons of useful stuff. True, you will not have applications traditional for most distributions. You won't get Firefox and OpenOffice. Instead, you have Midori and AbiWord. You can also install the applications you need if necessary.
Do you want to see this miracle? Download the latest release from here. If you want to put on a hard drive - no problem!
Also in nature there is a good version of Puppy called Quirky. It is built using the Woof system and can be very interesting for people who like to experiment.
Clonezilla live
Computers come and go, but data doesn't. I love Linux because it runs on almost any hardware. Linux works fine on older computers, which in my opinion are more reliable than modern computers. Of course, the same cannot be said about low-quality memory or dying hard drives. It is good practice to think that any system is one keystroke away from sudden death, and plan your actions accordingly.
I use Dropbox for storing documents, this allows me to be sure that I have a copy of my important files, such as photos, purchased music, photos and work notes; in general, everything that can be crammed into 50 gigabytes. The rest of the data I copy every few weeks using Clonezilla to the backup hard disk. So if my main HDD suddenly dies, I can quickly replace it and copy back my data from the backup.
Clonezilla is based on Linux and uses free software. Do you have machines running on different platforms running Windows and Mac and need to back up data from them? Clonezilla supports x86 32-bit and 64-bit systems, and can work with almost any file system. Even if you come across some exotic filesystem not supported by Clonezilla, you can always use dd to copy the contents of the file system byte by byte. If the filesystem is supported by Clonezilla, you will save time, since they will only copy the data, and not all partitions, including free space.
There are two versions of Clonezilla: one is designed for installation on servers, and the other is a Live version. If you are administering a network of several computers, then Clonezilla is what you need. Just boot from the Live CD and you can back up to locally attached hard drives or over the network to a server.
SystemRescueCD
I am a big fan of this distro and try to always have an up-to-date version of SystemRescueCD on a stick or CD. I don't use it often, but when the need arises, this Live CD helps me a lot.
SystemRescueCD is mainly intended for recovery work on Linux systems, however, in principle, it can be used on others running on x86 platforms (by the way, older versions can work on SPARC too). You can even configure it to PXE boot if needed. If you have a network of many computers, you may not use a Live CD / USB stick at all, but boot all computers using PXE. If you need to carry out recovery work on the system or just copy data from a damaged system, then SystemRescueCD is your option!
SystemRescueCD comes with a complete set of essential utilities, including partition managers and networking tools. Be sure to take a look at this distribution and always have a fresh copy on hand, just in case.
Network Security Toolkit
Last on the list, but certainly no less useful, is the Fedora-based Network Security Toolkit (NST). If you've ever looked at the Top 100 security utilities published by Insecure.Org, you might wish to have it all on one disk. The Network Security Toolkit is just that. Of course, not all 100 are present in it, but those that are very close in functionality. You will get Wireshark, Nmap, Snort, Nessus and a bunch of other useful things like geolocation.
NST has an easy-to-use Web-based interface and is a must-have for every network or system administrator, as well as for people interested in network technologies. Just like SystemRescueCD, I rarely use NST, but I still prefer to have it always at hand. By the way, it is available not only as a Live CD image, but also as a virtual machine, if you suddenly go to use it in VMWare Player or Workstation.
Outcomes
Even if you are not a fan of using Live CDs, I still recommend that you have at least one of them handy. I especially recommend getting a copy of Knoppix or SystemRescueCD for emergencies. If your hard drive dies or system updates get crooked, the ability to boot will be of great importance.