 Entrance
Transfer Android Internet to PC. How to distribute mobile Internet from an Android phone via Wi-Fi
This is done by creating a mobile hotspot on the phone, which thus provides access to the Internet. In this article we will demonstrate how this is done using an Android phone as an example.
Step No. 1. Open Android settings.
First, you need to open Android settings. To do this, open the list of all applications and find the application called “Settings”. You can also open settings using the top curtain.
Step No. 2. Open the “Other networks” section.
After opening the settings, go to the “Other networks” section. On some phones, this settings section may be called “More” or something else. But, it will always be located next to the Wi-Fi and Bluetooth settings.

Step No. 3. Open the “Modem and access point” subsection.

Step #4: Turn on the access point.
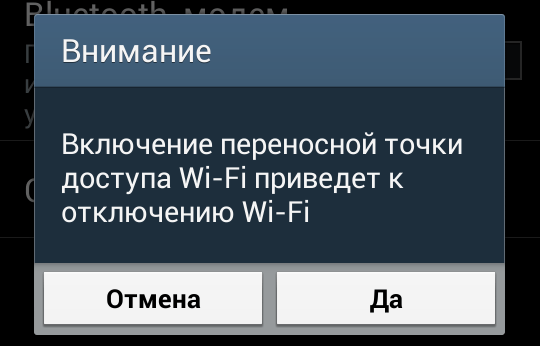
Now you need to enable the access point. To do this, move the "Portable Hotspot" switch to the on position. On some phones, to enable the access point, you need to check the box next to the corresponding item.

After turning on the Wifi hotspot, a window may appear asking you to confirm the action. Here we simply click on the “Yes” button.
Step No. 5. Look at the password for your access point.
In order to connect to the access point on your phone, you need to know the password. To do this, after turning on the access point, open the “Portable access point” section.

Here you can find out the name of your access point (its SSID), as well as the password.

Step No. 5. Connect to Wifi using a computer.
Once the access point has been created, you can begin connecting the computer. To do this, click on the Wifi icon on the taskbar.

After this, a list of available Wifi networks will appear on the screen. Among them will be the hotspot created by your phone. Select it and click on the “Connection” button.

After this, a window will appear asking you to enter a security key. Enter the password for our access point on the phone.
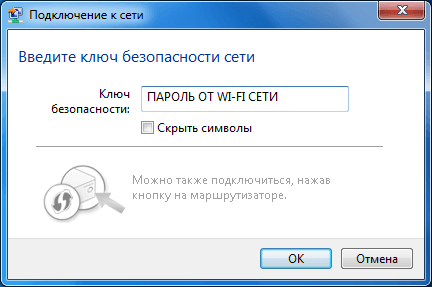
That's all, if the password is correct, the computer will connect to the access point and the Internet should work.
Many of us do not have Wi-Fi routers, and we want to fully use the Internet! What to do? And everything is very simple! We need to distribute via USB!
Our actions:
3. Connect the Android device to USB
4. Enable USB debugging. To do this we go to Settings -> Applications -> Additional options -> USB Debugging. We put a tick.
*5. Turn off USB storage mode
6. Go to your phone Settings -> Wireless -> Mobile networks. Against Data transfer uncheck the box.
7. Go to your phone Settings -> Wireless -> Tethering/Access Point Sharing. Against Shared USB modem check the box*. If you cannot complete this item (do not check the box), restart the device.
8. The computer should recognize the phone as a network adapter/modem - drivers will be installed automatically - wait until they are installed (if some drivers are not installed, that's okay)
9. In the window that appears, select Home network; if nothing appears within 2 minutes after installing the drivers, skip this step.
10. Right-click the Internet status icon and click Network and Sharing Center
11. You should have a new connection.
12. Now you need to distribute the Internet to your phone - go to Internet connection settings computer!
There we click the Properties button, then click on the Access tab, and check the box to allow the phone to use the computer’s Internet - then select where we will distribute the Internet, and also click the Settings button, and check all the boxes, in the windows that appear, click OK
*If it is enabled and available on your device at all
13. Launch the previously installed Terminal Emulator application
14. Write the commands (don’t forget to allow root rights when prompted):
sunetcfg
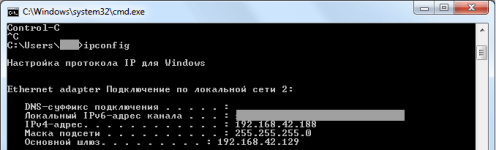
15. The addresses will appear in the USB0 line. Write down the IP Address and Network Mask.
(For example 192.168.42.129 255.255.255.0)
16. Open Internet connection settings, as in point No. 12.
17. In the window that appears, click the Properties button, then click Internet Protocol version 4 TCP/IP
18. In the window that appears, put a dot in the Use the following IP address position and enter the IP that the Terminal Emulator gave you, but at the end of this IP we write not the number that this program displayed, but1
19. We save everything, apply it and go to the phone.
20. Open the Terminal Emulator program
21. Write the following commands (don’t forget to allow root rights when prompted).
It is worth noting that 192.168.42.1 is what we have in the Internet Protocol settings window on the computer in the IP address field. That is, we enter your address.
suifconfig usb0 up
22. Enjoy unlimited internet on your phone
After all these shenanigans, you need to reboot the device and after turning it on (and every time you want to access the Internet via USB), perform only these steps:
1. Connect your phone via USB
2. Enable debugging
3. Enable USB modem
4. In the terminal emulator, write:
suifconfig usb0 up
busybox route add default gw 192.168.42.1
setprop net.dns1 8.8.8.8
ATTENTION!- 192.168.42.1 this IP is different! Here you enter what you wrote down in the Internet Protocol settings window.
3 people liked the post
In life, situations may arise when you need to quickly connect your smartphone to the Internet, but there is not a single available Wi-Fi point nearby. But if there is a computer connected to the Internet next to you (for example, via a twisted pair cable or a USB modem), then you can make this PC an excellent Internet repeater for your smartphone. In this material I will tell you how to distribute the Internet from a computer to a phone, what tools exist for this, and how to use them.
How to share the Internet from a computer to a phone via Wi-Fi
If you are interested in how to distribute the Internet from a PC to mobile devices, then the first (and simplest) option is to organize a Wi-Fi access point on the PC to which your smartphone can connect. To do this, we will need a computer or laptop with a Wi-Fi module, as well as programs specially designed for this (for example, MyPublicWiFi, Hotspot Connectify, etc.). For example, to turn your computer into a virtual router for distributing the Internet using the first of these programs, do the following:

How to connect the Internet from a computer to a smartphone using a USB connection
When it comes to distributing the Internet, you can also use connecting your smartphone via a USB cable to a PC. At the same time, in the vast majority of cases, you need to have root rights to your device, which somewhat reduces the popularity of this method compared to the one given just above.
However, if you decide to transfer the Internet from a PC, then you will need drivers for your Android phone, as well as a special Android Reverse Tethering program (you can download it, for example, from here). The latter is a utility for Windows OS that allows you to use ADB (Android debug bridge) to distribute the Internet from your computer using a USB cable.

So, follow these steps:

You can read more about the Android Reverse Tethering program on the 4pda forum.
We distribute the Internet from a PC to a mobile phone using Bluetooth
To share the Internet from a PC to a smartphone, we can also use a Bluetooth connection. In this case, drivers must be installed for Bluetooth, and it itself must be activated on the PC (with the corresponding icon in the system tray).
So, to connect your smartphone to the Internet via Bluetooth using a computer, do the following:

Video instruction
Above, I discussed several options for how to distribute the Internet from a computer to a phone. It is most convenient to use the first of the listed options, using a special program for organizing a virtual Wi-Fi access point on a PC. If for some reason you are not satisfied with the first option, you can try to connect to the Internet via USB or Bluetooth, but keep in mind that in the second case you need to have root rights on your mobile device, and in the third you need to correctly configure Bluetooth connection on your PC.
Good day!
What do you think is more widespread and accessible: 3G/4G networks or cable Internet?.. (to the network)
Answer: if cable Internet is available only in large cities (and not in all areas), then 3G/4G networks have entangled not only cities, but even regional centers and villages. The other day I specifically looked at a map of 3G coverage in different areas - it turns out that now you can access the Internet using a smartphone even in villages that are hundreds of kilometers from large cities! Grandiose! 10 years ago it would have been difficult to imagine this...
Actually, if the Internet is on a smartphone, it can also work on a PC. This article will be about how to share it...
I think that the material can be useful in many cases, for example, when you go out of town to a dacha, vacation with relatives in the countryside, when moving frequently, and simply as a backup communication channel (especially useful if your main Internet provider often lets you down).
Via USB (relevant for PCs and laptops)
The easiest way is to connect your phone with a cable (it comes included with each device) to the USB port of your computer and share (distribute) the Internet.
Advantage of the method: simple and fast, in addition to sharing the network, the phone is also charging (which means the battery won’t run out so quickly).
Disadvantages: can only be connected to one device (what if you need to share the Internet on 2-3 PCs?). In addition, extra wires get tangled under your arms and legs (21st century, and still... you can’t live without them).

I think there is no point in considering the USB connection itself (?), but after it:
- check that you have a 3G/4G network on your phone (usually displayed in the top menu);
- then open the phone settings: in the network settings section, select “More” (see screenshot below).


Please note that in 99.9% of cases, Windows automatically connects to this network and you have access to the Internet (see example below).

If suddenly the network icon in the tray is still with a cross (without access to the Internet), try:
- press Win+R and enter the command ncpa.cpl, press Enter. All network connections on the PC should open;
- Next, you need to enable all networks named “Ethernet” (usually the Android network will be “Ethernet 3”). See example below (to turn on the network: just right-click on it and select the required one from the menu).

Via Wi-Fi (relevant for laptops and other smartphones)
Connecting via USB is, of course, convenient, but imagine if you don’t have a PC, but a laptop and all the ports are already occupied? Besides, if you're on the road (say), then every extra wire can be a huge inconvenience...
And the created Wi-Fi network allows you to share the network on several devices at once: say, on a laptop and another smartphone (for example).
How it's done : the first steps are the same - check that your phone has a 3G|4G network and open the network settings on Android, the “MORE” tab (see screenshot below).

After which, you can connect to this Wi-Fi network like any other. If you take a laptop, just click on the network icon in the tray, from the list of available networks, select the one we created: to access it you must enter a password.

In general, if everything is correct, the network icon will become active, you can use the Internet...

Just in case!
If suddenly you have a Wi-Fi network without access to the Internet - i.e. a yellow exclamation mark began to light up on it, then read the materials in this article:
Via Bluetooth (relevant for laptops and other smartphones)
If there are problems with the USB connection or Wi-Fi network (for example, some devices do not support Wi-Fi, system errors may appear, etc.), then you can try to share the network via Bluetooth. It doesn’t have any special advantages over Wi-Fi (if you don’t count ), but there is a minus: time to set up - you’ll have to spend a little more...
Act one : You need to pair the devices (i.e. connect them).
To do this, open the Bluetooth settings on your laptop (the easiest way is to use the tray: there should be an icon there).

You can also open the menu: START/Settings/Devices (Bluetooth, etc.) (this is for Windows 10 users).

On your smartphone, turn on Bluetooth - then you should see your laptop among the available devices. By clicking on it, you will see a confirmation request. You must agree to pairing (in some cases you will have to enter a code to connect; it will be displayed on your phone screen).

As a result, in your Bluetooth devices, your phone must be connected (pay attention to the “connected” status).

Step two: share the Internet with Android.
We check the presence of a 3G|4G network, then open the network settings, the “More” tab (an example is shown in the screenshot below).
After that, open the “Modem Mode” tab and turn on the phone in the “Bluetooth modem” mode (the green “switch” should light up - that is, the phone has switched to the desired mode).

Then open the Windows Control Panel at (to open the control panel - press the Win+R button combination and enter the control command) :
- Control Panel\Hardware and Sound\Devices and Printers
In this tab, select your phone and right-click on it - select from the menu that appears "Connect via > access point"(see example below).

Actually, you should automatically have a new network, which Windows should also automatically connect to and access to the Internet (which the tray icon will notify you about - example below).

If suddenly the network does not appear: Go to Windows Network Connections (to open them: press Win+R and enter the command ncpa.cpl) and enable the new network manually!
PS: by the way, you don’t need to pair the devices every time - it’s enough to do it once. Therefore, if we consider the method as a whole, it is not that long (at least with repeated and subsequent connections...).
That's all for now...
Additions are welcome...
Here are the steps required to transfer internet from PC via USB cable to Android device ( reverse tethering). It also describes a method for making Android distribute the received Internet via Wi-Fi.
In order to provide Internet on Android via USB you need:
- root;
- busybox;
- Android 2.3 or later.
If it is necessary for Android to distribute the received Internet via Wi-Fi, then the following is added to the requirements:
- kernel with iptables/netfilter support;
- iptables command line utility (if your system does not have one, you can get it by installing a firewall for Android);
Action algorithm
- Connect your Android device via USB to your PC.
- Turn off Wi-Fi and 3G connections.
- Turn on ->Settings->Wireless networks->USB modem.
What happens next depends on what operating system is on the PC.
For Linux
sudo dhclient usb0
sudo sysctl -w net.ipv4.ip_forward=1
sudo iptables -t nat -A POSTROUTING -o eth0 -j MASQUERADE
Where eth0- the name of the interface through which the Internet is accessible. Also, using ifconfig, find out the IP address on the usb0 interface (for example 192.168.42.188).
For Windows
After connecting Android via USB, windows will slowly detect the new device and add a new local connection. Go to its properties and enable automatic detection of the IP address (most likely it will already be installed).
Go to the settings of the connection through which you receive the Internet, to the “Access” tab. Set the sharing flag and select the network from Android in the drop-down list.

Further customization of Android
All that remains is to configure the default gateway in Android. Type in the terminal, substituting instead of 192.168.42.188 the address you received in the previous paragraph.
su
busybox route add default gw 192.168.42.188 dev usb0
After this, the Internet will be available on the Android device.
Setting up Internet distribution via Wi-Fi
If you want Android to serve as an access point and distribute the resulting Internet to everyone:
- Turn on ->Settings->Wireless networks->Wi-Fi hotspot. There you can also configure the Wi-Fi network name and password.
- Run the command in the terminal (with root rights):
echo 1 > /proc/sys/net/ipv4/ip_forward
iptables -t nat -A POSTROUTING -o usb0 -j MASQUERADE
This way you can distribute the Internet from a PC via a Wi-Fi network without having a wireless adapter, but only with an Android phone.