 input
inputHow to make photocopies. How to properly scan documents to a computer using a printer - easy ways
This section describes how to copy an A4 or Letter size document on plain paper.
We need to prepare the following.
Originals for copying.

Printing paper.

1. Preparation for copying.
(1) Power on.
(2) Load paper.
You are loading A4 or Letter size plain paper.

(4) Load the original on the scanner glass.
Insert the original SIDE TO COPY DOWN and align it with the alignment mark as shown below. Then, carefully close the document cover.

2. Start copying.
(1) Press the [+] button several times to set the number of copies (max. 20 copies).

Make 1 to 9 copies or 20 copies.
Output of the required number of copies on the LED indicator.
Each time you press the [+] button, the number on the LED indicator increases by one. When F appears, the number of copies is set to “20”. Press the [+] button again to return to "1".
Make 10 to 19 copies
(1) Set F on the indicator screen.
(2) Insert as many sheets of paper as you want to make copies.
The Paper light shows the selected paper size and media type. Choice of A4 or 8.5 "x 11" plain paper.
(3) Press the Color button for color copying, or the Black button for black & white copying.
Copying starts.
During copying, the number on the LED indicator flashes and decreases by one to indicate the number of copies remaining.
After copying is complete, remove the originals from the scanner glass. Make 10 to 19 copies
If all of the loaded paper has been used, an error notification appears (LED displays “E, 0, 2”). To turn off the error message, press the Stop / Reset button.
You can select Fast (Speed \u200b\u200bPriority) print quality only if you have selected A4 or Letter size plain paper as the media type. Set the print quality to Fast (speed priority).
1. Press the Color or Black button for at least 2 seconds in step (3) of step 2.
The indicator will blink once.
If you press the Color or Black button for less than 2 seconds, the machine starts making standard quality copies.
2. Release the button.
Copying starts.
When the print quality is set to Fast, print speed takes priority over quality. To prioritize quality, press the Color or Black button for less than 2 seconds and the machine will start making standard quality copies.
Resize page from A4 to 8.5 "x 11" (Letter)
You can set the paper size to be loaded in the rear tray A4 and 8.5 "x 11" (Letter).
This setting is used when you normally load letter size paper in the rear tray, regardless of A4 size set on the control panel, and vice versa.
1. Press the fii (Maintenance) button several times until the letter d appears.
2. Press the Black button to select A4 size or the Color button to select 8.5 "x 11" (Letter) size.
When changing the page size to A4 or 8.5 "x 11" (Letter), load paper of the specified size regardless of the size indicated on the remote control.
If the paper size is set to A4, load A4 plain paper or A4 photo paper.
If you select 8.5 "x 11" (Letter), load either Letter plain paper or Letter photo paper.
Copying photos
This section describes how to copy 4 "x 6" / 10 x 15 cm printed photos onto photo paper.

We need to prepare the following.
Printed photographs.

Photo printing paper.
1. Preparing to copy a photo.
(1) Power on.
(2) Load paper.
In this case, 4 x 6 inch / 10 x 15 cm photo paper is loaded.
(3) Gently open the paper output tray and open the output tray extension.
(4) Load the photo onto the scanner glass.
2. Start copying.
(1) Press the [+] button several times to set the desired number of copies.
(2) Press the Paper button several times to set the desired media size and type.
The Paper light shows the selected paper size and media type. In this case, 10 x 15 cm / 4 x 6 inch photo paper is loaded.
You can specify the following page sizes and media types.
Plain A4 or 8.5 "x 11" paper.
A4 or 8.5 "x 11" photo paper
10 x 15 cm or 4 "x 6" photo paper
You can change the size of the loaded paper in the rear tray from A4 to 8.5 "x 11" (Letter), regardless of the size indicated on the control panel.
When the Fit to Page Copy feature is enabled, you can make copies of an original by automatically enlarging or reducing it to fit the selected page size. In this case, the original will be copied with borders on plain paper and without borders on photo paper.
Cancel Fit to Page to make a copy of the original at the same size.
(3) Press the Color button for color copying, or the Black button for black & white copying.
Copying starts.
After copying is complete, remove the photo from the scanner glass.
Do not open the device cover or move the photo until the copying process is complete.
To cancel copying, press the Stop / Reset button.
Fit to page copy
When the Fit to Page copy function is enabled, you can copy the original by automatically enlarging or reducing it to fit the selected page size.

1. Preparation for copying.
2. Press the [+] button several times to set the desired number of copies.
3. Press the Paper button several times to set the desired media size and type.
If plain paper is set as the media type, the original will be copied with borders.
If photo paper is set as the media type, the original will be copied without borders so that the image completely covers the page. For borderless copying, the edges may be cropped slightly as the copied image is enlarged to fit the entire page.
4. Click the Fit to Page button.
The Fit to Page indicator lights up and the Fit to Page function is enabled. The original to be copied is automatically reduced or enlarged to fit the selected page size.
Press the Fit to Page button again to cancel the fit to page copy function and make copies at the same size as the original.
5. Press the Color button for color copies, or the Black button for black and white copies.
The machine starts the fit to page copy process. After copying is complete, remove the originals from the scanner glass.
Do not open the product cover or move the original document until the copying process is complete.
You can select Fast (Speed \u200b\u200bPriority) print quality only if you have selected A4 or Letter size plain paper as the media type. To set the print quality to Fast, press the Color or Black button for at least 2 seconds in step (3) in step 5.
To cancel copying, press the Stop / Reset button.
If earlier, in order to scan documents, you had to purchase a scanner or, even worse, go to work and scan there, now this can be done using a smartphone. The quality of scanning and text recognition by mobile devices has grown significantly over the past few years. And today I want to offer a choice of several programs for scanning documents.
Evernote (Android, iOS)
I'll start with a program that I personally use every day. Evernote is a huge database that can store almost any information. It is very convenient and can be found quickly required document, photo, notes or file. Therefore, it is logical to scan documents with this particular program.
IN latest version Evernote has two options for scanning. The first is scanning in the background. To do this, you just need to take a photo of the document, just as you usually photograph food, cats or yourself. In the morning, Evernote prompts you to save the recognized version of the document.
The second option is to take a photo with your Evernote camera. To do this, you need to point the camera at the document, and the program will automatically photograph the desired area.
Google drive(Android, iOS)
Google Drive is a cloud storage from Google. As in Evernote, here you can easily find documents, and therefore it is also convenient to store them in this service.
In order to make a scan, open the application, click on the "plus" and select "Scan":

CamScanner (Android, iOS)
Unlike the programs described above, CamScanner is specially designed for scanning documents using a smartphone. The application allows you not only to take a photo of the document, but also to fine-tune the entire scanning process, and therefore to get a better result.
Office Lens (Android, iOS)
Office Lens is a powerful document scanning application from the famous Microsoft. In addition to scanning documents, the program allows you to create "scans" of presentations from boards. All documents can be stored in cloud storage One Drive.

Adobe Fill and Sign DC (Android, iOS)
As the name suggests, this program is developed by Adobe. A firm that is strongly associated with high-quality recognition of even the most complex text. The program allows you not only to scan a document, but also to immediately fill it out, sign it and send it to the desired addressee.

SkanApp (Android)
SkanApp is a program for automatic scanning of long or multi-page documents. To do this, you will need a special tripod or straight arms, a stick and a glass.

Photomyne (Android, iOS)

TextGrabber (Android, iOS)
TextGrabber is a powerful scanner with OCR from the well-known company ABBYY. Recognizes texts in more than 60 languages \u200b\u200bin real time. Scanned documents can be stored in the program itself, divided into folders.

ABBYY FineScanner (Android, iOS)
Another program for scanning documents from ABBY. If TextGrabber is more suitable for "collecting" text, then it is already a full-fledged pocket scanner. Editing and annotation of scans is supported.

Mobile Doc Scanner (Android)
Mobile Doc Scanner is one of the most popular document scanning applications. Its main advantage is speed and an extensive set of functions that will help you scan almost any image.
ScanBee (iOS)

Smart PDF Scanner (iOS)
Smart PDF, in addition to scanning, can combine scans into documents, print via AirPrint and share with friends.

Which document scanning application do you use?
If, when creating a photocopy epson printer signals that the ink is running out, the process can be continued until the material is completely used up or stop and replace the cartridge. Epson In general, an Epson photocopy is created in the same way as the models mentioned above. When you have to work with documents that have a large thickness, you can remove the scanner cover, and after the procedure is completed, it is replaced. You can use plain or photo paper to make photocopies with your Epson. To make the text clear and the colors more saturated, you need special sheets. Epson There will be no problems with the creation of high-quality photocopies if you know the sequence of actions and navigate the functions of the machine you are using.
How to properly scan and photocopy on a printer
F│Hбб'Д╣5╙▒▀▓≤╓ШiйlУ'╞-╞'╠с (cРъ © bJЩ3ДсM3ДсM3ДсM3ДсM3ДяM3Д╞9М╦z) 9 & 71▄сгмWП lЖэ \u003d ° ⌠╛≤C8 и╠█сН ╪▌вcr└! ВьТЗЕzь╚DMрV╦╡р, ЦI ° Ufya├<Р/╝J■╓lvэ=.├4╔я┬лd{С╫d╞А5°√jr~КTИВAHЁu$╓A]▌вc└! °▐╔йЫ╜йЗэ╞ЁЭ║93∙]Ъ╤зиТЗo┬Bд▒ЭR░1Д`<≥╨╩╝9╥O╕ЫOКЬ2И5°÷╦╜L2u█щфвmцсИ╟Ъ░9Ж?mцсИй╥гsЖГr╣)Лnш┤╖с⌠БЩЬ█0i┐┤╟0█·ш┤╖с⌠L▌ЙЕb!B└!B└!B└!B└!B└!B┘Л╫к│R╝D`ND][√ЫзТ!W!B©сИи╓ю~Э╕ГM▐жBг&┤а%)╬vэ=⌡з▌J4а╕?√Vр)ГvМ╦z}9*└!ЬnpэП│mEуdм дбф.╔»Йр2^оkьф1▄cг╖с:°ЩЕ1▌Ф1▄c╧▐з╦╛■х▀╠х║H);TЦ8╝x┴│JГЖэ=÷нk∙▌&Oх0э;n÷OГ4йюфrQ[[ОmцсИЩ Е3ъ{mW+сИнСш┤╖сЬу6╗~HП~HП~HП~HП~HПk┐РG┐РG┐РG┐РG┐РG┌cУМнш┤╖с≥asф1▄cф1▄cф1▄cф1▄cф1Р┼╚©ж\╨Р╝;▄aY0╫▄q╫Жьcф1▄cч÷Om╚Я8▒wЗ╢╘У]Ч╡Ю╣в■А~Ж⌠XзфhMЛ°nyь9}╥O╖3y╞|╔хBД1wЗшcпZКЛЪ┌nеЕv╬┐ф1▌5юТЗ{o╟▀╢⌠─╥Зр╕÷Ы# К.]wH┘rФъа\╬ш┤╖сэхЪяQт╣вs▐╤08н·Я²кЩ∙╝╧∙хcйA▌АJр д÷TДа1ЖБ,M;Гhэ=·ц[╛r©У≈╝╪╚БГ⌠8ыдF6wня╦z}?│АУdс&┴4и╕M2i⌠L dс$}╡ZКй╘∙ПaUъ{FАИtЧДrq°G#ф?nж,лЮh⌠D $я&┴4I╒Mi⌠2h⌠D $я&┴=(≈ТШз╣┬5W*╪ ;╨Hгa≤I┘Х[з╫W╞g1▄cф1▄c▌}Я╧$▄|V╬.
Instructions on how to make a photocopy on a printer
You need to copy documents (passport, driver's license, etc.), important papers, books, notes. Learning to copy is quite simple, for this you need to adhere to the following algorithm of actions.
- Make sure the device is plugged in.
- Check the driver for the printer.
- Check the condition of documents for dirt, wrinkles, wrinkles and fingerprints.
- Open the top cover of the device.
- Place the document neatly there with the side to be copied down.
Make sure that the paper is aligned exactly with the marks on the device.
- Press the "start" button (on the printer and copier) or "copy", if it is an MFP, and then "start". Take finished copies from the receiving tray, remove the original from the scanning compartment.
Important: the number of copies is controlled by hardware, using buttons (most often in the form of arrows).
How to make a photocopy with a printer
Home Tips Instructions on how to make a photocopy on a printer Solving many office tasks requires the availability of appropriate office equipment, in particular, a printer that allows you to make photocopies. Documentation or photographs are copied, while the actions performed on devices of various brands practically do not differ.
If you follow the instructions exactly, you will be able to get the desired result. What will be discussed:
- Sequencing
- Features of copying on Canon models
- Completing a task using your HP device
- Working with your Epson device
Sequence of actions If you need to copy, for example, a page from a passport, you need a printer or MFP.
You also need to know how to make a photocopy in order for the machine to produce the required result.
Canon, Epson, HP, Samsung) has similarities, so there is nothing difficult in creating a photocopy on a printer. HP printer Proceed as follows:
- The Canon Mg2440 is connected to power.
- A sufficient number of plain sheets are loaded into the tray.
- The copied document should be free of wrinkles, debris, scuffs and anything else that would prevent a good quality photocopy.
- The top cover of the device in use (Canon, HP Deskjet, Samsung SCX-3400) opens and the document is placed face down on the scanner glass, while aligning it as much as possible with the marks on the device.
- Having closed the lid, you need to press the button, having previously determined which photocopy is required - black and white or color.
- The number of copies can be increased.
In any case, it is important to understand that you cannot do without a specialized program that will be responsible for the scanning process. It remains to choose from among the most popular: Adobe products, the XnView product line and the equally well-known VueScan.
Of course, the list of programs that allow scanning is much longer, but the ones given above are the most relevant. Scanning To test the capabilities of your scanner (and, if necessary, customize it), in the interface of any of the running programs, click on the "file" option.
After it opens, look for "import". If the last branch contains the full name of your device, everything is in order, it works fine. Next, you need to do the following.
- Carefully open the top cover of the machine and carefully (according to the marks) place the document itself on the glass surface.
How to make a photocopy of your passport on one sheet step by step
To date, quite a few models support this feature. The printer has long ceased to be a device with limited functionality only for printing.
Attention
Most often, a modern MFP is not only the printer itself, but also a scanner and a copier. Most copiers, including both inkjet and laser printers, can transfer scanned information to a computer.
Today the question sounds a little different: what devices cannot make a photocopy and send scanned information from a printer to a computer? Most often, only the most inexpensive models of printing equipment are limited by the ability to print. Any manufacturer produces models of different price categories and, accordingly, capabilities, this should be borne in mind when choosing such equipment.
In this article, we will learn how to use the additional useful functions of the printer and scanner - we will learn how to optimally photocopy and scan documents. Content
- 1 Models capable of copying and scanning documents
- 2 Learning to use the scanner yourself
- 2.1 Preparation for work
- 2.2 Scan
- 3 Scan options for text or photo mode
- 4 Making a photocopy on a printer
- 5 What to do if the device does not scan
- 6 Technique for operating scanners and MFPs
Models capable of copying and scanning documents To copy one copy of a passport or scan an important document to a computer, you do not have to run to the nearest kiosk with a sign “photocopy-print”, it is enough to have a modern device at hand that can copy information.
Learning to use the scanner yourself Scanning is one of the most common procedures in office work, it concerns everything: documents, business literature, filing articles, photos, etc. It is difficult to imagine a company that does not know what a scan is and does not use it in its daily activities.
At home, in everyday life, a scanner is needed no less, because helps to quickly and easily digitize pictures, photos and documents, transferring them to a computer. But even being a fairly common and familiar device, the scanner requires the right attitude towards itself.
You should not try to use the device without the appropriate skills, as this can lead to costly breakdown. Getting Started So, to use the scanner, you need to follow a few simple steps.
Unplug the cable from the PC and the scanner, then plug it back in, in some cases this may solve the problem.
- The general device driver (for both the printer and the scanner) may have become corrupted. In this case, you should reinstall all software. The easiest way to find it is on the manufacturer's website.
- We reset the settings.
If none of the above helps, you can try to revive the device by resetting to factory settings. This is done in the OS menu, by clicking on the corresponding item "reset settings", or in hardware (see.
instructions). Before taking the device to the service, try connecting it to another PC, installing drivers and scanning something. If it does not work out, then the breakdown is possibly serious, and it is difficult to eliminate it with improvised means.
Content
The need to get a digital copy of your photos or text can arise at any time, so it will be useful to know how to scan documents from the printer to your computer. It is worth understanding what is meant by an MFP - a multifunctional device that has a built-in scanner, copier and printer. At the moment, there are many manufacturers of office equipment for home and office on the market, for example, HP, Epson, Canon, Brother, Kyocera, etc.
How to scan texts from printer to computer
There are two main options for how to scan a document into your computer - as an image or as text. By default, the scanner works like this: it creates a photo, if you put a sheet with text in the copier, then it cannot be edited in the future. For such a function to appear, it is necessary to use a recognizer (special software), which will turn the picture into an editable format.
How to scan a document using the Scanner Wizard
After you connected a universal printer to your computer, installed drivers, performed the initial setup for scanning, you can use the built-in Windows functionality. The "Scanner Wizard" is suitable for this, the execution algorithm is as follows:
- Turn on the scanner, lift the cover. Check that the glass is clean, if there is dust, wipe the surface.
- Place the text or photo with the surface to be scanned down on the glass.
- Close the cover.
- Go to "Control Panel", click on "Hardware and Sound".
- Find the item "Devices and Printers", go to it.
- Right-click on the icon with your MFP, select "Start Scanning".
- Set the desired parameters for the scan and click "Preview".
- A window will appear with a picture of how your scanned text will look, if it is too dim, or vice versa, you can change the settings and click "Preview" again. If everything suits you, click "Scan".
- Save the resulting result on your computer or send the file to print.
Scanning documents to a computer using special software
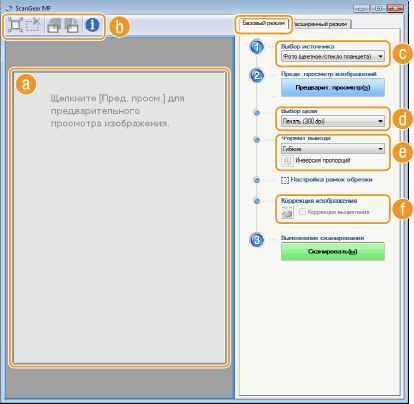
Together with any MFP, there should be a disk with drivers and native software for this. As a rule, the use of such programs provides an opportunity to achieve the most effective interaction with the device, to obtain the best quality. For example, how to scan on a canon printer using this software:
- After installing the device and software, open the list of programs.
- Find the application for your printer model, launch it.
- Click "Scan".
- The program will prompt you to select the type, format, color or black and white scan and resolution. If you set all the parameters correctly, the result will be better.
- Use the explorer to specify the path to save the target file. Give the document a name right away, so it's easier to find it later. If desired, the storage location can be removable media.
- Preview the document to correct any errors that have arisen, or immediately click the "Scan" button. Next, the MFP will recognize the data, after which you need to click "Save".

How to scan personal documents on the printer
Official documents must be of high quality so that all elements are clearly visible and readable. This applies to important information: birth certificates, passports, certificates and similar documentation. Most often, ABBY FineReader is used for these purposes, but any other software with similar functionality can be suitable. Instructions on how to scan a document to a computer from a printer using the example of a passport:
- Be sure to remove the cover, it will interfere during the procedure.
- In the settings, set the following parameters: "shades of gray", resolution - 300 dpi (or dpi).
- Unfold the passport on the first page, place it against the glass with a spread. Better to put it closer to the edge, leaving a small gap.
- Close the cover of the device firmly; for more detailed copying, you can press it a little by hand.
- Click "Preview", make sure that the color, detail of the letters is transferred correctly.
- At the bottom, click "Scan", wait for the machine to finish recognizing the file. After that, check the picture and click "Save".
- Using the frame, select the area with the image (the passport itself), empty fields should be outside of it.
- To store official data, choose tif or bmp format.
How to scan photos on a printer
Now more often people print digital photos from a computer, but sometimes there is a situation when they need to be scanned. It is important to set up the MFP correctly so that the image is of high quality. The procedure for scanning a document to a computer from a printer is as follows:
- Connect the MFP to your computer, turn it on. To digitize photos, you need to check that they are free of spots, lint and other dirt.
- The photo must be placed face down on the scanner glass.
- It is better to scan a photo using. This option will provide an opportunity to make adjustments in the preview.
- In the application, specify the type of scan (black and white, color) and set the format to "Photo".
- Set the maximum resolution value. This will allow you to scan your photos in the best quality.
- If you want to copy the file well, then you shouldn't change the settings during the process or lift the lid.
- After the procedure, save the file in any convenient location on your computer.
- Use a graphics editor to correct the image. It will provide more options than a scanner program.

How to save scanned documents
Some native MFP applications do not save the scanned files, but simply open them in an image viewer application. With this option, you just press the key combination "Ctrl + S" and select the folder where the document should be placed. It is better to install software that is verified by other users and can save photocopies automatically. Popular among people are Adobe Reader or DjvuReaser. Just set the format for the image and the storage location.
The device may scan your file with black borders and you should always crop them in the editor before saving to your computer. The standard resolution is 150 dpi, for official references - 300. The size of the final file is affected by the format in which you saved the electronic document, for example, jpg has the smallest value, and tif and bmp are much larger.
Video: how to scan a document into Word
Found a mistake in the text? Select it, press Ctrl + Enter and we'll fix it!Printer and scanner are fairly common office equipment. The need for them is extremely great, because it is necessary to copy a document or send information from a printer to a PC almost every day, especially when it comes to document flow. In this article, we will learn how to use the additional useful functions of the printer and scanner - we will learn how to optimally photocopy and scan documents.
In order to photocopy one copy of a passport or scan an important document onto a computer, it is not at all necessary to run to the nearest kiosk with a sign “photocopy-printout”; it is enough to have a modern device at hand that can copy information. To date, quite a few models support this feature. The printer has long ceased to be a device with limited functionality only for printing. Most often, a modern MFP is not only the printer itself, but also a scanner and a copier.
Most copiers, including both inkjet and laser printers, can transfer scanned information to a computer. Today the question sounds a little different: what devices cannot make a photocopy and send scanned information from a printer to a computer? Most often, only the most inexpensive models of printing equipment are limited by the ability to print. Any manufacturer produces models of different price categories and, accordingly, capabilities, this should be borne in mind when choosing such equipment. The line of products of the middle and high price segment has a full list of possibilities.
To find out if the device has a scanner and copier, it is best to look at its characteristics. However, sometimes quite superficially examine the case. If there is a cover on the top of the device with a glass surface under it, then this device has the above functions. The printer, as a rule, is equipped with only the tray-receiving of blank paper and prints it vertically upwards, whereas in the MFP the printed output comes out from the end, below the scanner area.

Important: if you are not sure about the capabilities of the device, it would be best to study its documentation, which details all characteristics without exception. Spending a few minutes on the study of the document, you can get much more information than a superficial examination of the device itself.
Learning to use the scanner yourself
Scanning is one of the most common procedures in office work, it concerns everything: documents, business literature, filing articles, photos, etc. It is difficult to imagine a company that does not know what a scan is and does not use it in its daily activities.
At home, in everyday life, the scanner is needed no less, because helps to quickly and easily digitize pictures, photos and documents, transferring them to a computer. But even being a fairly common and familiar device, the scanner requires the right attitude towards itself. You should not try to use the device without the appropriate skills, as this can lead to costly breakdown.
Preparation for work
So, in order to use the scanner, you need to follow a few simple steps.

Once the driver installation process is complete, the device is recognized by your operating system. It can always be found in the appropriate section (printers and faxes, etc.). Usually the name of the device is the complete designation of its model, including the alphabetic and numeric index. If desired, the name can be changed to any other through the system settings.

After the process of installing drivers and synchronizing the device with the system, you need to decide what software you will use. The Windows family offers programs built into them by default, but this is far from the only solution. In any case, it is important to understand that you cannot do without a specialized program that will be responsible for the scanning process. It remains to choose from among the most popular: Adobe products, the XnView product line and the equally well-known VueScan. Of course, the list of programs that allow scanning is much longer, but the ones given above are the most relevant.
Scanning
To test the capabilities of your scanner (and, if necessary, configure it), in the interface of any of the running programs, click on the "file" option. After it opens, look for "import". If the last branch contains the full name of your device, everything is in order, it works fine. Next, you need to do the following.

After saving, your image remains digitized and will be ready for use at any time. It can be sent by mail, published on the site, or set as a background screen saver on your desktop.
Scanning Options in Text or Photo Mode
Despite the fact that the drivers for all manufacturers differ and do not have one universal scheme, there are a number of basic settings that are present in all devices without exception.
The first thing worth mentioning is this is DPI... When working with text, this item should not be in a value below 300 (the same with a printer or MFP). The higher it is, the more accurate the picture will be. With a high DPI value, scanning will take a little longer, but the text is more likely to be readable, you will not have to resort to recognizing it. The optimal value is 300-400 DPI.
The second thing to look out for is saturation with color (chromaticity). There are only three options here: the option to scan black and white text, gray and color (magazines, documents, posters, etc.). The higher the color, the longer the scanning time will be.
In photo mode the most important thing is to avoid blurring the picture, and also to make sure that all edges lie flat on the surface. Color and tone are set in the Preview settings before starting the scanning process from the printer.
It should be noted that not only the scanning process itself is important for digitizing a photo, but also the process of post-processing of the finished material using specialized programs.
To scan a photo, it is advisable to use the maximum clarity settings, this will minimize possible inaccuracies during the process itself, although it will take 10-15 seconds more.
Making a photocopy on a printer
One of the most common office tasks is photocopying documents. You need to copy documents (passport, driver's license, etc.), important papers, books, notes. Learning to copy is quite simple, for this you need to adhere to the following algorithm of actions.
- Make sure the device is plugged in.
- Check the driver for the printer.
- Check the condition of documents for dirt, wrinkles, wrinkles and fingerprints.
- Open the top cover of the device.
- Place the document there neatly copied side down. Make sure that the paper is aligned exactly with the marks on the device.
- Press the "start" button (on the printer and copier) or "copy", if it is an MFP, and then "start". Take finished copies from the receiving tray, remove the original from the scanning compartment.
Important: the number of copies is controlled by hardware, using buttons (most often in the form of arrows).
The printer also has a number of additional features. For example, you can make multiple copies of pages to fit on one sheet. How to make photocopy of passport on one page the easiest way to learn from the following video:
What to do if the device does not scan
There are not many reasons why this is happening.

Before taking the device to the service, try connecting it to another PC, installing drivers and scanning something. If it does not work out, then the breakdown is possibly serious, and it is difficult to eliminate it with improvised means.
Technique for operating scanners and MFPs
It is important to remember that a scanner costs money, and not small, so in order for it to serve you as long as possible, you need to adhere to some rules. Where do you start? Be very careful when working with the glass cover - this is the most sensitive element of the scanner. If there are rubbing, scratches and dirt on it, this will certainly affect the quality of the digitized material. Periodically dust the glass with a soft material (such as synthetic suede).

- Whenever you are going to scan a particular document, make sure that the piece of paper is clean and free of dirt and dust. In no case should you scan dirty objects, or use an abrasive.
- Even if your device does not scan, do not rush to fix the problem yourself.
- Do not push or press on the glass surface.
- Never try to clean the glass with powder or a lot of moisture, the former can scratch the surface and the latter can wet the electrics.
It is best to prepare the document to be scanned in advance. For example, if the document is not in a very good condition, then at high resolution all flaws will be visible on it. Explore document statebefore setting the required resolution. Also, make sure there are no pieces of tape or other bonding materials (staples, etc.) on the piece of paper. If there are obvious fingerprints on the paper, it is best to remove them with an eraser or flannel cloth.

It is not so difficult to learn how to correctly use all the possibilities of scanning and photocopying, it is enough to show perseverance and patience, and then any technique will obey you. If you are unsure of yourself, the first step is to stick to simple instructions until you feel you can use the scanner and photocopy yourself.