 entrance
Partitioning with fdisk. Ubuntu partitioning
To install Windows, simply select a disk partition. The system itself will format it and install all the files there. But Linux allows for much more flexibility in customizing the location of the system and its files. During installation, you can place different folders with system or user files on different partitions.
This is a very interesting feature that increases the reliability of the system as well as the usability. Our today's article is aimed at beginners, we will look at how to perform disk partitioning to install linux. Let's talk why you need it, what sizes to choose for partitions, and so on.
To begin with, disks do not exist in Linux as we know them in Windows. Everything is much more transparent here. There are partitions on the disk, and there is also one root file system.
The partition you selected for this is connected as the root file system, and other partitions are connected to it in subdirectories. Flash drives, DVD disks and other external media are also connected here. For example, the bootloader partition is connected to / boot, virtual kernel file systems are connected as / sys, / proc, / dev, and RAM is connected as / tmp.
But to the user, it all looks like a single file system. One gets the impression that all files are located on the root partition, and not scattered over several. Generally speaking, it is possible to install Linux on one partition without partitioning the file system, but this is not recommended, below we will discuss why.
Why do that?
Each of the sections has its own task. Partitioning a disk for linux between several partitions isolates them from one another. If one partition, for example, the home partition, runs out of space, then the system can still work normally, because this does not affect the root partition in any way.
Taking out the home partition is also very useful when reinstalling. This way you can reinstall the system but keep all your data. Alternatively, you can still use one user on multiple systems.
The bootloader is moved to a separate partition if the file system of your root partition is not supported by Grub, for example, if you use Btrfs, xfs, etc. Also, such a partitioning of the disk into linux partitions is needed if you use LVM technology or encryption. In addition, the loader will find its files faster if they are on a small partition at the beginning of the disk, and not somewhere in the wilds of a large gigabyte file system.
Servers sometimes have / var and / usr partitions. This is again necessary for isolation and security, for example, you can prevent the execution of files from the / var section using the mount option.
Partitioning a disk for Linux
The standard Linux disk layout uses four partitions:
- / - root, the main partition for the file system;
- / boot- bootloader files;
- / home- section for user files;
- swap- a swap partition to unload pages from RAM if it is full.
All that is listed here besides swap are mount points on the filesystem. This means that the specified partitions will be connected to the corresponding folders in the file system.
Now we will not consider how disk partitioning is performed for a linux installation in practice. All this is done in the installer in a couple of clicks. But let's dwell in more detail on file systems and their sizes, so that you know exactly which values to choose.
/ Boot partition
Partitioning a linux hard drive begins by creating this partition. Everything is very simple here. This section contains the configuration files and bootloader modules that are read when Grub starts, as well as the kernel and initrd image. These files do not take up much space, about 100 megabytes, but some distributions may also host Grub themes here, and older versions of kernels will accumulate over time, so it's better to stock up on space and allocate 300 megabytes. This will be enough.
As far as the file system is concerned, we want the fastest and simplest. The goal of this section is to check out files as quickly as possible at boot time. Logging is unnecessary here, as it will only slow down the download and the files are changed very rarely. Therefore, our choice is ext2.
Chapter /
This is the main section of your system. It will contain all system files, and other partitions will be connected to it. We will also install all our programs and games here.
Considering all this, you need to allocate a sufficient amount of space. The minimum requirement for all files from the installation disk to fit is 8 Gigabytes. But when you install all the programs you need, the system will start to occupy about 20 Gigabytes (this is without games). With each update, the size of the system will increase by 200-500 megabytes. Now add games here. If you take 50 Gigabytes under the root, you won't be mistaken.
The file system must be stable, because otherwise you risk losing the entire system if the computer is shut down unsuccessfully. And so we need a journaling file system. You can use ext4, resierfs or btrfs. Now the latter has become noticeably more stable. But it is strongly discouraged to pick something like XFS because it is very sensitive to crashes.
But you cannot use ntfs or fat. The point is that the kernel uses some features of the filesystems to work properly, for example, hard links to configuration files or the inotify system to notify about changes in the filesystem. And these file systems do not support such functions.
Swap section
This is the swap partition where unused memory pages will be sent if it is full. Also, all memory contents are written here when the computer goes into sleep or hibernation mode. Of course, the swap partition can be placed as a file on disk, just like in Windows, but this will be faster. The size is calculated very simply, it should be equal to the amount of RAM. The file system is special - swap.
Home partition - / home
This is the section for your files. This will contain your downloads, documents, videos, music, and program settings. There cannot be little space here, so we take everything that is left. The file system, as well as for the root, needs a stable and fast one. You can take the same ext4 or btrfs, or even xfs, if you are sure that there should not be unexpected failures and power outages. linux partitioning for this partition is done last.
Dynamically resizing partitions
It often happens that the partitioning of the disk for installing linux has already been completed, the system is installed and working normally, and after a while we realize that little space was allocated for this or that partition. In such cases, a long re-partitioning or even complete deletion of partitions awaits us, if you did not immediately foresee such an option.
Firstly, you can create a spare partition, after the one that may require a lot of space in the future, leaving 10 GB in reserve so that later there will be no problems, not such a bad idea.
Secondly, you can use. It is a virtual disk interlayer in Linux that allows you to dynamically resize partitions regardless of free space after and before them.
conclusions
Now you know how linux disk partitioning is done and you can handle this task. The correct breakdown will save you a lot of time later. If you have any questions, ask in the comments!
Computer disks use GPT or MBR partition tables. Modern computers use the GPT partition table in Windows 10 or Windows 8.1 (Windows 8) operating systems.
The GUID Partition Table (GPT) is part of the EFI interface that replaced BIOS. The BIOS uses the MBR (Master Boot Record) - the master boot record. Gradually computers with MBR disks are being replaced by computers with GPT disks, the type of SSD or HDD does not matter.
The main difference between partition tables is as follows: on disks with MBR, you can create 4 main partitions, disks up to 2.2 TB are supported, on disks with GPT, the number of partitions is practically unlimited (depending on the operating system used), disks larger than 2.2 are supported TB, the system boots up faster.
The advantage of GPT is that it stores its data in different places on the disk, as opposed to the MBR, which is located in one place. In GPT, in case of damage or failure, data can be used from another location, on disks with MBR, in this case, loading will not be possible. The benefits of the GPT partition style are mainly implemented in the 64-bit version of Windows (Windows 7 x64 supported).
How to find out which disk is GPT or MBR? You can find out the format of an MBR or GPT disk using the Windows operating system, using third-party programs designed to work with disks. The article discusses the AOMEI Partition Assistant program, other similar programs are suitable.
How to find out GPT or MBR in Disk Management
The easiest way to find out the style of disk partitions is to enter the Disk Management snap-in.
In Windows 10, right-click on the Start menu, select Disk Management. In Windows 7, right-click on "Computer", select the "Management" context menu item, in the "Computer Management" window, select the "Disk Management" section.
You can enter disk management in Windows in another way: press "Win" + "R" on the keyboard, in the "Run" window enter the command "diskmgmt.msc" (without quotes), and then click on the "OK" button.
After that, the "Disk Management" window will open, which displays all the disks connected to this computer.
At the bottom of the snap-in window, you will see all physical disks connected to the computer, which are labeled “Disk 0”, “Disk 1”, etc. Please note that one physical hard disk can have several partitions (disks “C "," D ", etc.).
Right-click on the name of the disk, in this case on “Disk 0”, and in the context menu, select “Properties”.
In the "Disk XXX Properties" window that opens, open the "Volumes" tab. In the "Disk Information" section, you will see the option "Partition Style: Table with Partition GUIDs (GUIDs)". This means that this disk has a GPT partition style.

After I went into the properties of "Disk 1" and opened the "Volumes" tab, I saw that there was an MBR table on this disk - "Partition Style: Master Boot Record (MBR)".

How to find a GPT or MBR hard drive on the command line
Run Command Prompt as Administrator. In the command line interpreter window, enter the command:
Diskpart
List disk
Press Enter.
A command prompt window will display all physical disks connected to the computer.
One of the displayed options is labeled "GPT". A disk that has a GPT partition style is marked with an asterisk ("Disk 0"). This means that the rest of the disks, where there are no asterisks, have the MBR partition style.

How to find out the partitioning of a GPT or MBR disk in AOMEI Partition Assistant
AOMEI Partition Assistant (free version - AOMEI Partition Assistant Standard) is designed to work and manage disks. The program has the ability to convert (convert) GPT disks to MBR and MBR to GPT.
After starting the program, the computer disks will be displayed in the main window of AOMEI Partition Assistant. At the bottom of the application window, under the name of each physical disk, the partitioning type is shown: GPT or MBR.

Conclusions of the article
You can find out what type of GPT or MBR partitioning the disks have on your computer using the Disk Management snap-in, command line and third-party software: AOMEI Partition Assistant.
I recently got a 3TB (terabyte) hard drive. I will use it to store data. Here's how to create a partition table, partition and format a new hard drive in Ubuntu. I will create two partitions on the disk, format them to EXT4 file system, increase the free space on the disk, and change the owner of the disk (from root to normal user).
I connected the hard drive to the SATA connector next to the existing one, on which Ubuntu 11.10 is installed. We will use the GParted program to format and create partitions on the hard disk. If you do not have it installed, then you can install it through the Ubuntu Application Center or from the command line by running the command:
Sudo apt-get install gparted
Run GParted (the program must be run with superuser rights, you must enter the password at startup). From the command line, GParted can be run with the following command:
Sudo gparted
The program opens by default your main hard drive, mine is / dev / sda. On the menu GParted-> Devices the list of available media is presented, you must select the one you are going to format. My new hard drive is called / dev / sdb, so you need to select this menu item (make no mistake, or you will format the wrong drive).
When you switch to the desired drive, then if you select the item in the menu Section-> New Section, a message will appear stating that no partition table has been created: 
Create a partition table on disk
What is Disk Partition Table (GPT)
Partition table is a service area on a disk that stores a table with information about disk partitions. Partition tables are of different types, for example, GParted allows you to create tables of the following types: msdos, aix, amiga, bsd, dvh, gpt, mac, pc98, sun and loop. They differ in different structure, reliability and capabilities. Some are not supported on one operating system, but are supported on another. Linux hard drives typically use MSDOS (sometimes referred to as MBR) and GPT partition tables. The main disadvantage of MSDOS tables is that they do not support disks larger than 2.2TB. We will be interested in the GUID Partition Table (GPT) type, it is supported by Linux and has several important advantages. GPT supports very large disks, allows you to give symbolic labels (names) for partitions, allows you to create 128 primary (more precisely, for GPT there is no division of partitions into primary, logical and extended). The main disadvantage of GPT is that not all operating systems support GPT. For example, Windows versions earlier than Vista cannot read these discs. Also, Windows cannot boot from a GPT disk, which means that if you are going to install Windows on this disk, then you better choose the MSDOS partition table. I plan to use the disk as the second one in the system and only for data storage. I will be using the GPT Partition Table.
Create a GUID Partition Table (GPT)
So, we need to create a partition table. Select the menu item in GParted Device-> Create Partition Table... In the window that opens, select from the list the item gpt and press the button Apply.
Partitioning and formatting
Now we need to create partitions on the hard drive. For example, I will create two partitions, one with a capacity of 2TB, and the other ~ 800GB (Gb). Selecting a menu item Section-> New.
A window for creating a new section will open. In it, I registered the disk size in megabytes - 2048000MB, chose the EXT4 file system (note, the EXT4 file system is not readable from under Windows) and set the disk label BURGER (arbitrary name). As a result, we got the following (press the button Add):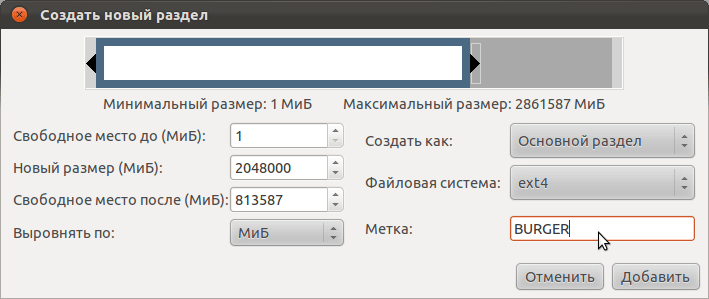
Now let's create a second partition that will take up all the remaining free space. Select menu item again Section-> New... The window for creating a second partition with a volume of ~ 800GB and with a CAT label looks like this for me (here again press the button Add):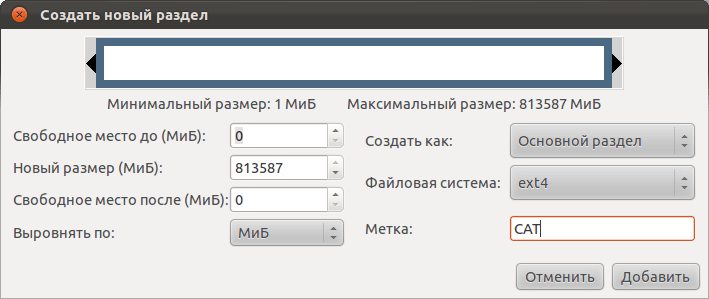
After completing the above steps, the program window will display how the disk will look after applying all the operations. To perform the specified operations, select the menu item Edit-> Perform All Operations or click on the button with a green check mark. 
The program will display a warning message. Think again if you have specified everything correctly and press the button Apply.
The partitioning and formatting process will begin. 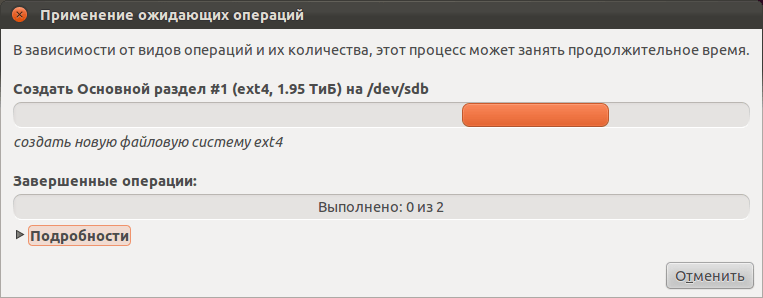
At the end, you should receive a message that all operations were completed successfully. The resulting Gparted window will look like this. 
Increasing free disk space
Now if you open the Nautilus file manager, new drives named BURGER and CAT will appear in the device list. If you click on them, then they will be mounted. 
In Ubuntu, disks are mounted in the / media directory. Since our disks have labels, they are mounted in the / media / BURGER and / media / CAT directories. Now we need to determine the name of the device used for the created partitions (disks). To do this, run the command in the terminal:
In the output of the command, you can see the device names that are used for our BURGER and CAT drives. I have this / dev / sdb1 and / dev / sdb2:
Open the drive in Nautilus, right-click on the free space and in the menu that opens, click Properties(or press Ctrl + Enter). The properties of the disk will open.
 |  |
As you can see, 42 and 107GB are already occupied on the disks! This is because the system reserves 5% of the total disk space for the root user. In particular, it is assumed that when there is not enough space on the disk, then the system will use these 5% and correctly perform all operations. But this is only true for system partitions, for example, for the root partition of the file system / or, for example, for the / boot partition (if you have one). And if you only use the disk for data storage, then 5% of the space will simply be lost and will never be used. You can simply turn off the reservation of space, or you can reduce its amount. To reduce the amount of reserved space from 5% to 1%, run the command (the number after the key -m determines the amount of interest used for the reservation):
Sudo tune2fs -m 1 / dev / sdb1
To completely disable space reservation, run the commands (first command for BURGER, second for CAT):
Sudo tune2fs -r 0 / dev / sdb1 sudo tune2fs -r 0 / dev / sdb2
Now, if you look at the properties of the disk, then we should get the following: 
Changing the owner of the disk
By default, in Ubuntu, my disk is mounted under the root group and by the root user (the superuser is the owner of the disk) and you cannot write or create anything on it under a normal user. For good reason, you need to make an entry in the fstab file for each disk so that they are automatically mounted in the necessary directories, but I will talk about this in one of the next articles, and here I will give a link. For now we will just change the owner of the disk (user and group) so that the disks are mounted under your user. Run the commands in the terminal (replace yuriy with your username):
Sudo chown yuriy: yuriy / media / BURGER sudo chown yuriy: yuriy / media / CAT
Now these disks will always be mounted as user yuriy.
This completes the process of creating partitions and formatting the disk. Constructive additions and advice are accepted in the comments.
fdisk is the general name for system utilities for managing hard disk partitions. They are widespread and are found in almost any operating system, but they work in different ways. Use a text-based user interface.
A warning: Don't create, delete, or modify partitions if you don't know what you are doing!
FDISK Utility on Unix / Linux
With FDISK utility you can view, create, resize, delete, copy and move partitions on your hard drive. And I will give illustrative examples of how to use it.
Viewing partitions in Unix / Linux
Let's start with the easiest one - browsing the sections. Use the "-l" option with the FDISK command to view the available partitions on Linux (on Unix systems - this option may not work. Tested on Mac OS X). All available sections in Linux are displayed by their device name. For example: / dev / sda, / dev / sdb, or / dev / sdc.
And so, run the command:
We get the following output:
You can find out some useful information on a specific block device. For example, the following command will list all partitions for / dev / sda:

If you have different device names, a simple write device name like / dev / sdb or / dev / sdc and so on.
FDISK output of available commands
If you would like to see all the commands that are available for FDISK, then simply use the following command, mentioning the name of the hard drive, for example / dev / sda, as shown below:
output all available commands for FDISK for example / dev / sda
Enter 'm' to see a list of all the available FDISK commands to help you navigate the / dev / sda hard drive. After entering 'm' on the screen, you will see all the available options for FDISK that you can use for the / dev / sda device (this device is taken as an example):

WARNING: DOS compatible mode is not recommended. Highly recommended
turn off the mode (command 'c') and change units for the sector (command 'u').
Available options when working with fdisk
- a: - This option is used to toggle the boot flag.
- b: - This option is used to edit BSD disc label.
- c: - This option is used to toggle the compatibility flag of dos.
- d: - This option is used to delete a partition.
- g: - This option creates a new, empty GPT partition table.
- G: - This option is used to create an IRIX Partition Table (SGI).
- l: - This option is used to list known types of partitions (Linux swap, Linux, GPT, Solaris, and so on).
- m: - This option is used to display the available commands (menus).
- n: - This option is used to add a new section.
- o: - This option is used to create a new empty DOS partition table.
- p: - This option is used to display the partition tables.
- q: - This option is used to exit the menu without saving any changes.
- s: - This option creates a new and empty Sun disklabel.
- t: - This option serves to change the "System ID" type of the partition (you can take it from the output of the "l" option).
- u: - This option is used to change the display / input blocks.
- v: - This option is used to check the partition tables.
- w: - This option is used to write everything changed and then exit.
- x: - This option is used to call additional functionality (only for experts).
Listing all partitions (partitions) in Unix / Linux
To list the partition table of your block device, use:
# fdisk / dev / sda
After that, you get to the menu (in it you can carry out various operations with sections), we are only interested in viewing, so we enter the "p" option:

Create partition table (disklabel) in Unix / Linux
If you have an empty block device and you want to make markup on it for installing a future OS, then first, you should choose the future markup.
I'll come to the main tables for markup:
- MBR (msdos)
To create your block device partition table use:
# fdisk / dev / sda
With this action, the block device / dev / sda was selected and to create a new partition table on it, use one of the options:
- g - To create a new, empty GPT partition table.
- o - To create a new, empty DOS partition table.
And let's move on to creating sections.
Create a new partition on Unix / Linux
And so, let's say you have free space on one of the devices (I have it / dev / sda) and you need to create a new partition (for example, to install the OS). Then you should run the utility as follows (Enter the following command to enter the control mode of a specific block device):
# fdisk / dev / sda
After entering command mode, press "n" to create a new partition in / dev / sda with a specific size.

After pressing "n", you are asked to select the type of the future partition:
- p - For " primary ", that is, create a primary partition.
- e - For "extended", that is, create an extended section.
I would like to note the following that "primary" partitions can be created up to 4 pieces, and all the rest will be "extended" (ie extended partitions). Since for me it is only the 1st section, then I select the "p" option. As I said earlier, this is my first, primary partition and for it, I have to specify the number (partition number), it is logical to specify 1 (But you can choose 1-4, because there are only 4). To create a full-fledged partition, you need to specify a sector (the beginning of the cylinder position for the partition being created), they tell me what it will be - 2048 (I chose the standard value), and also, you need to specify where this sector will end (the end of the cylinder position for the section being created) - I am offered to specify a standard value, but it does not suit me, because it will create 1 section of the maximum length (for me this is 21 GB - a test machine). At this stage, you can specify the end of the sector in kilobytes (K), megabytes (M), gigabytes (G). Suppose I want to create the 1st 5GB partition, then I have to write "+ 5G" (or "+ 5000M" and so on).
You can also create several sections. The actions will be what.
Please keep in mind that after creating a new partition, you must run (execute) the ‘w’ command for all actions to be saved. Well, after that, restart the OS to make sure that the partition has been created.
Formatting partitions in Unix / Linux
After the partitions have been created, formatting needs to be done. But before proceeding to this action, you need to decide on the file system (FS).
I will use the mkfs utility to format the partition. This utility supports the following filesystems:
- ext2: # mkfs.ext2 / dev / sda1
- ext3: # mkfs.ext3 / dev / sda4
- ext4: # mkfs.ext4 / dev / sda4
- fat: # mkfs.fat / dev / sda4
- minix: # mkfs.minix / dev / sda4
- msdos: # mkfs.msdos / dev / sda4
- vfat: # mkfs.vfat / dev / sda4
- xfs: # mkfs.xfs / dev / sda4
We select the type of FS and proceed to pharmacy.
Check partition size in Unix / Linux
After formatting a new partition, you can check the size of the partition using the "s" flag and the FDISK command. This way you can check the size of any particular device. For example:
# fdisk -s / dev / sda3 5285413
The size is displayed in blocks.
For output in gigabytes (GB), use:
# echo "` fdisk -s / dev / sda2` / (2 ^ 20) "| bc # echo "` fdisk -s / dev / sda1` / (2 ^ 20) "| bc # echo "` fdisk -s / dev / sda` / (2 ^ 20) "| bc
Looks usable.
Enable / Disable boot flag (*) from partition in Unix / Linux
When partitioning, I usually allocate 100MB for the partition that will store the bootloader. And for this purpose, it is necessary to indicate what exactly from it the download will be performed. And for this, you need to specify the desired section. Let's start:
# fdisk / dev / sda
The first step is to browse through the available partitions to see the current partition table. Remember, this is the "p" option. In my screenshot below, you can see that the boot partition is on the / dev / sda1 disk (you can see that this is the boot flag - asterisk ‘*’), as shown below:

Then enter the ‘a’ option to turn off the boot flag. We are asked to choose the number of the partition where the boot will be removed (I choose ‘1’ ie / dev / sda1). This will disable the boot flag on the / dev / sda1 partition:

To enable the boot flag, use the "a" option. After you clicked, you will need to enter the number of the section that will be loaded (for example, the 1st) and put everything back in place.
Delete partition in Unix / Linux
If you would like to remove a specific partition (i.e. / dev / sda4) from a specific block device (i.e. / dev / sda). You must execute:
# fdisk / dev / sda
Then, enter ‘d’ to enter the delete partitions menu. After entering, I am asked to enter the number of the section that I want to delete. Suppose I need to delete the 4th section, then I enter "4". Everything, the section has been deleted. Enter 'w' to record all changes! The new changes will only work after the next system reboot. This can be easily understood from the output below.

A warning: Be careful with this step, because using the ‘d’ option will completely remove the partition from the system and you could lose all data on the partition!
Using fdisk in bash scripts
If you know the commands well, you can write a small bash script or just use this construction in the shell shell, which would emulate the user's work:
Fdisk / dev / hda<< EOF n p 1 a 1 t c w EOF
I will not explain what these letters do, because I described all the options above.
On How to Use the FDISK Command on Linux, I've tried my best to cover almost all of the basic fdisk commands, but FDISK still contains many other commands you can use by typing "x". For more information, enter the ‘man Fdisk’ command in a terminal.
Many novice Linux users have doubts about how to partition a hard drive correctly. I will try to ease the pain of choice for our colleagues a little.
We have at our disposal - physical partitioning of disks into partitions (fdisk, gparted), sof-RAID (mdadm), logical disk manager (LVM), dm-crypt encryption (the rest should not bother).
The partitioning paths are inscrutable, so we'll start with the simplest.
1. Physical partitioning of disks
This is the simplest, most reliable and compatible old-fashioned method. It allows you to clearly delineate the boundaries of the partitions and their relative position on the disk.
When partitioning a disk, you can take into account its physical characteristics and get some performance gain. The fact is that the read speed can be several times higher closer to the edge of the disk than closer to the center. Accordingly, if you place, for example, / boot (128 MB), swap (memory * 2 or 2.5), / (root), then we get a good boot speed and work with the swap partition. If there are multiple disks, you can put swap at the beginning of each. But steaming with swap makes sense if you work with large amounts of data - linux does not use swap unless absolutely necessary. (check free -m). It is highly discouraged to abandon the use of swap, since linux is a good system, but miracles do not happen. By opening a 1GB file, you can lock the system tightly without the possibility of unlocking.
Partitioning a disk into a large number of partitions is only justified if it is done for some special purpose. In other cases, it is enough to get by with the simplest / (root) and swap.
It is very common for users to separate / home from / (root) - this makes no practical sense on single-user systems. Typically, / (root), / var, / home are shared on servers to prevent malicious users from filling up their logs or their home directory. By the way, you can mount / home with noexec without making a separate partition (man mount).
If you are using windows in parallel, then I recommend using FAT32 for the music / movie partitions that you want to have access to on both systems (and in no case make / home or home folder in FAT32 !!). NTFS is well supported, but not enough to use it every day (to remove the unclean shutdown that prevents the partition from being mounted, you need to load windows), errors in the file system can cause freezes and data loss (hello to greedy Bill).
Remember, excessive breakdown is the root of all troubles. Partitioning disks in a "special" way is only necessary for a SPECIFIC task.
2. Logical partitioning of disks
Don't be afraid of LVM - it's not that scary. With its help, you can repartition disks, expand partitions, add physical devices and expand on them, do shadow copying, a backup similar to a "time machine" appeared around 2002. Fear not, back up and use the flexibility of LVM.
For LVM, MD, DM to work, a physical / boot partition is required, which will allow the boot loader (grub, Lilo etc) to download a minimal system image (initrd) with the necessary drivers and configs to start the main system.
The logical breakdown is more complicated. The nesting of sections can be arbitrary.
For example, how is full encryption done in ubuntu: / boot DM-CRYPT] - the physical partition / boot, then the physical partition with dm-crypt, which contains LVM, in turn, which contains two logical partitions / (root) and swap.
With the nesting of encryption and raid, you can play as you like.
An example from the life of a paranoid:
/ boot DM-CRYPT [LVM [/ root DM-CRYPT-random DM-CRYPT-random DM-CRYPT-random DM-CRYPT-random]]
On every boot / tmp / home / var / log and swap are initialized with a random key. Of course, this puts a bold cross on hibernate, but at each boot, the system is absolutely clean of logs and temporary files. It is quite suitable for students or those who like to wander on porn sites.
3. Tips for optimization
/ boot can be made on an ext2 filesystem - it is faster than ext3 and should be sufficient.
On an actively used section, you can disable access time - the noatime flag. This is often done on web servers to reduce the load on the hard drive.
As many years of practice have shown, one should not rely on the reliability of a simple or sophisticated solution. It is worth using the most convenient and doing regular rsync to external media. In this case, there will be no questions about data recovery, which, with any solution (especially with encryption), greatly complicate life. For example, troubles on a encrypted partition in the presence of Luks can disable the system without the possibility of data recovery. Encrypted data is more susceptible to severe damage than unencrypted data.
(advise, add)
In linux, you can do absolutely anything and it will work. The main thing is to be guided by common sense and not hesitate to read man instead of the often harmful and outdated howto.
So, to summarize:
For desktops and laptops, the best breakdown method is no breakdown at all.
For those who do not like to backup, use "complex methods" like LVM. Option may be suitable:
swap (memory * 2), / (rest)
For ubuntu users, it is enough to choose: Use all free space for LVM, then you will have many opportunities for growth.
If you split /, / home, then sooner or later you will encounter a lack of space on one of the partitions.