 entrance
How to make beautiful frames in a Word. How to make a frame around the text and around the page in Word
Most of us work with such an irreplaceable program as Microsoft Word... It is indispensable due to the fact that it provides us with an endless flight of imagination in the design of documents: pictures, tables, fonts, diagrams, SmartArt - whatever your heart desires. It would seem that we have long learned to work in this editor, but sometimes we are faced with the fact that due to ignorance it is not possible to implement what we want to get in the end. For example, many still do not know how to make a frame around text or around a page in a Word... There is nothing wrong with that, especially since it is so easy to fix! Read the article and remember.
Perhaps it will be useful for you:
- starting from the second (without title page)
- if it is not deleted
How to make a frame around the text in a Word?
Some people manage to frame the text at the expense of a table from one cell. The result seems to be the same, but the principle itself remains incorrect. The main disadvantage of creating a frame around text from a table is that the user is deprived of the opportunity to choose a pattern, frame color, and this is the most important thing. This is exactly what gives all the beauty of the document. Therefore, in order to make a frame around the text in the mind in a word, a few necessary clicks are enough:
- Next "Page Borders"
- In the window that appears, select the "Border" tab. We customize to taste.
- Apply to paragraph
- We save
There is also another option that allows you to call a window in which you can also make a frame around the text in the Word. It's even simpler. In general, the principle of operation does not change, just for general education you can show: in the "Home" tab, click on the symbolic tab "Borders and Fill". And then everything is the same as described above.

How to make a border around the edges of the page in a Word?
It takes one minute to make a frame around the edges of the page in a Word. In the same way as when creating a border around the text, we call the "Page borders" settings window:
- Select the text we want to frame
- Click on the "Page Layout" tab
- Next "Page Borders"
- In the window that appears, select the central tab "Page".
- We customize at our own discretion
- We apply it depending on the need: to the entire document (then all pages of the document will be framed) or to one page. Experiment.
- Save by clicking "OK"

How to make a beautiful frame in a Word?
With the same success, in addition to the classic frames, you can use more beautiful, interesting frame options in the Word. They are called graphic because of the small pictures that will frame the page. Of course, such a framework is not for official documents, but for thematic cases they are just right. To make a beautiful frame in the Word, we also go to the "Page Borders" parameters, in the window that appears, stay on the "Page" tab. At the bottom there will be "Picture", where in the corresponding field select the frame you like.
Formatting text documents is a task that requires special attention... Every PC user is familiar with the basic options of "Word", but what if you need non-standard text formatting? For example, draw a border or mark the borders of the document? Not everyone is familiar with these operations. We will try to figure out how to make a frame in Word. What does that require? What tips will help us?
Word 2003 and borders
The majority of users are still working in the 2003 Word. This assembly of the utility has a discreet and familiar interface.
How to make a frame in Word 2003? Let's start by drawing the borders of the page. In order to cope with the task at hand, you need:
- Go to the "Format" menu item.
- Select the borders to be drawn.
- Specify other formatting options. For example, line thickness and type.
Once you are done adjusting the borders, click the "OK" button. The request will start processing and the change text document according to the parameters set.
Important: borders are drawn taking into account headers and footers. You can see them in the "Ruler" of the application.
Ready frames
Where are the frames for the text in the "Word"? The point is that sometimes ordinary lines - borders for formatting a document - are not enough. In this case, you have to look for special frames.

By default, they are in all Word applications. In the case of MS Word 2003, the user will need to adhere to the following algorithm of actions:
- Open the desired electronic file.
- Go to the "Format" menu item.
- Click with the mouse cursor on the words "Borders and Fill".
- Expand Page tab.
- In the "Picture" section, select a frame.
- Mark in the "Sample" field the borders along which the picture will be located.
- Specify the required frame parameters.
- Implement the acceptance of the adjustments.
Finding frame templates in the "Word" is not difficult. Usually they are sufficient for editing text documents. Fast, simple and very convenient.
New versions of the program
The techniques discussed earlier are only suitable for older versions of text editors. But what if the user works in MS Word 2007 or 2010 release?
In this case, the previously suggested instructions will be slightly modified. Thinking about how to make a frame in Word, the user has to adhere to the following algorithm of actions:
- Go to the "Page layout" block. It can be found near the "Insertion".
- Click on the line labeled Page Setup.
- Repeat one of the previously suggested instructions.
In the course of the actions taken, the user will be able to draw the borders of a text document or create a beautiful or original frame. No third party applications or incomprehensible operations will not be required.

Latest software
The Word-2016 version is slightly different from the 2007-2010 text editor assemblies. And this is a lot of trouble. Users have to quickly get used to the new design and toolbar of the utility.
How to make a frame in Word 2016? In general, the user will need to adhere to the previously indicated principles. The window for editing frames and borders is the same in all versions of the editor, only you can find it in different ways.
In our case, to draw borders and frames in Word-2016, you will need:
- Look at the "Design" menu item.
- In the right part of the drop-down list of commands and tools, find and click on the inscription "Page Borders".
- Carry out the setting of the parameters of the frame or borders in a text editor.
- Click Ok.
It is done. Now it is clear to you how the borders and frames are drawn in the "Word" in this or that case. All described manipulations work flawlessly. The most difficult thing is the choice of frame design, because everyone has their own tastes and preferences.
Framing a paragraph allows you to highlight an important idea, and a frame around the page decorates or is needed according to the requirements for the design of some types of documents. We will tell you how to make a frame in - for a fragment of text or for all sheets, including a frame with a stamp in accordance with GOST.
You can select a fragment of text with a regular rectangular frame or curly.
Regular frame
How to make a border around the text in Word:
- Select the text you want to frame. It can be a single sentence or an entire paragraph.
- On the toolbar in the "Home" tab, click on the "Borders" icon in the "Paragraph" section.
- Choose which sides of the paragraph you want the border on.
in order to change appearance lines or frame the text, open the last item of the submenu "Borders and Fill". Change the type, color and width of the borders. In the "Sample" box, configure which sides to put the lines on. If you want to draw frames for each line taken, in the "Apply to" item select "Text" - the lines will be framed separately. In the Fill tab, adjust the background color and pattern.
Figure
You can make a beautiful frame using a variety of shapes. Go to the "Insert" tab, in the "Illustrations" section, click on "Shapes". In the drop-down list, select an image from the list - rectangles, stars, arrows, callouts and much more. Click on the selected picture, place the cursor in the desired place on the sheet, hold down left button mouse and drag it to the side - a shape will appear on the page. To insert text into a frame, right-click on the image, select "Add text" from the menu.

The frame-shape can be changed at any time - click on it, the "Format" tab will appear in the menu. Various styles, fill patterns are available on it, you can change the direction of text, add WordArt objects. It is easy to move such a frame around the document - just hold down the mouse button on it and move the pointer in any direction - or copy, the text content will also move.
Page Border
Let's figure out how to insert a base frame in Word. We need the "Page Borders" tool, depending on the version of the program, it is located in the tab:
- 2016: "Constructor";
- 2013: Design;
- 2010 and in Word 2007: "Page markup";
- to create a frame in Word 2003, select the item of the same name in the "Format" menu.
In the window, set up the frame - the type of borders, the format of the lines, their color and width, for patterned frames - the picture. In the "Sample" section, set the border locations.

You can apply the created picture to all documents - in this case, the same frames will automatically appear on all sheets. Or to separate sections, for which you must first place the section break symbols in the right places.
Using templates
To draw up documents in accordance with GOST, use special frame templates that can be downloaded for free on the Internet. A template is a ".dot" file. After downloading, open it like a regular document. A security message appears stating that macros are running - allow content to be included. A new "Add-ins" tab appears on the toolbar.

How to insert a frame in Word: select the desired frame with a stamp and click on it. A border will appear on the current sheet, you just have to enter the data in the fields.
Conclusion
We figured out how to make a frame in Word. The program provides interesting tools to create strict or beautiful frames. You can make frames yourself or use ready-made templates to quickly get the finished result.
How to make the text in Word have a frame?
Sometimes we want to highlight some parts of the text in a special way, and then we start looking on the Internet for information on how, for example, to highlight a passage with some color, how to change the font or add a frame.
Today we will talk about the latter.
There are quite a few ways to do this. Most of them are relevant for all versions of Microsoft Word and they are all done as simply as possible.
In this case, you do not need to know very much about the device of this program, or even be a more or less advanced user, you just need to follow the instructions below.
Method number 1. Standard
In short, this method consists in simply selecting the text, find in one of the program tabs on the top panel the item “ Borders and shading"And use it to create a frame around the selection.
In more detail, it all looks like this:
- Select a certain piece of text by clicking the left mouse button at its beginning and, without releasing it, at the end.
- After that, go to the Page Layout tab in Word 2010 and 2007, to the Design tab in Word 2013, and to the Format menu in Word 2003.
- Click on the "Page Borders" item in Word 2007, 2010 and 2013 and on the "Borders and Fill" item in Word 2003.
The same window for all versions will open “ Borders and shading»(Only the design of the window itself will differ).
- Go to the tab " The border».
Important: when you open this window, the "Page" tab is automatically opened. They have the same interface, but the first will perform certain actions for the selected text fragment, and the second - for the entire page.
V open tab Select "Border" for the "frame" type.

Click "OK" at the bottom of the window - and you're done.
It is interesting: try experimenting with the frame border type. For this there is special section, which is called "Type".
As you can see, there you can select a frame with borders in the form of a dot-dash, a dash-dotted line, and so on. Also in this window you can select the color of the lines, their width and many other parameters.
And the frame itself can be made voluminous, with a shadow, colorless, or make it special in other ways.
This window will definitely come in handy for people who often work with Word.
Method number 2. Using tables
This method also works in absolutely all Microsoft versions Word and does not cause any particular difficulties.
It consists in first creating a table for one cell and one column, writing some text in it, and then simply "adjusting" the size of the table to the size of the text.
In more detail, in Microsoft Word 2007, 2010 and 2013 all this is done as follows:
- Go to the "Insert" tab on the top panel of the program;
- Press the "Table" button;
- Hover over the grid in such a way that only one square is selected. We press on it.

- The required table 1 × 1 will appear on the screen.
- Hover the mouse cursor over it, press the left button and enter the desired text.
- Hover the mouse cursor over the borders of this table, we see that it takes the form of a line with arrows on both sides. We move them in such a way as to reduce the size of the table.
In Microsoft Word 2003, the same thing happens like this:
- On the top panel, select the "Table" menu;
- In the drop-down list, hover the cursor over the "Insert" item, then again "Table"
- A window will open where next to the inscriptions "Number of columns" and "Number of rows" you need to specify "1";
- Further actions are exactly the same - click on the table, insert the required text there and resize it with the mouse cursor.

In principle, in this way you can create tables in later versions of Microsoft Word, but there are already more convenient way, which was described above.
Method number 3. Using shapes
As you know, Microsoft Word has the ability to insert all kinds of rectangles, circles, cones, and the like into a document. The sets of shapes are identical in all versions.
The essence of the method is to create a regular square and add text to it.
In fact, we are creating the same 1 × 1 table, only in the form of a picture. V Microsoft Word 2007, 2010 and 2013 this method implies the following actions:
- Go to the "Insert" tab;
- Select the item "Shapes";
- Select a regular rectangle. When drawing a rectangle, the user can immediately edit its dimensions;
- When the rectangle is drawn on the page, click on the rectangle with the right mouse button and select "Insert Text";
- We write the required text.

V Microsoft Word 2003 the whole process looks a little different. In this program, the list of shapes is just in a different place.
But the figures themselves, as mentioned above, are exactly the same as in later versions. There, to add a rectangle, you need to do the following:
- On the bottom panel, hover the mouse cursor over the item "Autoshapes".
- In the drop-down menu, select the item "Basic Shapes".
- In the list, you just need to click on the rectangle (number 1 in the figure below).
- Further work with the figure is done in exactly the same way as in later versions of Word - expand or contract, right-click, select "Add Text" and insert the desired inscription.
There is another way, which is to simply click on the rectangle on the bottom panel and continue to work with it in the same way.
This option is indicated by number 2 in the figure below.

As you can see, all these methods are extremely simple and should not cause any particular difficulties. To find the menu items you need, you don't need to walk through the Word tabs for a long time and look for the right one.
But the result will be very effective.
Method number 4. Text box tool
Microsoft Word 2007, 2010, and 2013 include the Text Box tool. It is located in the "Insert" tab.
To make text in a frame using such a tool, you need to follow these steps:
- Open the "Insert" tab;
- Click on the "Inscription" button.
- Select one of the label styles.
As you can see, the very first style is a regular frame. Click on it, insert the text and click on an empty space on the page.
After that, the frame can be edited in the traditional way - resize, move, and so on.

As you can see, there are other options for inserting text in this menu - for example, there is a very effective inscription in the form of a panel on the side. Word 2003 also has such a tool.
There, the whole process of using it looks like this:
- Click on the "Insert" menu;
- In it, select the item "Inscription".

Anyway use this tool very comfortably.
Method number 5. Using lines
In one of the methods above, we looked at the process of using the Shapes menu to draw a rectangle on a page of text.
But in the same menu there is another element that will help us make a frame around a certain piece of text. This element is the most common lines.
In Microsoft Word 2007, 2010, and 2013, this method is as follows:
- Select the "Shapes" menu in the "Insert" tab;
- We choose a regular line;
- Draw a line 4 times on all sides of the text so that their edges coincide, that is, we get a single shape.
Important: be careful not to make the lines blue or red. Usually Word chooses these colors by default.
To change the color, you need to select it among the options on the top panel (in the picture below it is highlighted with a red oval).

In Word 2003, accordingly, the process will be exactly the same, only there the line must be selected from the panel below in the AutoShapes menu. The rest of the application process is the same and the rules are the same.
Surely one of these methods will help you create a frame around the text in your version of Word.
In the video below you will see visual instruction to create a border around the text
Good day to all, my dear friends and guests of my blog. In my article today, I want to tell you how to insert a frame in a Word to transform your document. In fact, this is a very good thing, and there is nothing complicated about it, but in different versions office has its own differences.
How to make a frame in Word 2013
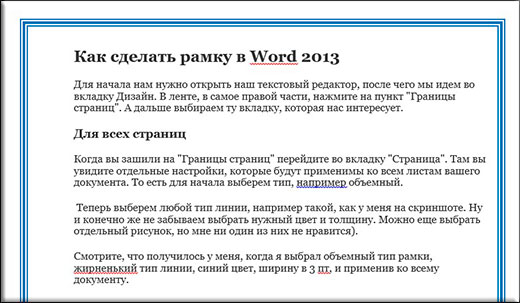
First, we need to open our text editor, after which we go to the Design tab. In the ribbon, on the very right side, click on the item "Page Borders"... And then we select the tab that interests us.
For all pages
When you sewed on "Page Borders" go to the "Page" tab. There you will see individual settings that will apply to all sheets of your document. That is, to begin with, let's choose a type, for example, volumetric. Now let's choose any line type, for example, the one I have in the screenshot. And of course, do not forget to choose the desired color and thickness. You can also choose a separate drawing, but I do not like any of them).

See what I got when I chose a 3D border type, bold line type, blue color, 3 pt width, and applied it to the entire document.
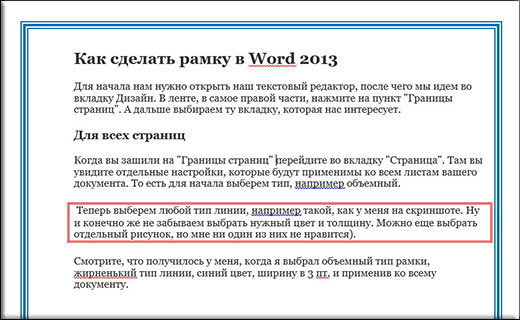
For a specific part of the text
But if you want to frame not the entire document, but only a certain part of the text, then you need to select this part, and then go to the above item, just go to the "Borders" tab. The essence here is exactly the same, but you only apply it all to a part of the document.

See what I got when I selected a specific paragraph and applied a red border setting to it.
Well, as you already understood, in order to remove the frame, you will simply need to set the type "No". That's all).
Other versions of WORD
If you are the happy owners of more early versions office, then you will need to enter a little differently.
In Word 2007 and 2010, everything happens absolutely the same, you just need to open the tab initially "Page layout" rather than "Design" as in the previous example. Well, then again you are looking for an item "Page Borders" and do everything the same way as before.
In Word 2003, the whole process is exactly the same, except that you will need to look for the "Format" menu item in the upper part of the editor, and from the drop-down menu select the item Borders and Fills.
Ready frames
In addition to the built-in frame editor, you can use ready-made solutions that can be easily found on the Internet.
For example, if you need GOST frameworks, you can download them. When the archive is downloaded, unpack it. There you will see the file Forms_A4.dot... This will be the frame template. But do not rush to open it just like that. Copy it to the folder where you have installed office in the STARTUP folder. Now you have everything installed.

Go to Word. We noticed that when you create a new document, you have an item "Security Warning"... He always does this when connecting external data. This is fine. Just click on "Include Content".
Now go to the "Add-ons" menu. There you will see our downloaded data, which we just copied to the office folder. By clicking on any of the provided templates, you will see how it will immediately fit into the document according to all the rules.

Just in case, I put a special font inside the folder for forms of this format. this font.
Patterned frames
In addition to the above, I suggest you use another way to decorate your document, namely loading external patterned frames. In fact, these are just pictures in the format PNG image with transparent background... You can download them.
Now go back to your text editor, look for the "Insert" menu, select "Picture", then look for those files that you just downloaded.
Yes, and do not forget to right-click on this frame and select "Picture Format", then go to the "Layout" tab, and then put "Behind the text". Well, now you can write anything within this frame, as well as move it as you see fit.

Of course, they will not fit the entire sheet, but you can always stretch and move them as you need.

Well, that seems to be all that I would like to tell you today about how to insert a frame in a Word. I hope that many of you will find this information useful. Therefore, I look forward to seeing you again on my blog. Check back often. Bye Bye!
Best regards, Dmitry Kostin.