How to make a luminous brush in Photoshop. Paint with light in Adobe Photoshop
In this tutorial, we will paint with light in Adobe Photoshop. We will get a wonderful job, realistic and juicy. We will create a path using the Pen tool, then circle the paths with brushes, add light, sparks, bokeh, and use adjustment layers.
1. Sketch
Step 1
Open Photoshop and create new document. Creating work from scratch is good in that you can initially select any document size, and not adjust to the quality and resolution of the source. In our case, it will be a document for printing format A2. That is, the size of the document will be 42.5cm x 59.4cm, resolution 300 dpi and color mode - CMYK.
Now draw the heart with quick movements.

Step 2
Draw your text with your tablet. If you have better results on paper - draw on it, and then scan.

Step 3
The lesson author decided to complete this step in Illustrator. This is a personal preference, and if you also use this program, you can draw text in it (it can really be more convenient). Then paste the resulting work into Photoshop.

2. Create multiple lines
Step 1
If you chose to work in Illustrator, then follow these steps. If not, go to step 3. Paste your text into the Photoshop document as Path.

Step 2
Choose tool Brush / Brush (B) point her 100% soft edged (shaded edges)and diameter in 10 px. Take tool Pen / P (P), right click on the text and select Stroke Path. Make sure the option is disabled Simulate Pressure and press Ok.

Step 3
In the menu, select Filter\u003e Blur\u003e Motion Blur / Filter\u003e Blur\u003e Motion Blur. Adjust the settings as shown below and click Ok.

Step 4
Bring down Opacity layer to about 50% and duplicate the layer. Specify a layer mask ( Layer\u003e Layer Mask\u003e Reveal All / Layer\u003e Layer Mask\u003e Show All) and hide some parts of the lines with a large shaded round brush of black color.

Step 5
Take tool Pen and circle (not too precise) the text in mode Path.

Step 6
Specify the outline with the brush stroke (as in Step 1). Do this separately for each letter. Pick a brush size between 5, 10 or 15 pxto get the most realistic result, and experiment with the parameter Opacity.

Step 7
After you apply the outline to the letter, hide the ends of the lines with the layer mask so that the lines are thinned at the ends.

Step 8
Use the original layer only as a guide, do not try to accurately repeat the outline. Add thickness to the lines in the middle, but keep the classic typographic shape, leaving the bottom and fillets thin.

Step 9
Continue to circle the words. Try to thicken the left side of the letters. So you keep the distance between them.

Step 10
Do not forget to erase the beginning and end of the lines so that the light strokes look more realistic.

Step 11
Create several lines for each letter to get a result similar to the one in the picture below.

3. Add colors
Step 1
Now let's colorize our work. Create an adjustment layer above all layers. Gradient Map (Layer\u003e New Adjustment Layer\u003e Gradient Map / Layer\u003e Adjustment Layer\u003e Gradient Map) Use colors: # 000000; # 54000c; # d69f0a; # fffee9.

Step 2
The adjustment layer should always remain on top of the remaining layers - at the very top. We will carry out the rest of the work in the layers below (including create new layers under the corrective ones). Now let's add some glow. Repeat the letter stroke process, but this time take a very large brush ( 100-200 px) and enable the option. Use color # 8c8c8c. Change the blending mode of this layer to Screen / Lightening.

Step 3
Cover with such a glow all the thick parts of the letters.

Step 4
Now add some more thicker lines. Enable option Pressure Simulation and choose white color. Draw lines of various thicknesses ( 25–75 px).

Step 5
Add thick white lines on top of all the letters.

In this lesson, we will learn how to create bright, luminous lines around an object. It can be both an object and a human figure. You will also learn how to adjust the brush for different types of processing. So, let's begin.
Step 1.First you need to decide on the very object around which we will draw our lines. I chose just such a metal can from under the drink. I think it will look quite original. You can use any other, it does not matter much.
Step 2Now take Pen Tool, circle your object and create a selection. After that, copy the object into a new document with a black background of any size you like. Further Ctrl + click on the jar layer, then Highlight-Feather (Select-Feather)and set the value to 1px. Next, invert the selection, and click Del.

Step 3Duplicate the layer with the object, make the blend mode Multiplication (Multiply), and reduce the degree of transparency to your liking.
Step 4Create new layer. On it with Tool Elliptical Selection Area (EllipticalMarqueeTool)create an oval selection, and fill it with a gradient. I took the black and green. Instead of green, you can choose any other color you like. Next, transform the gradient so that it seems to lie horizontally (see the figure below). This will add a little perspective to your picture.

Step 5Now open some texture, like the one in the picture below. Unfortunately, the author did not provide a link to the original image that he used. So grab any other suitable spotted texture and paste it into your document. Then discolor it in any way convenient for you.

Step 6Change the texture layer to blend mode to Multiplication (Multiply). Now the white spots become a little lighter.

Step 7Also add a layer style. External glow (OuterGlow), the settings you see in the picture below. Style blending mode - Lightening the base ( Color dodge) . And for your texture, in the layer style settings, set the values \u200b\u200bto your liking. Notice how much more intense and brighter the light coming from under the jar has become.


Step 8And now we will prepare a brush for drawing smooth glowing lines. We must work with the parameters in the brush settings so that the lines drawn by it end with a thin, pointed strip. So, we adjust the shape of the brush in the tool settings tab. It is located in the upper right corner of the upper panel of the program. Open the window Brushes (Brushes), there we choose Shape Dynamics (ShapeDynamics). Play with the settings Minimum Diameter (MinimumDiameter)until you get the result, as shown in the image below.

Step 9Take Pen Tool (PenTool) and draw them a smooth, curved line. Next, while this tool is still active, right-click and select in the window that appears Stroke (StrokePath). Then, in the newly appeared window from the general list, select Brush (Brush)and put a check mark next to the window Simulate Pressure (SimulatePressure).

Step 10Now add a layer with a line style External glow (OuterGlow).Style blending mode - Lightening the base ( Color dodge) . Set the settings as shown below.

Step 11Now, in the same way, draw as many luminous lines as you want. Try to conduct them in different directions, bend, rotate, in general, do everything so that the result is approximately similar to the picture below. Yes, and do not forget that the layer with the lines should be under the layer with your main object.

Step 12The effect of lightening the base looks much better if the object in the foreground overlaps with a color gradient. So now go back to the gradient layer that we created at the very beginning of the lesson, and use the transformation to increase it to your liking. Now around our jar of lighting effects will be more.

Step 13You probably managed to notice that after increasing the gradient, the edges of the texture became visible. We do not need this at all. Get rid of them with Tool Eraser (EraserTool) large diameter and small stiffness. But here I can say that it all depends on you. If you use a different texture, then you can simply stretch it to the size of the document at the very beginning, thereby relieving yourself of the need to overwrite it now.

Step 14 Now let's add some atmosphere to our object. Using soft Brushes (BrushTool) we will add some colored green spots. Do it all on a new layer. Change the layer blending mode to Soft light (SoftLight). Pay attention to how realistic the jar now looks!

Step 15Select the object on the jar layer, invert and delete the unnecessary area.

Step 16Our luminous lines look good, right? But they will look even better if they are interconnected between themselves and the object itself. So now move the layer with the light lines above the layer with the object.

Step 17We wipe most of the lines on the jar. Here you work to your taste. Try to make sure that some lines appear to go straight from the object. You see the result below.

Step 18Another thing that will add some style to our picture is a scattering of glowing dots of different diameters. In order to perform this action, we must reconfigure the brush. Only now the settings will be completely different. Play them so that you get something like the brush shown in the picture below. If you can’t adjust, use a regular round soft brush, change only the diameter and stiffness. Or you can use a finished brush with a scattering of stars, for example. There are plenty of them on the net.

Step 19Apply a brush on a new layer around the glowing lines and around the object itself. Change its size and rigidity periodically. Then add the same style to this layer, with the same settings as the line layer.

Step 20Now erase some points. We must achieve a light, refined effect. Some of them can be made translucent.

Step 21In the end, using a conventional brush with a high level of stiffness, on several layers, add a couple of highlights, such as are when shooting with a camera. Adjust the transparency level of these layers to your liking. This will give a little more realism to our work.

Do not be afraid to experiment. Good luck to you!

Photoshop lessons. Recently, in one of my work, I needed to depict the effect of neon. Having rummaged in Photoshop lessons, I found something similar. In English, such a thing is called Glow Effect. It looks very beautiful and seems difficult to repeat. But in fact, everything is very simple and affordable. The basic principle: first, the Pen Tool is used, and then the property of the previously selected brush (Paintbrush Tool) is applied to it. But first things first.
Create a new document and fill it with a dark background, for example # 1C1C1C. All luminous effects look very beautiful and natural on a black or slightly highlighted black background.

We will draw an ordinary curved line, but at the same time glowing, like a trace from a flying crazy meteor. Turn on the Pen Tool. In this case, Paths should be included in the tool properties.

Drawing with a pen is not easy, but very simple. Put in the place where the line starts the first point, then at a certain distance put the second point and, without releasing the left mouse button, "pull the line" in some direction. At this moment, you can, moving the mouse in different directions, change the curvature of the resulting segment. When you achieve the desired curvature, release the mouse button, put the next point and act in exactly the same way. I got four such points in the picture.
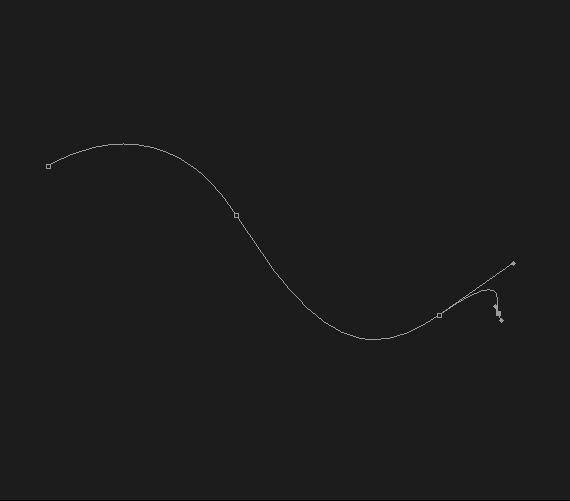
In the next step, select the Paintbrush Tool. Take a brush with hard edges, but a thin one, 5 pixels thick. In this case, you can choose any color, because then we will change it anyway with the help of effects.

Now you need to switch back to the Pen Tool. Add a new layer. Then we right-click on our line and select the Stroke Path item in the drop-down menu. A dialog box appears with the appropriate name. The Brush tool will already be selected by default in the window. Be sure to tick Simulate Pressure so that the edges of our line are thinned “from void to void”. And now again we right-click on any part of the line and select Delete Path from the drop-down menu. We get here such a pretty squiggle:
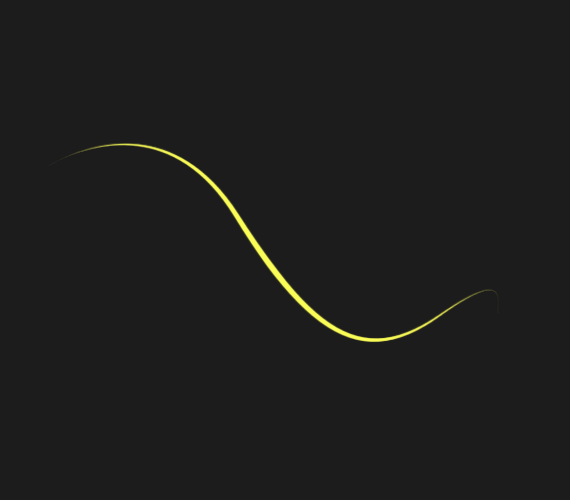
A bright zigzag on a dark background already seems luminous. We strengthen this effect and add a drop of glamor. Click on the Add a layer style icon and sequentially add the following effects:
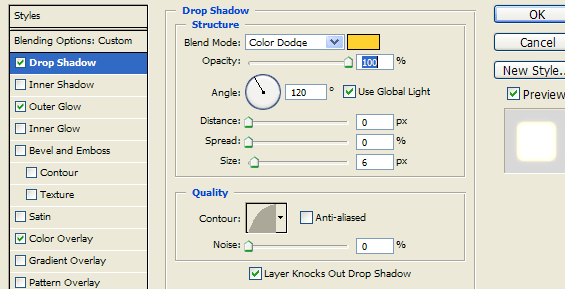
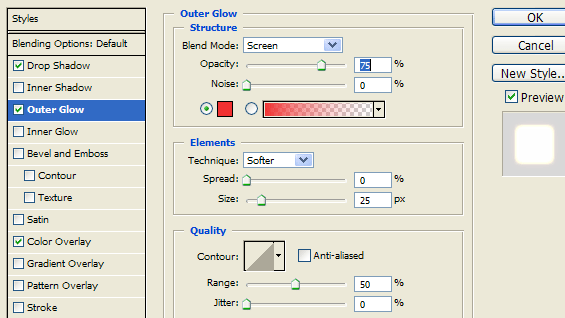
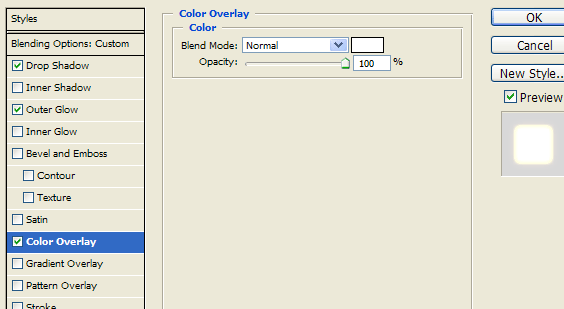
The last of the applied Color Overlay effects makes the zigzag white-hot. For this reason, when choosing a brush, we used the first color that came across. At the output we get such a beautiful effect
In this Illustrator tutorial, we will learn how to draw beautiful glowing lines. The result looks very impressive.
 | Step 1. Create a new document ( Ctrl + N) measuring 8 by 11 inches and using Rectangle Tool (M), draw a black rectangle the size of our document. |
  | Step 2 Now, choose Mesh Tool (Gradient Mesh (U)) and click on them, as in the picture below. At the intersection, change the color to dark blue ( C \u003d 100, M \u003d 40, Y \u003d 0, K \u003d 60) To select a specific point, use Direct Selection Tool (Arrow (A)). |
  | Step 3 Using all the same, draw another horizontal line and paint the point of its intersection with the vertical line in red ( C \u003d 0, M \u003d 100, Y \u003d 100, K \u003d 50) Colour. |
Step 4 Fill the last point of this grid (add another line (see the figure)) with dark orange ( C \u003d 0, M \u003d 80, Y \u003d 100, K \u003d 30) color.

Step 5 Create a Brush that we will use to draw the Lines. To do this, select Rectangle Tool (M) and draw a rectangle of length 4 inches and tall 0.125 inch. Paint it 5% in black.

Step 6 Select the rectangle, click Ctrl + C (to copy) Ctrl + F (to paste up) and change the height (by 0.03 inches) and the fill (to white).

Step 7 Select the first rectangle (which is thicker) and change it Transparency on the 0% . If you find it difficult to work with these almost invisible rectangles, transfer them to the previously drawn Grid.

Step 8 Select both rectangles and go Object\u003e Blend\u003e Make (object\u003e transition\u003e Make). Now, they should look like this:
Step 9 We bring our Blend to the Panel Brushes. For a new brush, set the type New Art Brush (Object), We leave the rest of the installation as is. Blend itself we no longer need, so it can be removed or removed to the side.

Step 10 Let's start creating vertical lines. To do this, you can use the tablet or, if it is not, draw a line with Pen Tool (P).

Step 11 In Panel Transparency change the Blend Mode to Overlay.

Step 12 Draw a few more lines in the same way.

Step 13 We draw some more lines, Mixing Modes also set - Overlap, but change the line thickness to 0.5 pt.

Step 14 Again, draw 5-10 lines (Blend Mode - Overlapthickness - 0.25 pt, Opacity - 20% ).

Step 15 We draw another 3-5 lines with a line thickness of 3 pt, Opacity of 35% and Blend Mode of Overlay.

Step 16 With the lines we are done. Add a little glow to the illustration. To do this, draw a circle (select Ellipse Tool and hold while drawing Shift) size 0.5 by 0.5 inches. Fill it 5% yellow.

Step 17 Select the circle and click Ctrl + C (to copy) and Ctrl + V (to paste a copy in the foreground). Reduce copy size to 0.25 on the 0.2 inches. The fill color is white.
Glowing lines are often required to create collages. Make them easy with the Pen tool. Consider an example. Create a new file with a size of 500 * 500 pixels. Let's make the background so that the line looks more spectacular. Create a new layer. On the toolbar in the upper square, set the burgundy color, in the lower - black. Fill the "Gradient" type with "From main to background" background.
To add heterogeneity to the background layer, create a new layer and fill it with “Clouds”. 
Change the blending mode to “Lighten the Foundation”. Set the value of the Brush tool. 
Create a new layer. Using the Pen tool, put the first point at the top and the second at the bottom.  Using the Pen tool, left-click the line to the side.
Right click on the line and from context menu select “Contour Stroke”. 

After the outline is drawn, remove the contour line. To do this, right-click on the path and select "Delete path" from the context menu. 
Make a copy of the line. One of the layers is numbered 1, and the other - 2. For layer No. 1, go to the "Filter" - "Blur" - "Gaussian Blur" tab. 
For layer No. 2, go to the “Layers” tab - “Layer Style” - “Blending Options”. In the window that opens, check the box next to the “Inner shadow” parameter and set its color. 
Create a duplicate of layers No. 1 and No. 2 and combine them. We go to the tab “Editing” - “Transformation” - “Deformation”. Curve the line. 
Add a layer mask to the lines with the lines and in the layer mask with a black brush paint over the extra sections of the line to which the inner shadow was added to hide the luster of the line.

 input
input