 entrance
The disk is write protected cd rw. How to remove write protection from a USB flash drive - step by step instructions
The era of floppy disks is long gone, but sometimes when trying to write to a flash drive, the user may encounter a situation known since the time of use. floppy disks- the removable disk is locked and cannot be used to write files.
We will consider in detail how to solve this problem in our today's article.
So, you need to write some information to a flash drive, you insert it into the slot and you get a message like "The disk is write-protected, remove protection or use another disk."
This problem can be quickly resolved, and we will talk about it a little later, but now a few words should be said about the purpose of installing write protection on a flash drive.
Note! Usually, this operation is performed with only one purpose - to protect the flash drive from viruses that can spontaneously copy to removable media without the user's knowledge.
Ways to remove write protection from a flash drive
There are 2 key ways to remove protection from a flash drive: hardware and software.
The hardware method is to install a lock switch, which is present in some models of USB flash drives, as well as SD cards. Typically, the switch is located on the side edge of the drive.
Look closely at your existing drive and look for an open / closed lock icon or Lock sign on it.
Note! Removing the protection is very simple - you need to move the locking lever in the opposite direction. Write protection removed. Insert the flash drive into the appropriate slot and try the file write operation again.
The software method involves software interaction between the operating system and the controller of the flash drive, which is responsible for the ability to record information.
Remove write protection using programmatic way, you can use Command Prompt, Registry Editor, or Windows 7/8 Local Group Policy. Let's take a closer look at all the above methods.
Removing protection with regedit
Step 1."Start", in the search field enter the name of the editor windows registry- regedit. Right-click (RMB) on the program and in the context menu go to the item "Run as administrator".

Step 2. Let's move on to the StorageDevicePolicies section:
HKEY_LOCAL_MACHINE \ SYSTEM \ CurrentControlSet \ Control \ StorageDevicePolicies
Important! If there is no such section, you need to create it. To do this, right-click on the section Control - Create - Section. We name the section "StorageDevicePolicies" without quotes.

Create (RMB in the right column of the registry) DWORD parameter (32 bits) in the created registry branch. For convenience, we will call cos given element WriteProtect.

Step 3. You need to make sure that the value of the WriteProtect parameter is 0. Right-click on WriteProtect, select "Change". If the value "1" must be changed to "0" and click "OK".

Step 4. Close the registry editor, remove the flash drive and restart the computer. We insert the flash drive. The flash drive now works in normal mode allowing you to write files.
Removing protection with Diskpart
If the USB flash drive could not be unlocked using the registry, we will try to do this using the Diskpart command interpreter, which allows you to manage the disks and partitions using the commands that the user enters in the command line.
Step 1."Start", in the search field enter the name of the command Windows strings- cmd. Right click in the program, in the context menu we carry out "Run as administrator".

Step 2. Now you need to enter the commands: diskpart and list disk, and after entering each of them, press the Enter key.
Step 3. In the above list, you need to determine which serial number in the name has a flash drive.
This can be done based on the specified size, in our case an 8 GB flash drive is presented in the table as "Disk 1" with a volume of 7441 MB.
Step 4. Select the disk with the "select" command, clear the attributes that allow only reading "attributes disk clear readonly".
If the flash drive needs to be formatted, enter the following "clean" commands, create a "create partition primary" partition, format it in NTFS "format fs = ntfs" or FAT "format fs = fat".

Removing Protection Using the Local Group Policy Editor
Step 1. Open the editor by pressing the key combination Win + R, after which you should enter the command gpedit.msc and press "OK" or Enter.

Step 2. In the editor, open the branch: Computer configuration - Administrative templates - System - Access to removable storage devices. And we look at the state of the parameter " Removable disks: Deny reading ".
If the parameter is enabled, you must disable it.

Step 3. To disable the recording restriction, double-click on the parameter and in the window that appears, select "Disable", "OK".

If all the above methods did not help to solve the problem with the recording, you can try to go to the official website of the flash drive manufacturer and search proprietary utilities to work with the drive.
It is also possible that a flash drive has exhausted its resource (there is a limit on the number of overwrites, after which the drive is switched to read-only mode) and the only way out of the situation is to buy a new flash drive.
 How to remove write protection from a flash drive - these are the coolest ways, read! If the user's attempts to erase, format, write, edit, save the file, make a transfer or other similar actions with the flash drive were unsuccessful, then, probably, he is dealing with a protected flash drive and needs to decide how to remove the protection. The guide below contains all the necessary instructions for the question posed.
Causes of the "disk is write-protected" error. Why is the USB flash drive write-protected?
When the PC is outraged that the disk is write-protected, you must first clarify the cause of the problem.

- Hardware;
- Software.
The disc can be write-protected at the request of its owner, simply by using a mechanical switch on the device or by using software tools. Also, the medium is often programmatically blocked by the system itself, by malicious applications, etc.
Basic types of write protection
The first type is mechanical write protection: Manufacturers of flash drives take care of protecting the integrity of the information stored on their media. The simplest type is equipping the device with buttons on the case or toggle switches with a "lock" icon.
The second type is software write protection: Programmatic refers to a more reliable type of protection in which special utilities blocking access to information.
The easiest way to remove write protection from a flash drive (USB or SD card) in case of mechanical protection
 If the USB flash drive, SD is mechanically write-protected, then how to remove the protection in this case?
Inspect the media itself for a switch. On some USB flash drives, usually a small toggle switch is located at the end.
Almost all SD cards are equipped with a toggle switch, so you need to set the toggle switch as shown in the photo below before using them.
Owners of computers with the installed utility " Total commander", In any incomprehensible case, refer to the capabilities of this file-combine, stuffed with many features.
In order to eliminate the problem in question, it is enough to follow several steps:
- Click on "Configuration";
- After that, click "Settings";
- In the menu that appears, enter the "File operations" tab and check the box: "Auto method selection";
- Click "Apply";
- Click "Ok";
- Done.

You will need to complete the following steps:

Note: Sometimes the section described in paragraph 11 is missing. In this case, you need to create it. This is done simply: by clicking the right button on the mouse in the Control subfolder, hover over the Create line and click Section.
How to remove protection from a USB flash drive using Diskpart?
If the disc is write-protected, then the "Command Line" (KS) will help it quickly unlock, but the information on the USB-media will be erased.
Steps:
- Launch “KS” with extended powers through “Start”;
- Then in "KS" type "Diskpart";
- Click "Enter";
- Print "list disk";
- Click "Enter";
- Enter "select disk (here, specify the letter that denotes removable media in the system, you do not need to insert brackets)";
- Input;
- Then execute "attributes disk clear readonly";
- Enter "clean";
- "Create partition primary";
- "Formatfs = fat32";
- Input;
- "Exit";
- Input;
- Done.
How do I remove protection from a disk using local group policy?
In the absence of positive results in deciding how to remove protection from a flash drive using the above methods, you will have to use a complex method and fix the problem through group policies(GP).
Action steps:
 If you decide how to remove protection from usb flash drive, it is more convenient for the user to use the "KS", then you will need to run this tool with extended powers.
Action steps:
- In the search line, type "cmd" or "KS";
- Click on the RMB search result;
- Open "KS" with extended rights.
- Diskpart;
- list disk;
- select disk (here specify the letter that denotes removable media in the system, you do not need to insert brackets);
- attributes disk clear readonly;
- exit.
- Done.

Programs for eliminating the error "disk is write-protected"
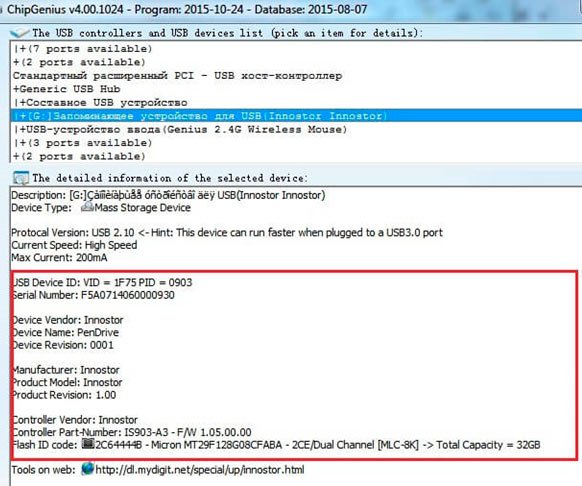
All companies producing USB drives develop software to work with them. However, all these programs can only lead to a positive result if the user is logged on with administrator rights. Second important condition is the software compliance of the drive model. It is convenient to use the ChipGenius utility to obtain accurate information about the media. It's free and always available at mydigit.cn.
The application displays detailed information about the flash drive, guided by which you can accurately determine which software to use.
Having found out the necessary information, it is recommended to visit the page http://flashboot.ru/iflash/, where to choose an application for your flash drive. In the last paragraph of this guide, examples of common software are presented to effectively solve the difficulties that have arisen.
How to remove write protection from individual folders or files?
To remove the protection of a separate directory, you need to enter its "Properties", set the checkboxes in the appropriate columns of the "Security" section.
If there is a ban on adjustments, for example, text document, then you can simply copy its contents to another file and save it with the usual settings, that is, without protection. Or use the file menu "Save as ...".
To remove protection from a file by the system, you should call from it context menu and click "properties". Uncheck the "read-only" box.
Often, one file or folder is used by several applications at once and as a result, the problem we are considering arises. It is required to close all utilities that use a file or directory. Access will then be provided immediately.
Sometimes a folder or file is protected with passwords. To crack them, specialists have developed applications, for example, "Office Password Recovery". It is one of the most effective tools for cracking access codes. It is required to perform only a few sequential actions:
- Click "open";
- Enter the "attack" tab;
- Click "start";
- Wait until the process is complete;
- Done.
Also, access to individual directories and files can be obtained by starting the PC in Safe Mode.
When the described methods do not help, it is recommended to install the "Unlocker" application, which, after installation, will appear in the context menu, so use it to work with separate files especially convenient.
To do this, you will need to install a paid or free modification of the "HDD Low Level Format Tool" (basically, they differ only in the speed of formatting and the absence of automatic updates).
In addition to flash drives, the program can work with USB hard drives. The installation wizard will help you quickly install the utility on your PC.
If the user does not fundamentally receive regular updates and he is ready for limitations in formatting speed, then it is better to choose the free option.
 After installing the program to format a protected flash drive, you must perform the following steps:
- Select a USB flash drive.
- Click "Continue".
- Read the information in the first tab of the program menu and go to "Low-level format".
- Confirm your commitment and then click "FORMAT THIS DEVICE".
After waiting for the completion of the process, the mission will be completed, that is, all bytes of information have already been erased. In order to use the device in normal mode in the future, you will need to format it with the means built into the OS.
Programs for formatting protected flash drives
A significant number positive feedback the following programs have started working:
AlcorMP- This utility, in addition to removing protection, does an excellent job of restoring the performance of the YUSB carrier.
In the menu, you can select the "Russian" language, so even for beginners, it does not cause any difficulties.
HP USB Disk Storage Format Tool- The application is suitable for many flash drives, and it is also available for installation for free on the official resource.
In addition to unlocking and formatting functions, the utility can create bootable USB drives.
JetFlash Recovery Tool- The owners of "Transcend" appreciated the speed and simplicity of this program, which is able to correct errors in reading write blocks and unlock protection.
Using this software will not make it difficult for the user, since the built-in wizard will help you perform basic operations with a USB flash drive.
Apacer Repair- Owners of flash drives from "Apacer" effortlessly cope with locks, thanks to a proprietary utility.
If it is impossible to format the media using standard OS tools, the program will effortlessly complete the task within a few minutes.
Check Disk- A fully functional modification of the program is freely distributed on the Internet.
In addition to the main formatting function, the utility is used to monitor and fix errors on hard drives and USB media (including flash drives).
What to do if the disk is write-protected, and how to remove protection - from time to time this question arises for all people using flash drives.
The problem of a write-protected disc is a very common problem, and solutions are known.
We will list the most popular ones, in ascending order of difficulty.
The first thing to do
At the system message "the disk is write-protected" first of all check if is the media equipped with a physical switch.
It is found on some models of SD cards and USB drives, and protects the drive from random entry new data over the already recorded.
Most often, this element is located on the side of the device and is indicated by a lock icon or the inscription Lock.

The guard can be removed by moving the lever in the opposite direction. After the switch is in the desired position, you should try recording again.
Check your flash drive with antivirus software. Flash drives are constantly “traveling” between computers and are at a high risk of malware infection.
Make sure the write protection is not the result of a worm.
Format the drive using the same file markup as the computer on which the recording will be made.
If all the above methods did not help, move on to more complex ones.
Specialized programs
- JetFlash Online Recovery Utility for Transcend Brand Products(the utility works only in Windows);
- USB Disk Storage Format Tool app from renowned manufacturer computers and HP accessories. Unlocks any drive, regardless of its model and size, checks for errors, formats it for the selected file system and can create bootable USB Flash;
- Apacer Repair Tool application - solves various problems with opening and formatting Apacer drives, including those with USB 3.0.
Advice! All applications should be opened only as an administrator. To do this, in the menu that opens with the right mouse click on the executable file, select the item "Run as administrator".
Making changes to the registry
Launch Registry Editor you can open command line(Win + R) and typing regedit. Next, follow these steps:
- find the item HKEY_LOCAL_MACHINE in the opened editor window;
- open the SYSTEM, CurrentControlSet, Control and StorageDevicePolicies sub-items one by one;

- if there is a corresponding section in the computer registry, go to the right side of the editor and check if there is a WriteProtect parameter with a value equal to 1. It is this unit that most often causes an error;
- instead of one, put zero, save the changes and restart the computer, after which the error should be eliminated.
If the section is missing, it is created by right-clicking on the Control item and selecting "Create Section". The name is set to StorageDevicePolicies.

After the section is created, you need to go to the empty area on the right and find the item "DWORD Parameter", renaming it to "WriteProtect" and setting the value to 0 (zero).
Now you need to close the editor, eject the disc, restart your computer and repeat the recording cycle again.
Working with the command line
The next option for removing protection from the media is using the Windows command interpreter called Diskpart.
With it, partitions and disks can be controlled by entering commands at the prompt. The user actions in this case are as follows:
- run command line as administrator. To do this, in Windows 7 you need to find the corresponding item in the Start menu, and for Windows 8 or 10 - press the key combination Win + X);
- type Diskpart in the line and press the enter key.

- in the opened interpreter, type "list disk" and determine in the list that opens under which number your media is located in it;
- in turn, enter the commands in the window: select disk N (N is the number of the drive), attributes disk clear readonly and exit. After each, press the enter button.
After closing the command line, you need to restart your PC or laptop and take any action with the drive - for example, format, write information to it, or erase a file.
Restoring the file system
Check functionality file system drive and, possibly, restore it, allows CHKDSK utility... To start it, you should:
- open command line;
- type the command "chkdsk X: / f", where X is the name of the volume of the scanned disk;
- wait a few minutes for the application to check.

In most cases, errors detected on a USB-drive are corrected by the program, and the flash drive is again available for writing.
Restoring the controller
Sometimes the reason for the failure of a flash drive is a malfunction of the firmware of its controller.
To fix the problem, special programs are used that determine the VID and PID (identifiers, respectively, of the manufacturer and device).
Popular applications are CheckUDisk 5.0, ChipGenius and USBDeview.
After identifying the identifiers, download the application from the network that restores the operation of the firmware.
For drives with an AlcorMP controller, use the programs lcorMP and Alcor recovery.
You can check their compatibility with the flash drive after launching them.
Red color indicates the inability to use the utility, yellow and green allow disk recovery.

Local Group Policy Editor
The editor is a utility used to modify local group policy objects.
It is opened by pressing the Win + R key combination, which calls up the command execution line, and entering gpedit.msc.

Now you should find the branch Computer configuration / Administrative templates / System / Access to removable storage devices in the tree structure of the utility.
Here the value of the item "Removable disks: Deny reading" is checked, which must be turned off for normal operation with flash drives and SD cards.
If disc writing is limited, you should double-click on the corresponding parameter and, when the dialog box appears, select "Disable".

Advice! When using any application for working with flash cards and USB drives, it should only be opened as an administrator. To do this, in the menu that opens with the right mouse click on the executable file, select the "Run as administrator" item.
conclusions
After starting all the utilities and performing the suggested actions, most of the media starts working.
The last thing that can be done with a flash drive or memory card, if all the previous methods did not work, is to finally make sure they are not working.
Try to write something to them on several other computers. If the disc doesn't open on any of them, your only option is to buy new media.
If you want to know more about removing write protection from a flash drive, here is our other material on the same topic:
Video instruction:
Instructions
To bypass the protection of such disks, it is best to use special programs... One of best programs this kind is CloneDVD. With its help, you can copy the contents of the disk bypassing protection. Download the application from the Internet and install it on your computer. The program is commercial but has a free trial period. After installation, restart your PC.
Run the program. After starting it, the tray of your optical drive will open automatically. Insert a write-protected DVD into it, click on the folder image that is in the top menu of the program. After that, using the browse, select the folder where the copy of the disk will be saved. Then click on the arrow opposite the Copy as line and select DVD.
Then click on the arrow opposite the DVD Capaciti line and select the DVD format from which the information will be recorded. It is a standard DVD 5 with 4.7 or the larger DVD 9 with 8.5 GB.
At the top left of the window, there is a section called DVD content. By default, all the files that will be written to the HDD... If you do not need to write down all the files, in this list you can mark only those that you need.
After selecting all the required options, click "Start". The process of recording information from the disc will begin. In most cases, all selected information is written to the hard disk. The speed at which data is written to disc depends on the specific DVD as well as your optical drive. Quite often the program sets the minimum speed.
After the process bar reaches 100%, the disc will be burned. The information will be located in the folder that you have chosen to store the data.
There are several ways to open a file if you do not have access to it. The most common variant is that the file is simply infected with a virus and must be deleted. But sometimes the file just uses another application that prevents it from launching. Therefore, to run such a file, you need to unblock it.
Instructions
First of all, you should consider what kind of file it is. If it is not system program, but just a recently downloaded file (especially the .exe format), then it is quite possible that this or some other malicious software. If the file is recent and you are not sure about it, then before starting it, it is advisable to check it with an antivirus, and not a simple one (for example, free version Avast), but effective. To perform this procedure, the following is suitable: Kaspersky Internet Security CureIt. Alternatively, if the file is less than 20 megabytes, then you can check for many antiviruses at once (follow the link http://www.virusscan.jotti.org/ru). If a virus is detected, then it is better to remove it, and then check all operating system for viruses.
When this happens with system or standard files Windows programs, then everything is much more serious. Sometimes viruses infect such standard programs like paint, notepad, etc. In this case, you should remove them, and you can reinstall them as follows: Start - Control Panel - Add or Remove Programs. There you need to select the item Install programs, then insert into the drive installation disk with the operating system and restore the programs damaged by the virus. Undoubtedly, with the help of some antiviruses, it is possible to "recover" files, but it is better for the system to remove the virus and reinstall the files, since even the restored programs may be again susceptible to the virus or work incorrectly.
If the security software does not detect a virus in a file that does not open, then this means that the file is being used by a certain application, and, accordingly, it will not start until the application stops using it, or until you disable it. In order to find out which application is using this file, it is best to use free utility like AVZ or IObit Security 360 and find out exactly what it is all about. If the file is in use unknown application, and it has nothing to do with the system, then, most likely, this is a kind of malicious software which blocks some processes. Using the same utilities, the application can be found, and then uninstalled and rebooted, after which the file can be launched.
Perhaps the situation is that simply because of some system error(possibly due to long-term failure to diagnose) the file is in use system application... If the file is not related to the system, then the problem is solved. To unlock a file, just download the Unlocker program, then right-click on the file and select “unlock”.
If several people use one computer and several accounts have been created, then sooner or later a situation may arise when it becomes necessary to set the rights to certain folders for certain users. The procedure is simple. All you need is a few minutes of time and basic computer knowledge. But you can configure the security of the PC and access to folders according to your requirements.

You will need
- - Computer with Windows OS.
Instructions
If you are using an operating room Windows system 7 or Vista, then the following method will work for you. Click on the desired folder right mouse button. A context menu will appear. In it, select the "Properties" item, then - the "Security" tab. Then click on the "Change" button. A window will appear in which there will be a list of accounts that are on your computer. Select the one for which you will set the rights to the folder. Highlight this account by clicking on it with the left mouse button.
Copy protection, often incorrectly referred to as “copyright protection,” is a property of a disc that makes it difficult to make exact copies of it. The purpose of copy protection is not to make copying impossible, since that cannot be achieved, but prevented. simple copying software, music, movies and other data.
You will need
- CloneDVD program, DaemonTools program.