 entrance
Installing htc recovery. Installing custom recovery on HTC One M7
How to enter Recovery? Many instructions for upgrading and Android firmware require you to perform actions from the Recovery menu. What this mode is and what it is for, you will learn from this article. What is Recovery? Recovery is special treatment Android downloads in which:
- perform a full Android data reset
- flashing a smartphone
- get Root rights
How to enter Recovery? The Recovery menu is usually found in all smartphones and tablets from Samsung, but absent in other brands of Android smartphones, but it can be easily added by flashing this section to your Android device.
If in Android smartphone there is a Recovery menu and it was not changed, then it is called STOCK, if there was no or third-party Recovery menus installed, it will be called CUSTOM.
There are basically two types of custom recovery CWM and TWRP, less common 4ext,Philz CWM, (different teams developers).
How to enter Recovery
ATTENTION! If the Recovery menu is absent or not installed, then it is IMPOSSIBLE to enter it!
 Method for Samsung
Before transferring a smartphone or tablet recovery, disconnect Samsung from charger or USB cable!
New models
Turn off Android and hold down Central button + button Volume Up+ button On off
 Turn off Android and hold down Center button+ Volume Up button + On / Off button
  in a universal way(read below).
For Samsung Galaxy S8 - S9
- Press and hold the dedicated Bixby button and Volume Up + Power
- After the screen saver appears, lower the power button, but continue to hold the Bixby button and Volume Up
- Hold these buttons until the screen shows android logo on a blue background
- Release the buttons
- In a few seconds Galaxy smartphone The S8 will boot into Recovery mode.

Older models and some tablets
- Turn off Android and hold down Central button and button On off
- Turn off Android and hold down the button Volume Up and the button On off
or in a universal way (read below).

Method for HTC
Switch to bootloader mode, then:


If suddenly it doesn't work out, use in a universal way(read below).
 Method for Google Pixel and Nexus
Turn off Pixel / Nexus and hold down the buttons Volume DOWN + ON / OFF In the menu, use the volume keys to find the Recovery menu and confirm the selection with the ON / OFF button:
If suddenly it doesn't work out, use in a universal way(read below).

Method for SONY
Turn off, turn on and when to appear on the screen the logo Sony or when the indicator will light up —Pinch / Press(possible options):
- Volume DOWN
- Volume Up
- Click on the logo
- Or turn off Sony, hold down the "Power" button, wait for a couple of vibrations, release the power button and hold down the "Volume Up" button
in a universal way(read below).

For selected Motorola and Lenovo models
- Turn off Android
- Press simultaneously the buttons "Volume up" + "Volume down" + "Power"
For other versions of Motorola and Lenovo - turn off Android and hold down "Volume down" + "Power"
If you can't use in a universal way(read below).
A universal way for all Android devicesusing a PC and ADB tools
(Asus, HTC, Lenovo, Sony, HTC, LG, Samsung, Motorola and others, provided that recovery is available in this device)
Adb Run Program - Method 1
Using the proprietary program of the site Adb Run (do not forget to enable USB Debugging)
 Working window ADB RUN
 From the command line - Method 2
Another option is how to get to the Recovery menu using standard tools ADB and ADB RUN programs:
Connect Android to PC and type the command adb reboot recovery
Example in ADB RUN: 
From the command line - Method 3
As practice shows, on some devices (and more specifically in LG), it is impossible to translate an Android device using the command adb reboot recovery , in this case, you should use the following command
adb shell
reboot recovery
There is also a command to switch to Recovery mode for LG, you need to enter the command
adb reboot --bnr_recovery
After that, the device will start to reboot in a few seconds!
A universal method from an installed terminal with Root rights
(Asus, HTC, Lenovo, Sony, HTC, LG, Samsung and others, provided that recovery is available in this device)
- Download and install from the store Google play Terminal application;
- Go to the newly installed application;
- Type the following commands:
su
reboot recovery - After a couple of seconds, Android will start to reboot.
Recovery menu controls
Volume keys Up and down- move through the menu Key On off- selection of an item in the menu. There are such Android devices in which no keyvolume, in this case you will need OTG cable and computer mouse... Once you start putting Android into Recovery mode, plug in your mouse.
This concludes the article. If you do not know how to use and what items in Recovery are responsible for, then read the article
- If there were errors while installing the update - Status CWM
That's all! Nothing complicated! Read more different articles and instructions in the section. Stay with the site, it will be even more interesting further!
The other day we talked about how in order to gain access to superuser (root) rights on a smartphone HTC 10, as well as to be able to install an alternative TWRP recovery on it and custom firmware, you must first unlock its bootloader.
At the same time, we provided you with instructions for unlocking the bootloader. HTC 10, which is suitable for other smartphones from this manufacturer, and today we want to tell you how to get Root and install TWRP recovery to this smartphone.
What we need for this:
HTC 10 with unlocked bootloader
Windows, Mac or Linux computer
ADB and Fastboot programs for PC
USB cable
How to unlock the bootloader of a smartphone and where you can download ADB and Fastboot programs for various operating systems you can read in this material, and today we will immediately start installing the recovery on the TWRP smartphone
How to install TWRP recovery on HTC 10
Before installing TWRP recovery on a smartphone, make sure that the "Debugging via USB" option is enabled in its settings. You can read where to find it and how to enable it in.
1. Download the file with the image of the most recent version (today it is the twrp-3.1.1-0-pme.img file) of the recovery on the TWP official website by going to it at this address.
2. Copy the file to your computer, to the folder where you downloaded the ADB and Fastboot programs earlier
3. In the folder with the ADB and Fastboot programs, start the Windows command line window (by right-clicking on the free space in the folder and selecting "Open command line window here" or "Open Power Shell window here") or Linux terminal or Mac.
4. Connect your smartphone with a cable to your computer and in a command prompt window or terminal enter the following command:
adb reboot download

Your smartphone will reboot into bootloader mode
5. In a command prompt window or terminal, enter the command:
fastboot flash recovery twrp-3.1.1-0-pme.img
where instead of twrp-3.1.1-0-pme.img, if necessary, substitute the name of the file you downloaded from the recovery. The result of this command will be the installation of the modified recovery TWRP to your smartphone.
Do not close the command line window, as we will need it for getting Root.
Rooting HTC 10
1. After installing the recovery, your smartphone will remain in Fastboot mode and in order to go into recovery you will need to use the volume control buttons to select the "Reboot to Bootloader" item on its screen and press the power button to confirm your choice.
Here you will need to use the volume buttons to select "Recovery Mode" and press the power button.
2. After that, TWRP recovery will start on the smartphone. On the main screen, at the very bottom, you will see a slider that will need to be moved to the right in order to allow the recovery to make changes on the smartphone.
With the help of this recovery, you, among other things, can install, you can install Zip files with various modifications of the system. To get Root, we need to install a Zip file with SuperSU from Chainfire on our smartphone, which you can download at this address.

3. After downloading the Zip file to your computer, place it in the folder with the ADB and Fastboot programs, and in the TWRP recovery on your smartphone, click on the "Advanced" button, and in the menu that opens, click on the "ADB Sideload" button. Move the slider at the bottom of the screen to the right to confirm your choice.

4. In a command prompt window on your computer, type the command:
adb sideload SR1-SuperSU-v2.82-SR1-20170608224931.zip

The installation of SuperSU on your smartphone will begin. After successful installation, return to the TWRP main menu and select "Reboot System" to reboot your phone.
That's it, now your HTC 10 has a Root.
The Recovery menu is a special service mode mobile system Android. Present on all smartphones and tablets. It is used to start if the user wants to quickly clear all information in the device, restore factory settings, change the firmware, and also in some other situations.
In the event that Recovery on the device has never been changed, it is called STOCK. If this menu has been stitched, then it is already called CUSTOM.
Among the custom recovery, CWM and TWRP are considered the most popular due to their functionality.
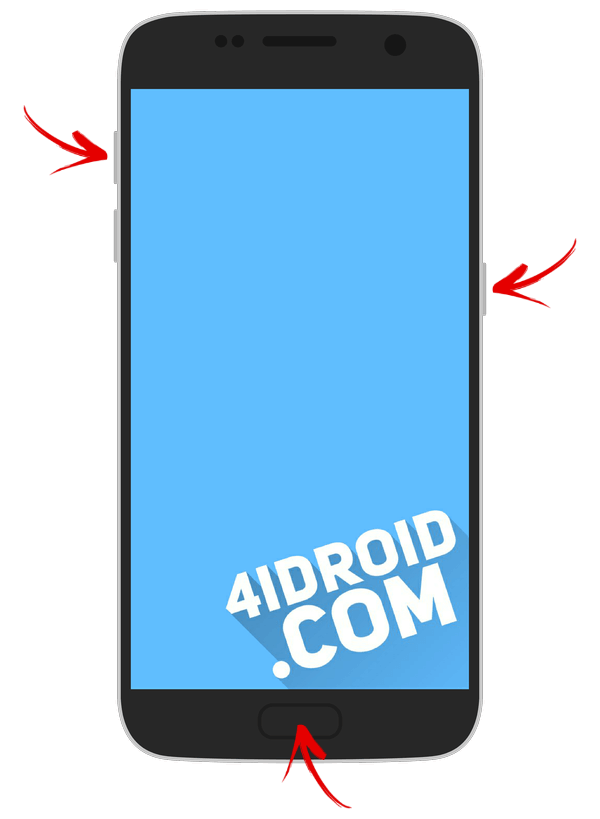
To enter the menu recovery on a turned off device, a special combination of pressing HOME, POWER, VOLUME + and VOLUME- is used. Moreover, on different devices you need to use different of these buttons.
Below in the article you can find a way for your device. By the way, there are also special programs to launch this menu. One of the most convenient, called Quick Boot, we will consider here.
A universal way to enter recovery on Android
Today, for many models different manufacturers the same key combination is suitable. Therefore, it makes sense to consider this method first. Perhaps it can be called a universal way.
The procedure is as follows:
- Turn off your Android smartphone or tablet.
- Press the power button and then short press the volume up knob.
- The device will go to Recovery.
- With the device turned on, hold down the on / off button for a few seconds.
- A menu with some parameters will be displayed on the screen, where there may be a "Go to Recovery" button or something like that.
If on your Android these key combinations do not lead to the desired result, then see below all the possible combinations specifically for each popular line of devices. For all other devices, one of the above described universal options is suitable.
Recovery for Samsung
If you have a popular device Galaxy line Samsung Electronics, then one of the following methods will work for you. Keep in mind that all key combinations apply when your smartphone or tablet is turned off.
Methods:
Recovery for Sony Xperia
If you are the owner of a Sony Xperia line device, then turn off the device, and then turn on and When the indicator lights up or the SONY logo appears on the screen, press the Volume Down or Volume Up key. On some models, the logo is pressed.
This option is also possible: turn off the device, hold down the power button and wait for a few vibrations, then release the ON / OFF button and quickly hold down "Volume +".
Recovery for HTC
First of all, the user needs to switch to Bootloader mode. In most cases, this is done by removing and reinstalling the battery:


Recovery on Nexus
With the device turned off, hold down the following key combination: volume down and on / off (power).

Now find the Recovery item and go to it by pressing the power button.

We go into recovery using the Quick Boot application
There are also special programs that help you switch to Recovery with one touch of your finger. The procedure in this case is not at all complicated. Just open the Play Store, search for the application and install it. I decided to introduce you to one of the most convenient ones called Quick Boot.
After installation and launch, select the Recovery item in the program menu.

The device will successfully reboot into the mode Recovery Recovery, and you can continue working with the sections that you need, depending on the task at hand. For example, if you need to restore all factory settings on your device, you will work with the Wipe data (Factory reset) section, the Apply update from section is used to update the firmware, etc.
How to work in the recovery menu
Navigation here is done by pressing the side volume up and down keys. To confirm the selected option, the on / off button is briefly pressed.
Advice: if you are not sure of your actions, it is better not to experiment in this menu, as the consequences will be irreversible. Mobile devices Android, unlike a PC, will not issue warnings about possible problems.
What's on the Recovery menu
This menu contains the following sections:
- Reboot system. When you click on this item, the Android will restart in normal mode. In case you just entered Recovery out of curiosity, use this command to exit.
- Apply update from. This section is for updating installed firmware from the available distribution kit, installing patches, etc. In this section, you can select the type of update from the following list:
1) Internal storage - from an existing option, including from system memory, file storage, memory card;
2) External storage - from some external device;
3) Cache - from the internal system cache. - Backup / Restore. A backup system image is stored on each device. When you click on this item, recovery from this image will be launched. That is, the system will be completely updated to the state in which it was after the purchase.
- Wipe cache partition. The contents of the system cache will be completely deleted.
- Wipe data | Factory reset. Selecting this item will allow you to reset all settings made by the user for the entire period of operation. The device will completely revert to the factory preset settings. Please note that during the reset process, all information entered and saved by the user will be lost. Including all files, folders, music, videos, etc. However, the performance of the tablet usually increases by an order of magnitude after a factory reset.
In this article we will talk about what Recovery Mode is on Android, how to enter it on different models popular manufacturers, and also answer some frequently asked questions.
What is Recovery
Recovery mode is the so-called "recovery mode" Android systems... Factory Recovery, which comes out of the box on the device, has limited functionality, but even from it it can be done or else.
With the modified Recovery (or) a number of new functions appear, among which, the creation backups systems and recovery from backups, as well as other interesting options, which we will discuss in a separate article.
How to enter Recovery: instructions
To get into Recovery on Android devices, you first need to turn off the device, and then press and hold a certain key combination until the screen lights up. Unfortunately, there is no single combination with which you can enter the Recovery menu as on smartphones Samsung and HTC, LG, Xiaomi, etc. Therefore, below we have collected instructions for various models.
(!) True, there are practically three universal way- more details about each are written at the end of the article:
- By connecting an Android device to a computer, you can put it into recovery mode through the command Windows string using ADB.
- Special applications allow you to enter the Recovery menu from the system.
- Through the Terminal, entering the command (you need ROOT rights).
(!) There you will also find information on what to do when a recumbent Android appears on the screen with exclamation mark in the belly and the inscription "No command (No command)".
(!) Also, some smartphones and tablets lack Recovery. In this case, you will have to install it yourself (unless, of course, a custom recovery is developed for this model) - there are links to instructions above.
Moving through the menu is carried out with the volume up and down keys, the choice is made with the on / off button. On new devices, CWM and stock recovery can be touch sensitive.
Lenovo
On off Lenovo smartphone pinch and hold at the same time:
- Volume "+" and "ON"
If that doesn't work, use:
- Volume "+", Volume "-" together with the power button
Nexus, Pixel
If you have a Google Nexus or Pixel tablet or smartphone, you first have to go to Fastboot mode, and from there go to recovery. To do this, hold down:
- Volume "Down" + turn on

Then use the volume keys to switch the arrow to "Recovery mode" and select this item by pressing the power / lock button.
Htc
Use a combination:
- Volume "Down" + launch

On some (you will go directly to Recovery):
- Volume "UP" + launch

On most HTC devices, you will be taken to Bootloader first. Then, using the volume keys, go down to the "Recovery" item and go to it by pressing the power button.
In the Bootloader menu itself there is a "Factory reset" item, which is responsible for resetting the phone parameters to factory settings.
V modern models Samsung uses the following key combination to enter recovery mode:
- Home button + volume up + power on
On older devices:
- "Home" + turn on
On older Samsung tablets:
- Volume up + power on
Meizu
On the smartphones Meizu there is no usual non-touch recovery, but there is a menu from which you can install the firmware or reset the settings to the factory settings.

To get into it, use the following combination:
- "ON" + Volume "UP"
Lg
- Hold down the Volume Down and Power keys until the LG logo appears.
- Then quickly release them and squeeze again.
- Wait for the menu to load.

On off Xiaomi phone hold these keys:
- Volume "Plus" + turn on

The Xiaomi recovery menu is available in multiple languages (works in Chinese by default). To change to English, click the button as shown in the photo.

After that, you can boot Xiaomi into Fastboot, Download or Recovery modes.

Sony
On many Sony phones Stock Recovery is not installed (you will have to install TWRP - there is a link to the FAQ at the beginning of the article) and only on some models it is present. You can enter using one of the combinations (try in turn):
- "ON" + Volume "Minus"
- ON + short press Volume Up until the SONY logo appears, then quickly again Volume Plus
- "ON" + volume down + volume up

Huawei, Honor
For phones and tablets from Chinese manufacturer Huawei or Honor:
- Volume "Down" + Power
- Volume "UP" + Power

Motorola
- Press and hold the Power key and Volume Down for 2-3 seconds, then release them.
- You will be taken to Fastboot Flash Mode. Use Volume “Down” / “UP” to change the option to “Recovery Mode”.
- Confirm the selection with the power button.

Fly
Hold until the "Fly" logo or vibration appears, one of these combinations - depending on the specific model:
- Volume "Down" + enable
- Volume "UP" + turn on
Asus
- Hold down the Power key and Volume "+" (second option: Power and Volume "-").
- After the vibration, release the power button while continuing to hold the Volume until Recovery appears.
Chinese phones with MTK processors: Doogee, Bluboo, Blackview, Oukitel, Elephone, UMI and others
- Hold Volume "UP" + "ON".
- When the menu appears, move to the "Recovery" item with the Volume "UP" button, confirm with the Volume "Down".

We put the device into recovery mode via a computer: a universal method
Connect your Android device to your computer via USB,. Launch ADB and type in the command line:

Press "Enter", after which the device will reboot into Recovery mode.
We use a useful application
There are special programs thanks to which you can put the device into Recovery Mode in one click. For example, Boot Droid. It is enough to select "RECOVERY" in the list of options and confirm your choice by pressing "YES".

Entering Recovery Mode via Terminal Emulator
Download Android Terminal and type the following command:
Press "Enter", you will be prompted for root access, provide.

Then enter:

Click "Enter" again and the phone will instantly reboot into Recovery Mode.
The inscription "No command (No command)" appears and the lying Android with an exclamation mark

If, upon entering Recovery, the screen displays “No command” and the recumbent Android, quickly press 2 buttons: “ON” and Volume “+”. This will open the Recovery menu.
(4,82 out of 5, rated: 17 )
if you have flagship smartphone Htc one and you want to get Root rights as well as CWM recovery. Then article Getting Root HTC One + CWM Recovery For you!
For those who have just become a beginner or are not an expert in the huge world of Android and are not familiar with the concept of how - Root Android , and also why it is needed, what can be done after obtaining Root rights or how to get rid of them later if they are already needed, you can find out from the article - root Android!
Primarily!
There are no "left" links or unnecessary actions in this article! If you really need Root Rights, then read carefully and follow it step by step, this is a guarantee that you will do everything right! Now let's get down to getting Root rights!
Before getting Root you need to unlock Bootloader of your smartphone - Unlock Bootloader HTC. Step by step
Required components and conditions for obtaining
- At least 50% charged battery
- Downloaded and installed program Adb run
- And also install the drivers, if they were removed
- Download custom recovery
- Download update archive UPDATE-SuperSU.zip to get Root rights to HTC smartphone One (or if you do not install an alternative zip update archive)
Instructions for obtaining Root HTC One
1. After unlocking the bootloader, enter the Bootloader menu again.

2. Run Adb run and go to Fastboot menu -> Reocvery
3. In the menu that opens, move the recovery file, close the window and press the Enter button
If you get a message on the command line:
fastboot
a) Perhaps you do not have the driver installed or you need to reinstall it
b) The smartphone is not in bootloader mode and it is worth rebooting the smartphone again
5. Archive-update UPDATE-SuperSU.zip move to phone memory
6. Install this update archive UPDATE-SuperSU.zip from the Recovery menu
8 Restart the smartphone. Root rights received!
After obtaining Root rights, you can start automating your Android using Tasker or remove ads from applications.
Second way
This method consists in installing the Kingo Root program on the computer - which will install the Root rights to the smartphone