 entrance
Installing php 5 windows 7. How to install PHP: all the pitfalls of the process
PHP is one of the most popular programming languages for creating websites and web applications. It has developed many ready-made content management systems for blogs, company websites or even online stores. Despite the fact that this language has its drawbacks, it is quite easy to learn and therefore is very often used to develop new sites.
The php interpreter can be supplied as a module for Apache, execute scripts from command line or as a separate php-fpm service. These services differ in their capabilities and purpose, but for any kind of interpreter, you need to set basic settings, for example, work folder, included extensions, error display, and so on. All these settings are set through the php.ini file. In this tutorial, we will look at how to configure the php.ini file in operating systems Linux, although all information will work for Windows as well.
If you have not yet installed the php programming language interpreter, then you can read the article.
For each version of the interpreter, the php.ini configuration file is located in a separate folder. But all config files are located in the / etc / php folder, for example, / etc / php5:
The conf.d folder contains General settings for various extensions and modules, they will not interest us now. The next three folders are more interesting - apache, cli and fpm. They contain php.ini configuration files for each of these interpreters.
If you are going to use several of these interpreters, then you will have to specify the settings for each of them separately. You can make sure that there is a php.ini file in each of the folders.
As for the syntax of the file, it is divided into sections, first there is the php settings section, which is divided into subsections depending on the type of settings, then there are the sections for configuring different modules. The syntax of the settings themselves is very simple, it corresponds to the usual syntax of ini files. The line starts with the name of the setting, followed by an equal sign, followed by a value:
setup_name = parameter_value
Symbols denote the section name, for example, and the symbol; means a comment, it and all characters after it are not read by the interpreter. Now let's look at how php.ini is configured and go through the most important parameters.
Php.ini file setup
For the convenience of orientation, we will divide all the parameters into categories depending on their purpose. It will be enough for you to find the required parameter and change its value. Now open the php settings file, for example, for the apache module and proceed to the configuration. To avoid errors, do not add new lines, but look for existing ones and change the values to the desired ones:
sudo gedit /etc/php5/apache/php.ini

First, there is a little information about the file itself in the form of comments, then the settings of interest to us.
Php error output
The php 7 setup usually starts with configuring the error output. All error display settings are located in the Error handling and logging section. By default, displaying errors on the screen during script execution is disabled. This is done so that users cannot see anything unnecessary. Instead, all errors are written to a log file. If you are using php on home computer, then such measures are not needed and you can immediately display everything on the screen:
display_errors = off

Replace off with on. Php uses Various types errors, for example, critical, warnings, syntax errors, using the error_reporting line you can enable the output of only certain types of errors:
error_reporting = E_ALL & ~ E_DEPRECATED
If you need to combine several types of errors, then use the & symbol, and to disable the display, precede the type with the ~ sign. The above example displays all errors (E_ALL) except for deprecated feature messages (E_DEPRECATED). You can disable all types by using 0:
error_reporting = 0
Enable logging php errors if you don't display them on the screen:
In order not to clog the log with messages of the same type, you can ignore repeated errors within the same execution:
ignore_repeated_errors = On
Resource limits

If php scripts were not limited in resources, they could easily overload the server and prevent it from working normally. Therefore, by default php sets hard limits, but you may need to loosen them up a bit.
By default, the maximum script execution time is 30 seconds, let's make a minute:
max_execution_time = 30
If you specify 0, then the script can run indefinitely. You can also limit the time during which the script will load data, 60 seconds:
max_input_time = 60
Maximum number of variables in GET and POST:
max_input_vars = 1000
The following parameter sets the maximum amount of memory that a single script can use during its execution, in megabytes:
memory_limit = 128M
The maximum size of data transmitted in a POST request is also limited, the default size is 8 Megabytes:
post_max_size = 8M
You can limit the php scope on the system with the openbase_dir option, it specifies the folder above which the script cannot access file system:
open_basedir = / var / www /
Using the directives disable_functions and disable_classes, you can disable the use of certain functions or classes in scripts, for example, this can be useful for web hosting. In this example, we disable the use of the ini_set function, which allows you to change php settings from a script:
disable_functions = ini_set
Default directories

The php.ini configuration file allows you to specify the default file system paths for various actions. You can specify folders where the system will look for scripts if you try to include them using the include statement:
include_path = ".: / usr / share / php5: / usr / share / php5 / PEAR"
Php modules folder:
extension_dir = "./"
Folder for recording temporary files:
sys_temp_dir = "/ tmp"

In order for users to be able to upload their files to the server, for example, a photo, you need to enable this function in php:
file_uploads = On
Maximum upload file size:
upload_max_filesize = 2M
The maximum number of files that one script can load:
max_file_uploads = 20
The php.ini setup is almost complete, we are left with only extensions.
Configuring extensions
Extensions allow you to greatly increase the functionality of php. For example, thanks to extensions, you can use bases in your scripts mysql data, postgresql, mysqli, sqlite, the gd graphics library, and more. All of this is included in this section.
To enable the extension, just remove the comment in front of the line with its command, for example:
extension = php_mysql.so
extension = php_mbstring.so
extension = php_pgsql.so

Please note that for windows extension will be in dll format, but for linux you need to use so. In the next sections, each of the extensions is configured, but we will not consider them because they usually do not require configuration.
conclusions
In this article, we looked at how php is configured on the server, or an ordinary computer for website development. The php settings file has a fairly simple structure and is not difficult to deal with. After completing all the settings and saving the changes, do not forget to restart the web server or php-fpm service.
Generally speaking, php-fpm is a separate topic because there are many additional settings, and maybe we'll look at it in one of the next articles. If you have any questions, ask in the comments!
1.3KThis article provides step by step guide to install PHP to work with Apache HTTP Server on Windows. This procedure has been tested on both Windows XP and Vista. It is assumed that you have already completed the Apache installation.
PHP 5 configuration steps
1. Download PHP 5
Before getting started, download a copy of PHP 5 from download pages... Download the protected VC6 package from the Windows Binaries section - that is, do not download the installer. For example, select the package marked “ PHP 5.2.5 zip package", if on this moment the current version is 5.2.5.
Note: Please note that I have not tested the below procedure with PHP versions 5.3, only since 5.2.5, which was latest version at the time of this writing. In theory, the same steps should be followed to install PHP 7.
2. Install PHP 5
Create a folder for PHP on your hard drive. I suggest c: php, although you can use a different folder name and location. Personally, I prefer not to use names with spaces.
Extract all files from the downloaded archive to this folder. To do this, just double click on the zip file. And then drag all files to c: php folder.
3. For those who update the package: Delete the old PHP.INI file from the Windows directory
If you are migrating to PHP 5 with more old version, change to Windows directory, ( usually c: windows) and delete any php.ini files you previously placed there.
4. PHP configuration
Go to c: php folder and make a copy of php.ini-recommended file. Name new file php.ini. You should now have a c: phpphp.in file with the same content as c: phpphp.ini-recommended.
Note. If you are using Apache 1, you need to either move the php.ini file to the Windows directory ( c: windows), or customize environment variable PATH to include c: php. If you don't know how to do this, just move the php.ini file to the c: windows folder. You do not need to do this if you are using Apache 2, since later we will specify the directive with the location of the php.ini file in the Apache 2 configuration file.
To install PHP on Windows 7 using text editor (for example, such as Notepad, which can be found in the "System" section of the "Start" menu)? open php.ini file. You may need to make the following changes to the file:
a) Including short open tags
Find the following line:
short_open_tag = Off
If short_open_tag is set to off, tags like "
Since many third party PHP scripts use the “
short_open_tag = On
b) Magic quotes
When installing Apache PHP by default, incoming data is not automatically escaped with a slash. If you want your input to be prefixed with a backslash (""), for example, to reproduce your hosting settings, look for the following line:
magic_quotes_gpc = Off
and replace it with:
magic_quotes_gpc = On
It is not recommended to do this if this parameter is not specified on the hosting. Even when set to Off, you can still use in PHP addslashes () function to add slashes for specific pieces of data.
c) Using global variables
A number of old scripts, when executed, assume that all data submitted through a form will automatically have a PHP variable with the same name. For example, if a form has an input field named “something”, old PHP scripts assume that the PHP processor will automatically create a variable named $ something that contains the value specified through that field.
If you are using such scripts, you need to find the following line:
register_globals = Off
and change it to:
register_globals = On
Warning: when installing PHP on Windows, do not do this unless you have third-party scripts that need it to work. When writing new scripts, it is always best to assume that the register_globals element is set to “ Off«.
d) Error Display
On a live site, script errors are usually logged without being displayed in the PHP error file. But on a local machine, while you are testing and debugging a PHP script, it is more convenient to send error messages when they are detected directly to the browser window. This way, you won't miss errors even if you forget to check the error log file.
To have PHP display error messages directly in the browser window, find the following line:
display_errors = Off
and change it to:
display_errors = On
This parameter should always be set to Off on a live site.
e) Session path
If the script uses sessions, find the following line:
; session.save_path = "/ tmp"
session.save_path specifies the folder where PHP saves session files. Since the / tmp folder does not exist in Windows, you need to install a different folder. One way is to create a folder named c: tmp ( as previously we created c: php) and specify this folder for this parameter. If you do, change the given line as follows:
session.save_path = "c: tmp"
Note that in addition to changing the path, I also removed the semicolon (";") prefix from the string.
You can also use the current TEMP folder on your computer. Or create a tmp folder in your PHP directory like c: phptmp and adjust the config file accordingly. There are many possible options. If you can't decide which one to choose, just create c: php and do as I said above.
f) SMTP Server
When installing PHP 5 5, if the script uses the mail () function and you want the function to successfully send mail on the local computer, find the following section:
; For Win32 only. SMTP = localhost smtp_port = 25; For Win32 only. ; sendmail_from = [email protected]
Change it with your SMTP server address and email account. For example, if your SMTP server mail.example.com and the email address is [email protected], change your code like this:
SMTP = mail.example.com smtp_port = 25 sendmail_from = [email protected]
Please note that after this, when the script tries to use the mail () function, it will need to connect to your ISP for it to work successfully. If you do not change the above lines and try to use the mail () function in the script, the function will return a failure code and display an error message.
How to set up Apache for PHP 5
There are two ways to install Apache PHP. First: set it up to boot PHP interpreter as an Apache module. Second, configure it to run the interpreter as a binary CGI. Only one of them needs to be applied. Select the module method if PHP is also installed on the hosting as an Apache module, or use the CGI method if it is implemented on the hosting.
a) Running PHP 5 as an Apache module
To configure Apache to load PHP as a module for parsing PHP scripts, use an ASCII text editor to open the Apache configuration file, httpd.conf.
If you are using Apache 1.x the file is located in the folder c: Program FilesApache GroupApacheconf... Apache 2.0.x users can find it in the folder C: Program FilesApache GroupApache2conf and Apache 2.2.x users are in the folder C: Program FilesApache Software FoundationApache2.2conf... Typically, it is located in the conf folder of the directory where Apache is installed.
Find the section of the file that contains the LoadModule statements. Declarations preceded by the hash symbol "#" are considered commented out.
If you are using Apache 1.x, add the following line after all LoadModule statements:
LoadModule php5_module "c: /php/php5apache.dll"
If you are using Apache 2.0.x, add the following line after all LoadModule statements:
LoadModule php5_module "c: /php/php5apache2.dll"
If you are using Apache 2.2.x add the following line:
LoadModule php5_module "c: /php/php5apache2_2.dll"
Note that this PHP installation example uses the forward slash ("/") character instead of the traditional Windows backslash (""). This is not a typo.
If you are using Apache 1.x, find the "AddModule" series of statements and add the following after all the lines.
AddModule mod_php5.c
Then find the AddType block in the file and add the following line after the last AddType statement. This should be done regardless of which version of Apache you are using. For Apache 2.2.x, you need to find the AddType lines in the section
If you need support for other types of files, for example ".phtml", add them to the list, for example, like this:
For those using one of the versions of Apache 2, you need to specify the location of the PHP ini file. Add the following line to the end of your httpd.conf.
PHPIniDir "c: / php"
If you used a different directory, you will need to change c: / php to the correct path. Don't forget to use the forward slash ("/").
If you are using Apache 1, you have already placed the php.ini file in your Windows folder or elsewhere in your PATH. Therefore PHP will have to find it on its own.
Running PHP 5 as a CGI Binary
If you configured PHP 5 to load as an Apache module, you can skip this section. It is intended for those who want to configure PHP to run as a CGI binary.
The procedure for doing this when installing PHP 7 is the same for both Apache 1.x and all versions of the 2.x series.
Find the portion of the Apache config file that contains the ScriptAlias section. Add the below line just after the ScriptAlias line for “ cgi-bin". If using Apache 2.2.x, make sure the line is before the closefor section
note: if you installed PHP in a different location, for example c: Program Filesphp, you need to specify the appropriate path instead of c: / php / (for example, c: Program Filesphp)... Remember that we're using a simple forward slash ("/") here instead of the Windows backslash ("").
ScriptAlias / php / "c: / php /"
Apache needs to configure the PHP MIME type. Find the AddType comment block explaining its use and add the following line below it. For Apache 2.2.x find the AddType lines under
AddType application / x-httpd-php .php
As with installing PHP as an Apache module, you can add any extensions so that Apache recognizes them as PHP scripts, for example:
AddType application / x-httpd-php .phtml
Then you need to tell the server to execute the PHP executable every time it encounters a PHP script. Add the following code to the file, for example, after the comment block explaining “ Action«.
If you are using Apache 2.2.x, add the code right after the AddType statement above; there is no comment block in Apache 2.2.x " Action«.
Action application / x-httpd-php "/php/php-cgi.exe"
Note: the "/ php /" part will be recognized as ScriptAlias, a kind of macro that Apache will expand to "c: / php /" ( or "c: / Program Files / php /" if you installed PHP there). In other words, do not put the path "c: /php/php.exe" in this directive or "C: / Program Files / php / php.exe" and use "/php/php-cgi.exe".
If you are using Apache 2.2.x, find the following section in your httpd.conf file:
Add the lines below right after the section you just found.
c) Setting the default index page
This section refers to the option to install PHP on Windows as both an Apache module and a binary CGI.
If you are creating an index.php file and you want Apache to load it as the home page of your site, you will need to add another line to your httpd.conf file. Find the line that starts with " DirectoryIndex", And add" index.php»To the list of files. For example, if you had code like this:
DirectoryIndex index.html
change it to:
DirectoryIndex index.php index.html
The next time you log into the web server using the directory name, for example " localhost" or " localhost / directory /", Apache will send all scripts from index.php or the contents of the index.html file if index.php is not available.
Restart Apache web server
Restart your Apache server. This is required for Apache to read the new PHP configuration directives that you put in your httpd.conf file. The Apache 2.2 server can be restarted by double-clicking on the Apache Service Monitor icon in the taskbar and clicking the “Restart” button in the window that appears.
Testing your PHP installation
After installing PHP 5 5 or another version of the language, create a php file with the following line:
Save a file called test.php in the Apache htdocs directory. If you are using Notepad, remember to keep the name “ test.php"With quotation marks. Otherwise, the program will add the .txt extension on its own.
Open this file in a browser by entering “localhost / test.php” into the address bar (without quotes). Don't open the file directly through the explorer - you will only see the code you entered earlier. You need to use the above url for the browser to try to access the Apache web server which runs PHP to interpret the script.
If all goes well, you will see a page with information about PHP configuration. Congratulations - you have successfully installed PHP and configured Apache to work with it. You can upload the same test.php file to your hosting and run it there to find out how the hosting configured PHP on itself and try to reproduce these settings on your machine.
If that doesn't work, check to see if your PHP installation or Apache installation throws errors. To do this, open a command prompt window and run php-cgi.exe on the test.php file, for example, c: phpphp-cgi test.php.
If you invoke PHP from the command line and you see a large HTML file with all the PHP configuration information, then PHP is configured correctly. The problem is probably related to the Apache configuration. Make sure you restart Apache after making configuration changes and that you have configured your web server correctly.
Learning PHP
A complete reference guide for installing PHP can be found on the technology's official website. It can be viewed online or downloaded for offline study.
Have a nice day everyone!
This publication is a translation of the article " How to Install and Configure PHP 5 to Run with Apache on Windows"Prepared by the friendly project team
Web application developers may find it difficult to install the PHP scripting language on Ubuntu Server. This is due to many factors. But by using this guide, everyone can avoid mistakes during installation.
Installing PHP in Ubuntu Server can be done in different ways - it all depends on its version and on the version of the operating system itself. And the main difference lies in the commands themselves that will need to be executed.
It is also worth noting that the PHP package includes several components that can be installed separately from each other if desired.
Method 1: Standard installation
Standard installation assumes the latest version of the package. It is different for every Ubuntu Server operating system:
- 12.04 LTS (Precise) - 5.3;
- 14.04 LTS (Trusty) - 5.5;
- 15.10 (Wily) - 5.6;
- 16.04 LTS (Xenial) - 7.0.
All packages are distributed through the official repository of the operating system, so you don't need to connect a third-party one. But the installation of the complete package is carried out in two versions and depends on the OS version. So, to install PHP on Ubuntu Server 16.04, run this command:
sudo apt-get install php
And for earlier versions:
sudo apt-get install php5
If you do not need all the components of the PHP package on your system, you can install them separately. How to do this and what commands you need to execute for this will be described below.
Apache HTTP Server module
To install PHP module for Apache on Ubuntu Server 16.04, you need to run the following command:
sudo apt-get install libapache2-mod-php
In earlier versions of the OS:
sudo apt-get install libapache2-mod-php5
You will be prompted for a password, after entering which you must give permission to install. To do this, enter the letter "D" or "Y"(depending on your Ubuntu Server localization) and click Enter.

To install the FPM module in operating system version 16.04, do the following:
sudo apt-get install php-fpm
In earlier versions:
sudo apt-get install php5-fpm
In this case, the installation will start automatically, immediately after entering the superuser password.

The CLI is necessary for developers who create console programs in PHP. To implement this programming language into it, in Ubuntu 16.04 you need to run the command:
sudo apt-get install php-cli
In earlier versions:
sudo apt-get install php5-cli

PHP extensions
To implement all possible PHP functions, it is worth installing a number of extensions for the programs you are using. The most popular commands for performing such an installation will now be presented.
Note: Below will be provided two commands for each extension, where the first is for Ubuntu Server 16.04 and the second is for earlier OS versions.

The trend towards PHP 7 is gaining momentum. Because it works faster (objectively!), It is more convenient for development (but it's not accurate, sort of).
The same WordPress has been able to work on new versions of PHP for a long time. And other popular CMS are not lagging behind. Therefore, it makes sense to transfer entire servers to this version. But there is a catch in that the software in the official repositories of Linux distributions is in no hurry to update. To install something new, as a rule, you need to hack with additional repositories. Surely there is no problem with this if you are using virtual hosting. But if you keep sites on your own servers or VPS, then you already need to bother yourself with updating and installing the latest PHP version. And since in 80% of cases the servers use the ISPmanager 5 control panel, we will talk about configuring PHP 7 in it. Why am I writing about this, and not the ISPsystem support? And xs, because in their manual nothing is said about it.
What PHP versions are installed on the Linux distributions by default?
Hosters usually offer such OS for installation on VPS or Dedicated Servers:
| OS version | Default PHP version |
| Debian 7 | PHP 5.4 |
| Debian 8 | PHP 5.6 |
| Centos 6 | PHP 5.3 |
| Centos 7 | PHP 5.4 |
| Ubuntu 14.04 | PHP 5.5 |
| Ubuntu 16.04 | PHP 7.0 |
Of course, there are other options, or vice versa, there may not be something from this list. But the newest versions - Debian 8, Centos 7 and Ubuntu 16.04 - will be available for almost any hosting company. Of these three, only the last one can boast of having PHP 7 installed. But it has other problems - it is relatively new and you can pick up some incomprehensible glitches and bugs in it. In my experience, Ubuntu servers can use LTS versions (just even 04) only 2 years after release. At the very least, this is easier than looking for a long time and identifying problems that, in principle, should not exist. I have experienced these several times with the performance of some software in the latest versions of Ubuntu.
About Ubuntu versions
About Ubuntu versions
In general, I'm a big fan of just ubuntu. For many years and many servers I have devoted to working with her. This is an excellent and convenient OS for sites on your server. But that was the corporate sector, where everything is collected, debugged and configured individually. However, when I started working with client servers from webmasters, I came across the fact that neither Ubuntu nor even Debian are as good as Centos, and Centos 7 in particular. It is also recommended by the developers of the ISPmanager control panel. In practice, in deb-based systems (ubuntu also refers to them), I encountered some glitches with this panel. With centos - almost never happened.
In general, this is a matter of ease of administration - there is practically no difference in the operation of the software, and even more so, there are practically no sites between them. No performance difference - even more so. But in installing and configuring software - the difference can already be decent.
In Debian and Ubuntu, the software comes with some basic settings during installation. It even starts and works right after the installation, it is added to startup. Centos doesn't have that. Configs by default, software does not start automatically and some must be pre-configured, otherwise it simply will not start. For example, the same DBMS servers - they are installed uninitialized. And they need to be initialized (create a system base) manually before starting.
The same PHP 7 - on centos it is easy to install it simply by adding an additional repository. At least in the 6th, at least in the 7th version. In ubuntu 14.04 or Debian php 7 is also installed from add. turnips. But it is put there parallel to the default heel. And to make the Apache work on it you need extra. customization. But when using ISPmanager 5, everything becomes much easier.
Install PHP 7 on Centos from Additional Repositories
I have used this method before. The fact is that the opportunity that I was going to tell you about appeared in ISPmanager relatively recently. Therefore, I had to install PHP 7 only from the Remi repository. There are others, but the best of it. ISPmanager has the ability to install alternative PHP versions. But they could previously only be used in CGI mode. And this mode is not suitable for everyone and not for any site. (). Previously, for Apache and PHP-FPM, system-wide PHP was used - which is called in the panel native. And his version coincides exactly with those that I gave in the plate at the beginning of the article. In particular, in Centos 7 it will be 5.4. So, if you update native to the required version, apache will work on it. This has been done before.
This is not difficult.
Download and install the Remi repository:
wget http://rpms.famillecollet.com/enterprise/remi-release-7.rpm
rpm -Uvh remi-release-7.rpm
We allow its use:
In file /etc/yum.repos.d/remi-php70.repo needed for the first turnip enable use - enabled must have a value of 1. By default, there is 0, which means the repository is not used. There is another way to enable it, using the package installer option, but I use this one, because it is easier to remember and easier to understand.

yum install -y php
This will update the native php to version 7.0. After the update, you can restart the panel so that it "sees" the update:
/ usr / local / mgr5 / sbin / mgrctl -m ispmgr exit
To do this, you just need to stop it like this from the console and restart it in the browser. Well, either you can not do this, in any case, php 7 is already on the server and it will be it that will be used in the Apache or php-fpm module mode. (By the way, you can do a lot from the console in general)
But this is the way - the so-called "crutch". For some time now, you should not use it.
Enabling PHP 7 as Apache module in ISPmanager 5 panel
Since with regular updates of the panel it became possible to use any version of PHP, from those that are installed as alternatives and were previously available only in CGI mode. The so-called PHP version selector. Awesome feature, I recommend using ISPmanager for just that. Nowhere else is there such convenience and simplicity. This is said by me, the administrator, who, without false modesty, ate a dog on setting up servers without panels, and now with panels. Only here you can easily and simply set your own version of PHP for each site - from the ancient 5.2, which was relevant when I had not really started working even, to the newest 7.1.
In the options menu, you need to install these same alternative versions. After that, it will be possible to use the selector for each site, but only in CGI mode.
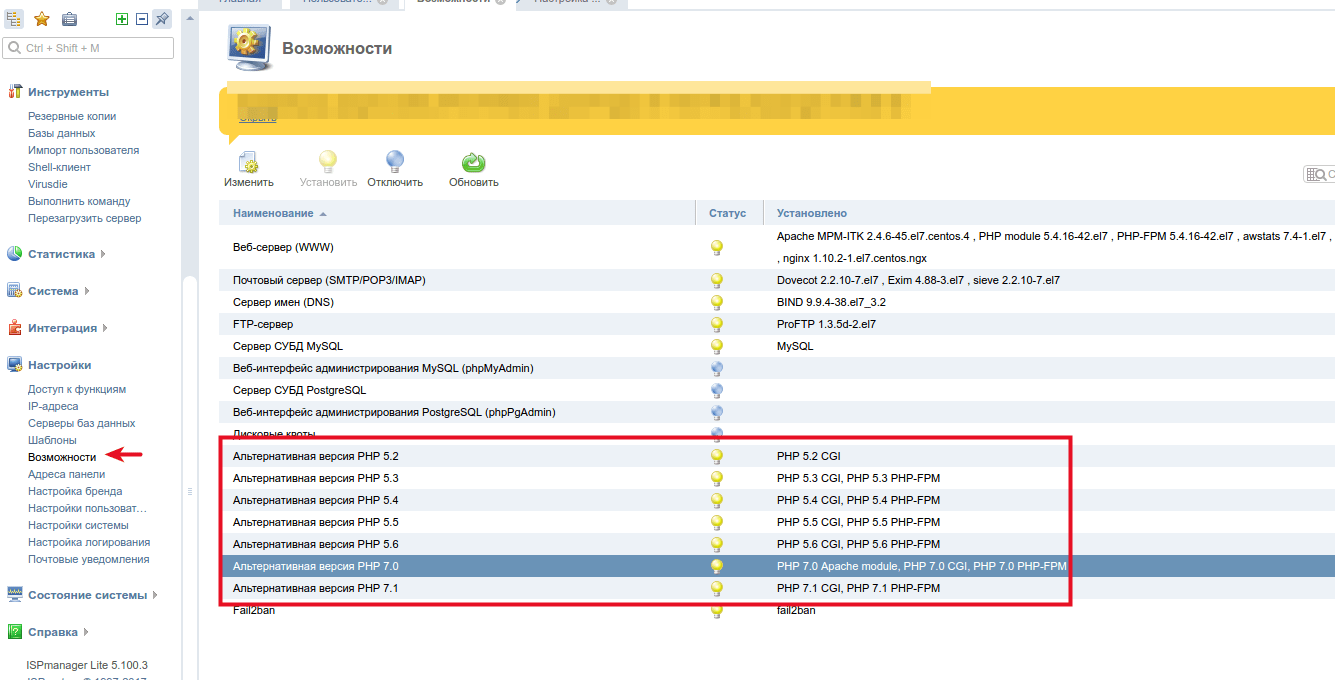
By default, alternate versions are only enabled for CGI and PHP-FPM modes (more recently).
But in the Apache module mode, you will not be able to launch these versions right away. The corresponding button in the PHP menu is simply grayed out.

For quite a long time I could not understand why this is so, and how to use this feature all the same. And I just installed the required version of PHP from remy, in the above described crutch way. Until today I asked the support - but where? Moreover, I previously conscientiously googled, found and read the official document on configuring PHP versions and found nothing in it.
It turned out that the chest opened simply:

You need to double-click on the required PHP version in the "Features" menu... In particular 7.0. And there is a corresponding option to install this version of php as an Apache module.
After that, go back to the PHP section and there the button becomes active for the required version.

Well, here I have already switched to the 7th version, so I show the active button on the native version 5.4.
This whole method above should work on both Debian and Ubuntu. In practice, I have not tested it yet. Check - unsubscribe pliz. But the "crutch" method in these OS will be even more crutch than in Centos, because there PHP 7 is installed in parallel with the 5th version and the system turns out TWO versions of native PHP. And here I would like to figure it out 🙂 That is why I recommend centos.
Enable an alternative version of PHP 7 for NGINX + PHP-FPM mode in ISPmanager 5
It's pretty simple. After installing the alternative version, it will be installed for PHP-FPM by default. It is enough to enable the required version in the user settings:
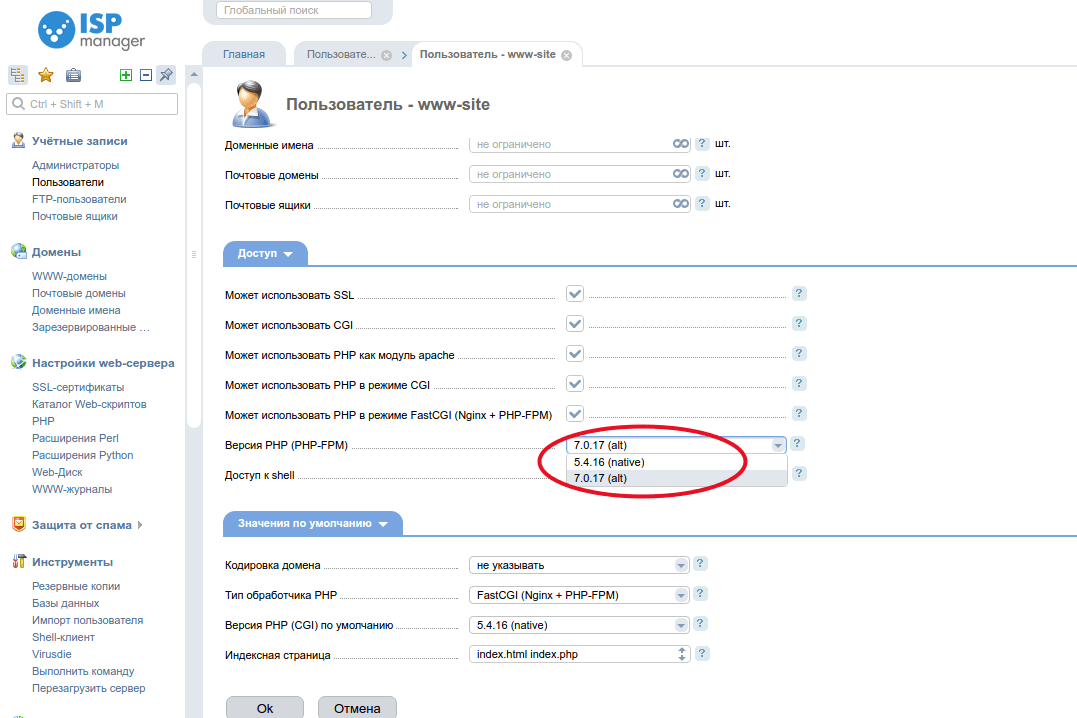
After that, all sites in PHP-FPM mode for this user will work in php7.
How to check the PHP version of a specific site and where to find its settings, php.ini file?
Sometimes, if you are using several versions of PHP on the server, you may have doubts that you are using the exact version that you were going to build. It is also a good idea to check the presence / absence of the required modules. Or PHP mode of operation - that this is exactly the apache module, and not cgi. A reliable and 100% working way to check this is to add the info.php file to the root of the desired site. Its content should be as follows:
phpinfo (INFO_MODULES);
Then go to site.com/info.php and see a complete breakdown of the issues in which you were tormented by doubts:

Moreover, please note that the main configuration file of the alternative PHP version included in this way is not at all where you expect. This can sometimes lead to long searches and misunderstanding why it is not possible to change this or that parameter in the PHP configuration. You look for it in /etc/php.ini, but the site uses php configured in a completely different place.
Use phpinfo in any unclear situation, it can save you a lot of time and nerves.
Well, that's all for me, sorted out with the practical admin part. Further, a little philosophy.
Why use PHP 7?
And the dick knows him. I am not a developer, I don’t understand all the charms. However, it has been noticed that it executes code noticeably faster than older versions. These are the results given in testing the work of drupal on PHP7 in probably a well-known study of PHP 7 and caches on Habré:
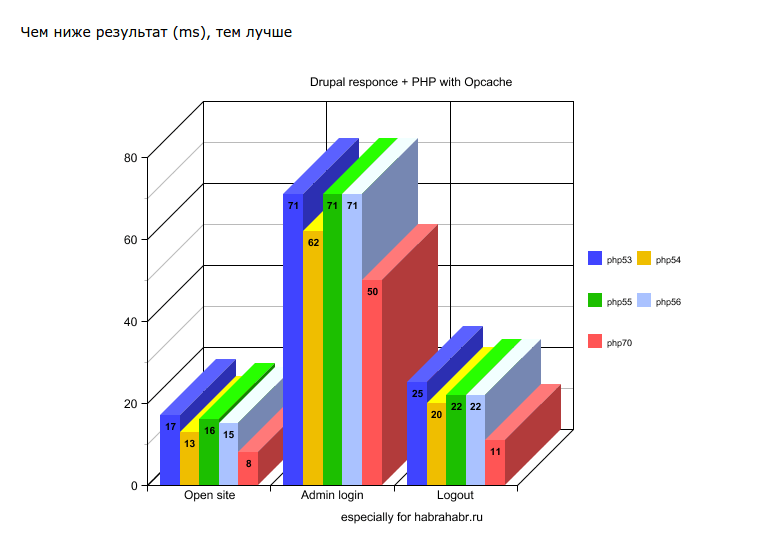
As you can see, it is almost 2 times faster than previous versions. For example, on a reference server with SSD, a reference empty WordPress will show about 400-500 milliseconds TTFB. But on php 7 with the opcache wp accelerator enabled and configured, it can work with a response time of 150-250 ms. Or it may not work 🙂 For you can put some awesome premium template from the template monster on it, and then fucking wonder why it is loaded for 3-5 seconds (this is only TTFB, but visually there are all 10-20 may be). And also to feel like a moron, because on the demo of developers everything flies, it opens in 100-200 ms. After all, you don't know that everything is cached to ebony, they don't need you to somehow interact with the site, you just need to sell it to you 🙂 And that wordpress itself does not even participate in page generation there - everything is done by nginx, and it is from the cache gives instantly. But this is so, a lyrical digression from a painful one.
In general, a lot of experience has accumulated on the topic of optimization and overclocking of response time, and someday I will most likely pour it on your heads, my dear readers 🙂 Moreover, optimization and acceleration of article writers is one thing, I have already written something about this. But on the topic of optimizing online stores and services, there is a separate conversation, and I think it should be especially interesting. So?
From the author: one friend (still that "crooked case master") decided to assemble the wardrobe on his own. As a result, after several hours of torment, he had only a table. Such a metamorphosis happened. In order not to find yourself in a similar situation, let's look at how to install PHP correctly.
What PHP won't work without
- not an ordinary language, but a server language. Because of this, simply installing a language interpreter won't be enough. For you to be able to execute the code on your personal computer, you need a local server.
There is enough of such goodness in the world wide web. We will not list the advantages and disadvantages of each of the servers. Instead, we'll describe the installation process of the time-tested Apache, which has long been associated with PHP development.
The history of this product is detailed on Wikipedia. Since the reliability of Apache has been proven by many years of "ruthless" use, it will not waste your precious time on proof. Let's try to independently install a PHP server on a PC running Windows.
Installing the "Indian"
Consider the step-by-step installation of an Apache Indian tribe server:
We go to Apache.org, in the menu on the right, click on "Download". After that, in the provided list of mirrors, select any and download the installation with the .msi extension (native format for Windows) and version no lower than 2.2
Since the project is open source, now many assemblies of this server have been "divorced". If you cannot find the specified one, go to this address. Native versions of Apache are available for download here on the mirror.

After downloading, we launch the installation package for execution. The installation procedure is standard: we agree to the terms of use, indicate the name of the domain and server, "soap" of the administrator. Then "Next".

Specify the directory where the Apache PHP server should be installed.

And we are waiting for the software installation process to go through. Go to the directory where you installed Apache. Find httpd.conf in the configuration folder and open it. Find the line "Deny from all" and comment on this directive. Thus, we remove the built-in server protection, which is not needed for local use of Apache. That is, we open access to all folders, including virtual ones. If this is not done, then the program, when trying to access any of the directories, will generate a "403" error.

Save all changes and restart the server.
Moving on to PHP
Go to php.net and download one of the "86" versions of the distribution kit (better protected). Then we unpack it in a separate folder on the same disk as the server. I will not fully describe all the language options that can be changed. You can read more about this in the accompanying technical documentation.
I would like to note that all PHP settings are set in the php.ini file. It opens with any editor (including Notepad). I will give a description of several commonly used parameters that are set through this file:
post_max_size - sets the maximum amount of data that can be processed at a time using the POST method.
upload_max_filesize is the maximum size of files that can be uploaded.
default_charset - using this parameter, you can set the default encoding to utf 8 in PHP.
Now, for complete happiness, it remains to register a few lines in httpd.conf. With these, we will connect PHP to the local server so that it works as an Apache module. This is quite enough for writing and testing code at home. These lines should be placed in the middle of the file:
LoadModule php5_module path to the PHP installation / php5apache2_2.dll - connects the library with which the distribution will be used as a module.
PHPIniDir "path to the php.ini / file" (for example, PHPIniDir "F: /php-5.3.5/") - understandable without words.
AddType application / x-httpd-php phtml php - configures the correspondence between PHP files and mime-type (application / x-httpd-php).
How is it? Setting up takes time, focus and skill. Have you ever thought that the easiest way is already assembled "closet". Although in our case, a cabinet means a ready-made software package, which includes PHP, a server, and a DBMS. It is clear that we are talking about Denver. Thanks to him, no "closet" will be able to turn under the "skillful" hands of a specialist into some kind of "table" or "bedside table".