 entrance
Interesting projects on arduino uno. Arduino: what you can do with it
Probably everyone has heard what is a digital drum machine or a beat machine. The electromechanical drum machine created by the Norwegian composer Koka Nikoladze is quite another matter. In it, the sound is formed due to mechanical action. The machine is powered by an Arduino, which allows you to program a melody for performance.
You've heard about Arduino and you want to figure it out as soon as possible in order to make your own device, robot or whatever else they have invented. You can blink the LED on the first evening, but it will take much longer to create a more complex gadget. There are many weeks and even months of studying C programming, searching for compatible libraries and modules, crutches and overcoming difficulties ahead. How to speed up the process? Start with an Arduino compatible board that can be programmed in JavaScript.
Original article in English http://www.bunniestudios.com/blog/?p=2407
The photo shows the finished printed circuit boards for Leonardo
The most interesting thing about the lamp is that it reacts to an approach with the help of a home-made, and in general, a very simple capacitive sensor. The main element of which is a sheet of foil. On this moment this assembly is just a prototype, and all the electronic components and the sensor (the same foil sheet) are not integrated into the lamp itself in any way, but the idea itself is very interesting.
Arduino, homemade glove with 5 wired bend sensors, 5 HITEC HS-81 servos and a mechanical arm. How it all works can be seen in the video. The Arduino reads data from the bend sensors and controls the servo motors so that the mechanical hand follows the movements of the human hand. By the way, in the first video, the author uses a ready-made set of hand mechanics, which can be bought on ebay, albeit without electronic components and drives. In another project, the author made a similar hand from scrap materials.
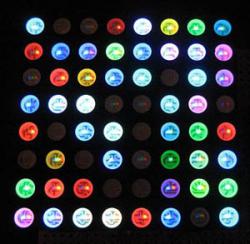 In this project, I will show you how you can connect an 8x8 full color LED matrix to an Arduino. The matrix itself has 32 inputs: 8 anodes, 8 red cathodes, 8 green and 8 blue. In this case, only 3 outputs to the Arduino will be used to control the matrix. There is no magic here, but there are 4 74HC595 shift registers.
For more information on using the 74HC59 with an Arduino, see Using the 74HC595 Shift Register to Increase the Number of Outputs.
One register gives us 8 outputs, since our matrix has 32 inputs, the project uses the technique of cascading shift registers. We need 4 registers 74HC59, while the number of connections to the Arduino will not change and 3 outputs to the Arduino will be used. For driving. Power is supplied via USB, but you can also connect standalone.
 Shooting fast-moving processes, such as a drop falling, an explosion of a balloon, is a very difficult task. It is almost impossible to guess the exact moment when you need to press the shutter release without special devices. No, you can, of course, make a hundred attempts, and at some point, luck will turn to you. But you can do without hundreds of balls. This is where the Arduino comes in. The following describes the process of constructing an Arduino-based auto trigger that responds to sound or laser intercept.
Strictly speaking, the Arduino will not control the camera shutter, but the flash. Unfortunately, the delay in the reaction of the camera to the signal is in the region of 20 milliseconds, which is not noticeable to the human eye, but still longer than one can afford when shooting a bursting balloon. Therefore, shooting is carried out in a dark room with a shutter speed of 10 seconds, but the flash fires exactly at the right moment. Since there is practically no lighting in the room, the entire exposure of the photograph will take place exactly at the moment of the flash operation (about 1 millisecond).
All about arduino and electronics!
Arduino- a trade mark of hardware and software for building simple automation and robotics systems, aimed at non-professional users. Software part consists of a free software shell (IDE) for writing programs, compiling them and programming hardware. Hardware part is a set of pre-assembled PCBs sold as official manufacturer and third-party manufacturers. The completely open architecture of the system allows you to freely copy or add to the Arduino product line.
The name of the platform comes from the name of the eponymous glass-house in Ivrea, which was often visited by the founders of the project, and this name, in turn, was given in honor of the King of Italy, Arduin of Ivrea.
Arduino can be used both to create autonomous automation objects and connect to software on a computer via standard wired and wireless interfaces
Why visit exhibitions? At a good Expo you can always see what awaits us in the near future, what trends and trends will be relevant in the next six months. Hong Kong Electronics Fair - just one of such exhibitions, where exhibitors demonstrate what they are capable of, and we, the guests of the event, get acquainted and actively test products, evaluate them and decide what will become a hit, what simply deserves interest, and what is doomed to lie unattended at the stand. Let us remind you that all this is being held under the roof of the most beautiful exhibition center in Hong Kong - Hong Kong Convention & Exhibition Center.
The AD8232 is a small chip board used to measure pulses of electrical activity from the heart. This electrical activity can be referred to as an EKG or electrocardiogram. Electrocardiography is used to diagnose various heart conditions.
The heart's electrical system controls the generation and propagation of electrical signals through the heart muscle, causing the heart to periodically contract and relax, pumping blood. In the course of the heart cycle, an orderly process of depolarization occurs. Depolarization is an abrupt change in the electrical state of a cell, when the negative internal charge of the cell becomes positive for a short time. In the heart, depolarization begins in specialized pacemaker cells in the sinus-atrial node. Further, the excitation wave propagates through the atrioventricular (atrioventricular) node down to the bundle of His, passing into the Purkinje fibers and then leads to a contraction of the ventricles. Unlike other nerve cells, which are unable to generate an electrical signal in a self-oscillating mode, the cells of the sinus-atrial node are able to create a rhythmic electrical signal without external influence. More precisely, external influences (for example, physical activity) affect only the oscillation frequency, but are not needed to start this "generator". In this case, periodic depolarization and repolarization of pacemaker cells occurs. The pacemaker also has a stable frequency generator that acts as the sinus-atrial node. Living cell membranes act as condensers. Due to the fact that the processes in cells are electrochemical, and not electrical, depolarization and repolarization in them occur much more slowly than in a capacitor of the same capacity.
This material will provide an example of how to use several 18b20 + temperature sensors, add the required amount and perform remote monitoring using the esp8266 nodemcu board and the blynk application. This material will be useful if you need to remotely take several temperature readings for monitoring.
Do you want to play video games from your childhood? Tanchiki, Contra, Chip and Dale, Teenage Mutant Ninja Turtles ... All these games are waiting for you! In this guide, you will learn how to quickly and easily assemble and configure a retro console based on a Raspberry Pi microcomputer and build RetroPie emulators.
A correspondingly shaped interactive snowflake created by Arduino Nano. Using 17 independent PWM channels and touch sensor for triggering and effects.
The snowflake consists of 30 LEDs, grouped into 17 independent segments, which can be controlled separately by the Arduino Nano microcontroller. Each block is driven by a separate PWM pin, and adjusts the brightness of each LED block and effects separately.
In this article, I decided to collect a complete step by step guide for Arduino beginners. We will analyze what an arduino is, what you need to start learning, where to download and how to install and configure the programming environment, how it works and how to use a programming language, and much more that is needed to create full-fledged complex devices based on the family of these microcontrollers.
Here I will try to give a concise minimum so that you understand the principles of working with the Arduino. For a more complete immersion in the world of programmable microcontrollers, pay attention to other sections and articles on this site. I will leave links to other materials on this site for a more detailed study of some aspects.
What is Arduino and what is it for?
Arduino is an electronic designer that allows anyone to create a variety of electro-mechanical devices. Arduino consists of software and hardware. Software part includes a development environment (a program for writing and debugging firmware), many ready-made and convenient libraries, a simplified programming language. The hardware part includes a large line of microcontrollers and ready-made modules for them. This makes working with the Arduino very easy!
With the help of arduino, you can learn programming, electrical engineering and mechanics. But this is not just a teaching constructor. Based on it, you can make really useful devices.
Beginning with simple flashing lights, weather stations, automation systems and ending with the system smart home, CNC machine tools and unmanned aerial vehicles. The possibilities are not even limited by your imagination, because there is great amount instructions and ideas for implementation.
Arduino Starter Kit
In order to start learning Arduino, you need to acquire the microcontroller board itself and additional details. It is best to purchase an Arduino starter kit, but you can also choose everything you need yourself. I advise choosing a set because it is easier and often cheaper. Here are the links to best sets and on individual details that will definitely come in handy for you to study:
| Basic arduino set for beginners: | Buy |
| A large set for training and first projects: | Buy |
| A set of additional sensors and modules: | Buy |
| Arduino Uno is the most basic and convenient model from the line: | Buy |
| Solderless breadboard for easy learning and prototyping: | Buy |
| A set of wires with convenient connectors: | Buy |
| LED set: | Buy |
| Resistor kit: | Buy |
| Buttons: | Buy |
| Potentiometers: | Buy |
Arduino IDE
To write, debug and upload firmware, you need to download and install the Arduino IDE. It is very simple and convenient program... On my site, I have already described the process of downloading, installing and setting up the development environment. So here I will just leave links to latest version programs and
| Version | Windows | Mac OS X | Linux |
| 1.8.2 |
Arduino programming language
When you have a microcontroller board in your hands and a development environment is installed on your computer, you can start writing your first sketches (firmware). To do this, you need to familiarize yourself with the programming language.
A simplified version of the C ++ language with predefined functions is used for Arduino programming. As in other C-like programming languages, there are a number of rules for writing code. Here are the most basic ones:
- Each instruction must be followed by a semicolon (;)
- Before declaring a function, you must specify the data type returned by the function or void if the function does not return a value.
- It is also necessary to specify the data type before declaring the variable.
- Comments are denoted: // Inline and / * Block * /
You can find out more about data types, functions, variables, operators and language constructions on the page by You do not need to memorize and memorize all this information. You can always go to the reference book and see the syntax of this or that function.
All firmware for Arduino must contain at least 2 functions. These are setup () and loop ().
Setup function
In order for everything to work, we need to write a sketch. Let's make it so that the LED lights up after pressing the button, and after the next pressing it goes out. Here's our first sketch:
// variables with pins of connected devices int switchPin = 8; int ledPin = 11; // variables for storing the state of the button and the LED boolean lastButton = LOW; boolean currentButton = LOW; boolean ledOn = false; void setup () (pinMode (switchPin, INPUT); pinMode (ledPin, OUTPUT);) // function to suppress bounce boolean debounse (boolean last) (boolean current = digitalRead (switchPin); if (last! = current) (delay (5); current = digitalRead (switchPin);) return current;) void loop () (currentButton = debounse (lastButton); if (lastButton == LOW && currentButton == HIGH) (ledOn =! LedOn;) lastButton = currentButton ; digitalWrite (ledPin, ledOn);)
// variables with pins of connected devices int switchPin = 8; int ledPin = 11; // variables for storing the state of the button and LED boolean lastButton = LOW; boolean currentButton = LOW; boolean ledOn = false; void setup () ( pinMode (switchPin, INPUT); pinMode (ledPin, OUTPUT); // function to suppress bounce boolean debounse (boolean last) ( boolean current = digitalRead (switchPin); if (last! = current) ( delay (5); current = digitalRead (switchPin); return current; void loop () ( currentButton = debounse (lastButton); if (lastButton == LOW && currentButton == HIGH) ( ledOn =! ledOn; lastButton = currentButton; digitalWrite (ledPin, ledOn); |
In this sketch I created additional function debounse to suppress contact bounce. There is a bounce of contacts on my website. Be sure to read this material.
PWM Arduino
Pulse width modulation (PWM) is the process of controlling voltage using the duty cycle of a signal. That is, using PWM, we can smoothly control the load. For example, you can smoothly change the brightness of the LED, but this change in brightness is obtained not by decreasing the voltage, but by increasing the intervals of the low signal. The principle of operation of PWM is shown in this diagram:

When we apply PWM to an LED, then it starts to quickly light up and go out. Human eye unable to see it because the frequency is too high. But when filming on video, you will most likely see moments when the LED is off. This will happen provided that the camera frame rate is not a multiple of the PWM frequency.
The Arduino has a built-in pulse width modulator. You can use PWM only on those pins that are supported by the microcontroller. For example, Arduino Uno and Nano each have 6 PWM pins: these are pins D3, D5, D6, D9, D10 and D11. Other boards may have different pins. You can find a description of the board you are interested in in
To use PWM in Arduino there is a function It takes as arguments a pin number and a PWM value from 0 to 255.0 is 0% filling with a high signal, and 255 is 100%. Let's write a simple sketch as an example. Let's make it so that the LED lights up smoothly, waits for one second and fades out just as smoothly, and so on ad infinitum. Here's an example using this function:
// The LED is connected to pin 11 int ledPin = 11; void setup () (pinMode (ledPin, OUTPUT);) void loop () (for (int i = 0; i< 255; i++) { analogWrite(ledPin, i); delay(5); } delay(1000); for (int i = 255; i >0; i--) (analogWrite (ledPin, i); delay (5);))
// LED is connected to pin 11 int ledPin = 11; void setup () ( pinMode (ledPin, OUTPUT); void loop () ( for (int i = 0; i< 255 ; i ++ ) { analogWrite (ledPin, i); delay (5); delay (1000); |
Collected the best and even crazy Arduino projects that we met in 2015.
Arduino Wake-Up Machine
Breaking Combination Locks with Arduino
This Arduino controlled mechanism can open any combination lock in less than 30 seconds. The hacker project Samy Kamkar has demonstrated the vulnerability.
Robot sorting Skittles
A 3D printed Arduino robot project that can save you the time it takes to sort Skittles. Perhaps the biggest disappointment is that the mechanism is not universal and fits M & M's. Video and more detailed description
Protopiper - prototyping gadget
An amazing prototyping gadget. Tired of running with a tape measure? With this device, you can quickly sketch a room-sized sketch.
Open Source Snow Blower
Laziness is the engine of progress in many cases. Shovel snow? You need a robot for this job. Perhaps the snow blower sellers will not like this project, because the author believes that everyone can independently make one for themselves. ...
Blaster for switching music
Everyone has different tastes in music. But it so happens that the music is just awful. No one in the company likes her. It happens. If your dream and such moments are to shoot a pistol and change the music ... then know that the project has been implemented, dreams come true.
Give your hair more power
You can discreetly send messages, launch applications, broadcast your position - all this can be done by gently stroking your hair - this is so natural for girls.
Knit with Arduino
To knit, you do not have to contact your grandmother or buy professional equipment. DIY robot that knits using Arduino.
BB-8 Robot on Arduino
A project for those who dream of making a BB-8 robot from Star Wars.
Ok Google, Sesame, open the door
In this project, an MIT student implemented a door opening using a voice google teams Now. To get into the house, you just need to say: "Sesame, open up." Video and description of the project.

A typewriter playing a symphony
The 1960 typewriter became not only a printer, but also a musical instrument.
AT-AT robot
Controlled AT-AT robot from Star Wars.
T-800 Robot from Terminator
There are many Terminator movie fans in the world, but few have recreated the T-800 robot. You can read more about the project and watch the video.

Robot minion egg from Kinder surprise
A fun homemade robot that you can make yourself. More details about the project.
Controlling your TV with your mind
The TV remote control is no longer needed. All you have to do is think about changing the channel. The project uses a chip from the game Star Wars Force Trainer ( star Wars) released in 2009. More details.
Most electronics engineers prefer to build their projects on the basis of a microcontroller, which we have already written about several times. In the article below, we will consider simple designs of electronic devices for beginners and the most unusual projects based on the mentioned microcontroller.
Features of projects on Arduino uno
To begin with, you should get acquainted with the functionality of the Arduino uno microprocessor, on which most projects are built, and also consider the reasons for choosing this device. The following are the factors on which a novice inventor should stop at Arduino uno:
- Quite easy to use interface. It is clear where which contact is, and what to attach the connecting wires to.
- The chip on the board plugs directly into the USB port. The advantage of this setup is that serial communication is a very simple protocol that is time-tested, while USB makes a connection with modern computers very convenient.
- It is easy to find the central part of the microcontroller, which is the ATmega328 chip. It has more hardware features like timers, external and internal interrupts, PWM pins, and multiple sleep modes.
- Open device source code, so a large number of radio amateurs can fix bugs and problems in software... This makes it easier to debug projects.
- The clock speed is 16 MHz, which is fast enough for most applications and does not speed up the microcontroller.
- It is very convenient to control the power inside it, and it has built-in voltage regulation function. Also, the microcontroller can be disconnected from the USB port without an external power source. You can connect external source power supply up to 12 V. Moreover, the microprocessor itself will determine the required voltage.
- Availability of 13 digital contacts and 6 analog contacts. These pins allow you to connect hardware to the Arduino uno board from a third party carrier. The pins are used as a key to extend the computational ability of the Arduino uno in the real world. Just plug your electronics and sensors into the connectors that match each of these pins.
- An ICSP header is available to bypass the USB port and interface with the Arduino directly as a serial device. This port is required to reboot the chip if it is damaged and can no longer be used on your computer.
- 32KB flash memory for storing developer code.
- The on-board LED connects to digital pin 13 for quick code debugging and simplification.
- Finally, it has a button to reset the program on the chip.
Arduino was created in 2005 by two Italian engineers, David Quartilles and Massimo Banzi, with the goal of teaching students how to program the Arduino uno microcontroller and improve their electronics skills and use them in the real world.
Arduino uno can sense the environment by receiving input from various sensors, and is capable of influencing the environment and other actuators. The microcontroller is programmed using the Arduino programming language (wiring based) and the Arduino development environment (processing based).
Now let's go directly to projects on Arduino uno.
The easiest project for beginners
Consider a few simple and interesting projects Arduino uno, which even beginners in this business can do - an alarm system.
We have already done a lesson on this project -. Briefly about what is being done and how.
This project uses a motion sensor to detect motion and high-pitched emissions, as well as a visual display consisting of flashing LED indicators. The project itself will introduce you to a few of the add-ons that come with the Arduino Starter Kit, as well as the nuances of using NewPing.
It is an Arduino library that helps you monitor and test your sonar distance sensor. While not entirely complete home protection, it offers the ideal solution for protecting small spaces such as bedrooms and bathrooms.
For this project you will need:
- Ultrasonic ping sensor - HC-SR04.
- Piezo buzzer.
- LED Strip Light.
- Automotive lighting with RGB tape. In this Arduino project guide, you will learn how to make RGB car interior lighting using Arduino uno board.
Many car enthusiasts like to add extra lights or upgrade interior bulbs to LEDs, however, on the Arduino platform, you can enjoy more control and detail by driving powerful LEDs and light strips.
You can change the color of the lighting with Android devices(phone or tablet) using the application " Bluetooth RGB Controller»(Dev Next Prototypes), which you can download for free from Android Play Store. Also you can find an electronic EasyEDA circuit or order your own Arduino based circuit on a PCB.
Amazing projects on Arduino Uno
Most professionals in the field of electronic project development on Arduino uno love to experiment. As a result, interesting and amazing devices appear, which are discussed below:
- Adding an IR remote control to speaker system ... V consumer electronics remote controller remote control is a component electronic device such as a TV, DVD player or other household appliance used to control the device wirelessly from a short distance. The remote control is, first of all, convenient for humans and allows you to work with devices that are not suitable for direct operation of the controls.
- Alarm... The real time clock is used to obtain accurate time. Here, this system displays the date and time on the LCD and we can set the alarm using the control buttons. As soon as the alarm time comes, the system beeps.
- Stepper motor... means a precise motor that can be rotated one step at a time. Such a device is made using robotics, 3D printers and CNC machines.
For this project, grab the cheapest stepper motor you can find. Engines are available online. This project uses a 28byj-48 pedometer which is suitable for most other similar projects. It is easy to connect it to the Arduino board.
- You will need 6 cables with female to male connectors. You just need to connect the motor to the board and that's it! You can also add a small piece of tape to the rotating head to see that it rotates. - Ultrasonic distance sensor... This design uses a popular one so that the device can avoid obstacles and move in different directions.

When you finish your work, the result of your actions will appear on the screen. To keep things simple and straightforward, it is recommended to use an LCD with an I2C converter, so you only need 4 cables to connect to the Arduino board.