 entrance
Connect two hard drives at the same time. Connecting two hard drives
Friends, I can explain to you in a nutshell why this happens, for example, you installed Windows 8 on one hard drive, and then Windows 7 on another, so Windows 8 commands the loading of both operating systems and all the files responsible for loading are in it, if You remove it or dismantle the disk on which it is installed from the system unit, then you will no longer boot Windows 7. Why? Because...
1. The partition from which the operating system is loaded is not active.
2. Or the partition from which the operating system is being loaded is active, but there are no operating system boot files on it. For Windows 7, 8, the bootmgr file and the Boot folder with boot configuration (BCD) files.
4. If you permanently disconnected one hard drive, then restore the download remaining on the second Windows disk 7, 8.1, 10 is possible according to our article.
5. Also you can produce.
Note: The EasyBCD 2.0.2 boot manager is best used if you have two or three operating systems installed on the same hard drive.
- If you want to install several operating systems with independent bootloaders on different hard drives, then you need to do everything so that each installed Windows does not know anything about its neighbor located on another hard drive installed in the same system unit. That's all. Another question, how to do it and how to manage computer boot afterwards? The answer is yes, very simply.
Look at my working system unit, it has four hard drives and operating systems are installed on all hard drives, they all start and work being in the system unit together or one at a time. There are no special boot managers installed on any system: EasyBCD 2.0.2 or MultiBoot.
SiliconPower SSD (120GB) - Windows 8 installed
SSD ADATA SSD S510 (60GB) - Windows XP installed
Kingston HyperX 3K SSD (120 GB) - Windows 7 installed
Western Digital Caviar Blue (250 GB) Simple Hard Drive - Installed Ubuntu Linux


The secret is simple, install any operating system on the computer, then simply disconnect from system block hard drive with this Windows and connect another hard drive and install another operating system on it, if you have a third hard drive, do the same with it. And now the most important thing, when you install everything and connect all the hard drives to the system unit, how to manage the loading of operating systems?
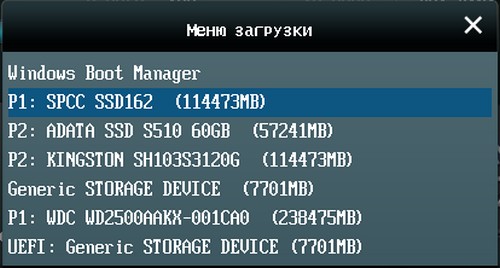
If there are several hard drives in the system, the BIOS (AMI) parameter appears hard drive drives,

And in BIOS (Award) parameter Hard Disk Boot Priority,

In BIOS UEFI option Hard Drive BBS Priorities, all of them are responsible for the supremacy or priority of hard drives in the system.

If in any of the above parameters the first is a certain hard disk, then the computer will boot from it first of all by default, since it is the main one. But to quickly change the priority of the hard drive, it is not at all necessary to climb into the BIOS every time and look for these parameters, you can make everything easier.
Press the Delete or F8 key at boot and enter the boot menu, then use the arrows on the keyboard to select the hard disk with the operating system you need and press Enter, the Windows you selected will load.

If you most often use a particular operating system, then you need to make it bootable by default.
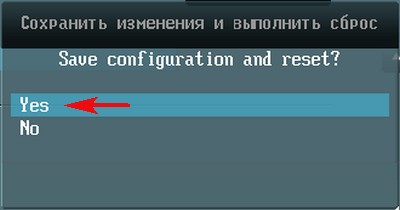
Boot option #1 is that hard drive operating system which is loaded by default first. Click on the parameter with the left mouse

And in the menu that appears, select the hard drive with the Windows we need. For example, I will choose a SiliconPower SSD with installed Windows 8 as it is my primary operating system.


And yes, the computer restarts and boots Windows 8 on my chosen SiliconPower SSD hard drive.
If during the day I suddenly need Windows XP, then I reboot, press Delete, enter the boot menu and select the hard drive with Windows XP installed and that's it.
Good day.
For many users, one disk is often not enough for daily work on a laptop. There are, of course, different options for resolving the issue: buy an external HDD, flash drive, etc. media (we will not consider this option in the article).
And you can install second hard disk (or SSD (solid state)) instead of a drive for optical discs. For example, I very rarely use it (over the past year I have used it a couple of times, and if it weren’t for it, I probably wouldn’t remember about it).
In this article I want to analyze the main questions that may arise when connecting a second drive to a laptop. So…
1. Selecting the desired "adapter" (which is placed instead of the drive)
This is the first question and the most important! The thing is, many people don't realize that thickness disk drives in different laptops can be different! The most common thicknesses are 12.7mm and 9.5mm.
To find out the thickness of your drive, there are 2 ways:
1. Open some utility, such as AIDA ( free utilities: ), then find out the exact model of the drive in it, and then find its characteristics on the manufacturer's website and look at the dimensions there.
2. Measure the thickness of the drive by removing it from the laptop (this is a 100% option, I recommend it so as not to be mistaken). This option is discussed below in the article.
By the way, please note that such an “adapter” is correctly called a little differently: “Caddy for Laptop Notebook” (see Fig. 1).

Rice. 1. Laptop adapter for installing a second drive. 12.7mm SATA to SATA 2nd Aluminum Hard Disk Drive HDD Caddy for Laptop Notebook)
2. How to remove the drive from a laptop
This is done quite simply. Important! If your laptop is under warranty, such an operation may result in a denial of warranty service. Everything you do next - do at your own peril and risk.
1) Turn off the laptop, disconnect all wires from it (power, mice, headphones, etc.).
2) Turn it over and remove the battery. Usually its fastening is a simple latch (there can sometimes be 2 of them).
3) To remove the drive, as a rule, it is enough to unscrew 1 screw that holds it. In a typical laptop design, this screw is located approximately in the center. When you unscrew it, it will be enough to slightly pull on the drive housing (see Fig. 2) and it should easily “move out” of the laptop.
I emphasize, act carefully, as a rule, the drive comes out of the case very easily (without any effort).

Rice. 2. Notebook: drive mount.
4) It is desirable to measure the thickness using a compass rod. If it is not there, you can use a ruler (as in Fig. 3). In principle, to distinguish 9.5 mm from 12.7 - the ruler is more than enough.

Rice. 3. Measuring the thickness of the drive: you can clearly see that the drive is about 9mm thick.
Connecting a second drive to a laptop (step by step)
To begin with, I want to pay attention to 2 nuances:
Many users complain that the laptop is somewhat lost appearance after installing such an adapter. But in most cases, the old socket from the drive can be carefully removed (sometimes small screws can hold it) and installed on the adapter (red arrow in Fig. 4);
Before installing the disk, remove the stop (green arrow in Fig. 4). Some push the disk "from above" at an angle without removing the stop. Often this leads to damage to the contacts of the disk or adapter.

As a rule, the disc fits into the adapter socket quite easily and there are no problems with installing the disc into the adapter itself (see Fig. 5).

Rice. 5. Installed SSD drive into the adapter
Problems often arise when users try to install the adapter in place optical drive into a laptop. Most often the problems are:
An incorrect adapter was chosen, for example, it turned out to be thicker than needed. Pushing the adapter into the laptop by force is fraught with breakage! In general, the adapter itself should “slide” into the laptop as if on rails, without the slightest effort;
On such adapters you can often find expansion screws. In my opinion, there is no benefit from them, I recommend removing them immediately. By the way, it often happens that it is they who rest against the laptop case, preventing the adapter from being installed in the laptop (see Fig. 6).

If everything is done carefully, then the laptop will have its original appearance after installing the second disk. Everyone will "assume" that the laptop has a drive under optical discs, but in fact there is another HDD or SSD (see Fig. 7) ...

Rice. 7. The adapter, together with the disk, is installed in the laptop
I recommend after installing the second disk, go to laptop BIOS and check if the disk is defined there. In most cases (if the installed drive is working and there were no problems with the drive before), the BIOS correctly detects the drive.
How to enter the BIOS (keys to to different manufacturers devices):

Summing up, I want to say that the installation itself is a simple matter, anyone can handle it. The main thing is not to rush and act carefully. Often problems arise due to haste: at first they didn’t measure the drive, then they bought the wrong adapter, then they began to install it “by force” - as a result, the laptop was taken for repair ...
That's all for me, I tried to make out all the "pitfalls" that may be when installing the second disk.
The ability to connect additional hard drives will be very useful to you if there is not enough free disk space on the already installed ones. Connect HDD to personal computer can:
- Installed in the system unit using standard SATA connectors on motherboard.
- By installing it in the system unit using the SAS connectors of the RAID controller.
- Using a USB-SATA adapter.
It is interesting! predecessorSATA was the interfaceATA (other name -IDE). The difference lies in the method of data transmission - serial transmissionSATA ParallelATA. It is generally accepted that serial transmission is faster, however, for the average user, the difference is imperceptible.
SATA
Step 1. Remove the case cover of your system unit.
Step 2 Connect the data cable to the connector on the motherboard.
On a note! The slot number is not important. Boot Definition hard drive occurs according to the software installed on it.

Step 3 Connect the data cable to the connector on the hard drive.

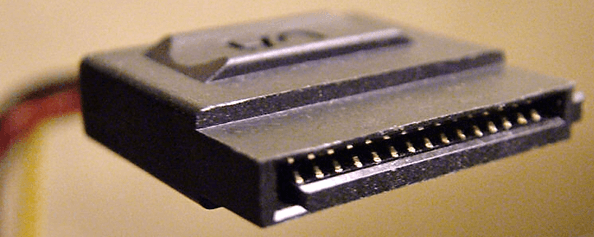
Step 4 Connect the power cable to the hard drive connector.

Important! When connecting the cable, the computer's power must be turned off. When connecting a cable with voltage applied to it, there is a high risk of damage to the hard disk controller, or the controllerSATA motherboard! In the event that your power supply has power connectors only for hard drivesIDE, use a special adapter.

Step 5 Secure the hard drive to the case with screws.

Important! Make sure that the cables do not come into contact with the fan blades of the system unit.
In the event that you are using a 2.5-inch drive, use a special sled to secure the hard drive inside the system unit more tightly.

Connecting a hard drive inside the case to the connectorsSAS
These connectors are backward compatible, that is, SATA can be connected to SAS, but SAS cannot be connected to SATA.
Step 1. Install the hard drive in a special construct (sled) of the appropriate size.
On a note! The designs are designed for certain form factors, that is, inserting a 2.5-inch drive into the controller basket of 3.5-inch hard drives will not work.

Step 2 Insert the sled into the controller basket and slide in until the sled handle locks into position.

Important! Don't forget to check the cable connectionRAID to the motherboard and change your controller settings.

Connecting a 3.5" Hard Drive Using an Externally Powered Adapter
Step 1. Attach the adapter to the hard drive.

Step 2 Connect the adapter and desired port your computer with a USB cable.

Step 3 Connect the power cable to the adapter.

Step 4 Apply power to the adapter by switching the toggle switch to the working position.

Step 5 If necessary, install drivers for the connected equipment.
Connecting a 2.5" Hard Drive Using a 3.5" Adapter
2.5" drives are commonly used in laptops. The connectors are no different from the 3.5 disk connectors, but the laptop hard drive is attached to the case using a special basket (sled).

Step 1. Remove the sled or other constructs from your hard drive.

Step 2 Follow the instructions for connecting a 3.5 hard drive with an adapter.
Connecting a 2.5" hard drive using the appropriate adapter
When using a special adapter for 2.5 hard drives, you do not need to remove the sled. As a rule, such adapters do not have external power supply, and receive voltage from the computer's USB port.

Step 1. Connect the adapter to the hard drive.

Step 2 Plug both ends of the adapter's USB cable into ports on your computer.
Important! Two ends of the cable are needed because information is transmitted through one of them, and the adapter is powered through the second.
Video - How to connect a hard drive
Conclusion
We have considered three different ways connecting hard drives with SATA connectors to a personal computer. Each of them requires the purchase of additional equipment, at least loops. In the event that you decide to use a SATA drive as an external one (connected via a USB adapter), it is recommended to purchase a reliable protective case for disk. When using the device, the cover should be removed to avoid overheating. Some Options hard drives working with different technologies are presented in the pivot table.
| Name | Data transfer rate, Mb/s | Number of devices per port |
|---|---|---|
| IDE (ATA) | 133,5 | 2 |
| SATA R.1 | 150 | 1 |
| SATA R.2 | 300 | Up to 15 |
| SATA R.3 | 600 | Up to 16 |
| SAS R.150 | 150 | Up to 4 |
| SAS R.300 | 300 | Up to 4 |
| SAS R.600 | 600 | Up to 4 |
Sooner or later, any user is faced with the fact that his data no longer fit on the existing hard drive. The solution to this problem can be a second hard drive. In this article, we'll show you how to install a second hard drive on your computer.
Step #1: Prepare your computer for installing a second hard drive.
First you need to prepare your computer. First, you need to de-energize it and disconnect all cables from it. A simple shutdown using the button on the power supply is not enough; the computer must be completely disconnected from the power supply.
Secondly, you need to open access to the insides of the system unit. To do this, remove both side covers. Usually, the side covers are fixed to the back of the system unit with four screws. Loosen these screws and carefully remove both side covers.
Step #2. Installing a second hard drive and fixing it.
After the computer is completely disconnected from the power supply and the side covers are removed, you can proceed to install a second hard drive. Hard drives are installed in a special compartment of the system unit. Defining this compartment is quite simple. It is located at the bottom right side system unit, and its width is exactly suitable for 3.5 inch hard drives.
In inexpensive computer cases, this compartment is usually turned with a hole towards the motherboard (as in the photo below). In more expensive models computer cases the hard drive bay is turned towards the side cover.
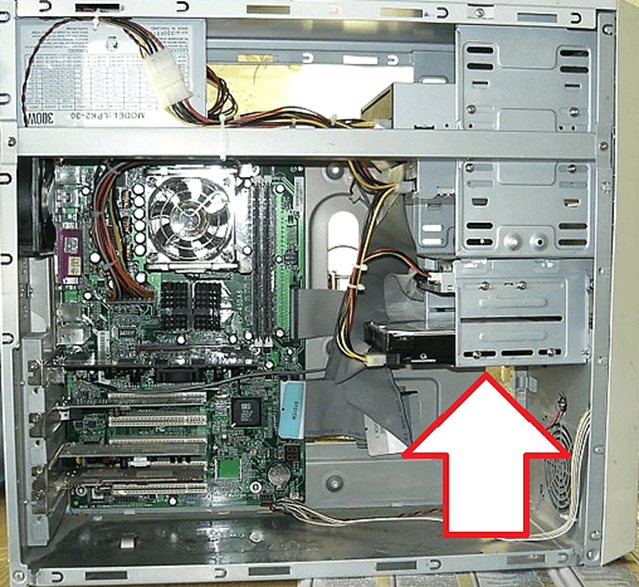
During installation of a hard disk system unit is best kept in an upright position. Insert the hard drive into the hard drive bay (as in the photo below). In some cases, in order for the hard drive to enter the bay without problems, you will need to remove the video card or RAM. You can read about how this is done in our articles: and. If your system unit has a lot of space for hard drives, then try to install a second hard drive away from the first. This will keep them cool better.

Once the second hard drive is installed in the hard drive bay, it must be secured with four screws, two on each side of the hard drive (see photo below). You should not save screws and fix the hard drive with only two or three. In this case, it will vibrate and make a lot of noise.

Step #3. Connecting a second hard drive to the computer.
After the second hard drive is installed in the computer and securely fixed, you can proceed to it. Hard drives are connected using two cables: one cable goes to the motherboard (data is transferred through this cable), and the other to the power supply (it is used for power supply).
A cable is used to connect the hard drive to the motherboard (see photo below). This cable is usually supplied with motherboard. If you do not have such a cable, then you can buy it separately.

A cable with a similar connector is used to connect the hard drive to power. (photo below).
If you have difficulty connecting a second hard drive to your computer, then look at how the first hard drive was connected and proceed by analogy.
Step number 4. We assemble the system unit.
After the hard drive has been installed, securely fixed and connected, the system unit can be closed. Replace the side covers and secure them with the screws. After installing the side covers, the computer can be connected to the power supply and started. If everything was done correctly, then after starting the computer, a second hard drive will appear in the system.
We live in an amazing time. Technological innovations are moving humanity forward, forcing everything more people think about the future. The computer industry has long crossed all possible thresholds and now its development can hardly be stopped or redirected to another direction. But, as is often the case, development undergoes a period of uneven distribution of efforts - the speed of development in certain areas leaves much to be desired.
One example of this phenomenon is computer memory. Every year programs and games for desktop machines are becoming more resource intensive, and while video adapters, controllers, and monitors are being actively upgraded, permanent memory is still represented by the hard drive, invented over 50 years ago. Many users are wondering in advance "How to connect a second hard drive to a computer?"
How to connect a second hard drive to a computer
Before a user who wants to increase the available space for saving new data, sooner or later the question will arise: what to do next? Of course you can buy solid state drive SSD, but their active life is still less than 5 years, so the best solution would be to connect a second hard drive to the computer. How to do this, we describe in detail in Russian in this article.
Before starting installation
Before you start upgrading your computer, it will be useful to figure out how ready the latter is for it. If new hard disk already purchased or at least selected specific model, then it is necessary to clarify which connector should be used to connect to the computer motherboard.
Among a number of interfaces for connecting hard drives to a computer, the main ones can be distinguished:
IDE - on this moment connector is outdated and almost never used. At one time, it allowed you to connect two drives at once through one cable.
SATA is the most popular connector found in most computers. His hallmark is a serial data transfer between the carrier and the receiving device (computer).
FireWire (IEEE 1394) is one of the options for connecting a 2 hard drive to a computer. It is most often used to connect to external storage media and is designed for a maximum data transfer rate of about 300 Mbps.
Next, you need to find out which interfaces are supported by the computer's motherboard. In order to do this, you need to open the "Device Manager", copy the model of the motherboard and search for the copied phrase on the Internet. Among the characteristics will be the line we need - "Interface for connecting storage media." If everything is in order, then you can proceed to the next step. If there is a discrepancy between the interface of the board and the disk itself, then you should take care of buying an adapter in a specialized store.
Installing a hard drive
Installing a second hard drive in a computer should start by preparing all necessary tools and replacement parts. We will need:
Small Phillips screwdriver (often included with new drives)
Wires for connecting a hard drive to the motherboard and power supply
The drive itself, freed from the factory packaging
If necessary, use the adapter purchased in the previous step.
First you need to remove the cover of the system unit case and familiarize yourself with the location of the first hard drive. Practice shows that it is most convenient to install elements of the same purpose next to each other, so it’s good if next to each other installed disk there is a free slot.
When the location for installing the drive is chosen, you need to try on the connecting wires - they should not be allowed to be too short to prevent the device from disconnecting during operation and losing data. Such foresight is quite justified, because losing data during a sudden power outage is easy.
The next step is to mount the drive to the computer case. It is carried out by asking for the help of the screws supplied with the hard drive and a small Phillips screwdriver. It is necessary to carefully monitor that during the installation process, not a single wire from those that are already inside the case is pinched between the wall of the system unit and the hard drive case. After the second drive is screwed on, you need to connect new connecting wires first to it, and then to the motherboard and power supply. After that, you can collect the wires together with an electrical clamp - this eliminates the possibility of damage and falling into the fan blades when the computer is running. The final step will be the assembly of the computer. This step is usually not difficult even for novice users.
Checking a second hard drive
Specialists in working with computer equipment advise checking the speed of writing and reading data from a disk immediately after installing a new media. “This allows you to identify factory defects and fakes,” they say. Therefore, after turning on the computer with established second hard drive, it is advisable to visit the website of the manufacturer of this equipment and find on it special software for working with the purchased model or series of models.
Interface like software solutions most often it is not replete with functions, but nevertheless they are able to provide basic data, such as the actual capacity of the media, the speed of reading and writing to the disk. If the actual data transfer rate is very different from the one declared by the manufacturer, then you need to check again the quality of the connecting wires and the contact between the disk itself and the wire leading to the motherboard.
conclusions
Installing a second hard drive in your computer is easy, just follow the brief instructions. When working inside the computer, it must always be unplugged from the electrical outlet to avoid personal injury. electric shock. In addition, when working with magnetic disks it is necessary to exclude the influence of powerful electromagnetic fields on the computer case, and also ensure the removal of static electricity from the drive itself.