 entrance
How to use the Titanium Backup program. Android: Backup with Titanium Backup
What is a backup? Bacup (Backup) is a backup of data. Backup applications in android will be useful before flashing the phone. If competently do backup applications, then after flashing it will not have to reinstall them from Play Market And on the new execution and configuration. We have already used this trick during the 6 version of Android. That time we promised to tell more about creating backups using the Titanium Backup program, it's time to keep our promise.
Today on the operator's table again the oldest of Lenovo A328. This time we will set it to describe the firmware process itself through the memory card, since we are not previously described, we will only describe the process of creating a backup of all the necessary applications that need to be transferred to a new firmware.
Setting Titanium Backup
Immediately make a reservation that the program will require! First you need to install Titanium Backup. You can download full version C (need registration) or download the usual version with Play Market.
After downloading and installing the program you provide the necessary privileges. However, the setting is completed.
Creating a backup application
To create a backup, go to the menu batch action, and choose the menu item "Make R.K. Total custom software. " Right you see the number of installed programs.
After selecting this item, you will find a list installed applications. Making a backup of all applications is optional, we have chosen only those that really need to be transferred. With the Greenify application, we removed the flag, since the functions of this application are to have different programs to save the battery (we wrote about it). This feature Android 7 Nougat fulfills independently, so we can clog memory for us to anything.

After selecting the necessary applications, click on the green tick in the upper corner and wait when the backup copies are ready.

Restoring applications from backup
Since we decided to format the memory card, all the backups of the applications were temporarily transferred to the computer, then, after formatting the map and install the firmware, we flooded backbones back. By the way, in the system, they look like this:

So, our smartphone will flash, but looks at us unfamiliar inconvenient Loncher and confuses the lack of favorite applications. Well, everything is easy to fiximibly. First of all, you need to download Titanium Backup again and install it. Next, you need to make sure that the application backup folder is on the device's memory card (or in the internal, if there is no memory card). If everything is in their places, Titanium Backup will find backups.
To restore applications, perform three actions:
- Launch Titanium Backup.
- Go to the packet action menu
- Select item: "Restore everything with data"

Next you can only wait for the end of the operation. Now all applications are restored. Let me remind you that you do not have to enter passwords, customize or somehow bring restored applications in the former type - Titanium Backup carefully saved all the settings. I will say more, even Google Chrome. After recovery, opened two tabs that were open at the time of preservation of the backup.
That's all! Faced with difficulties? Write comments.
If you need to create a backup copy of all available on your Android phone or tablet applications, including system programs, save all wiFi settings and mobile networksand then restore your phone or tablet in the initial stateNone of the program will not cope with this task better than Titanium Backup.
Therefore, today I want to tell you how to make a backup copy of your phone or tablet with this wonderful program.
Why do we need programs like?
Android has some backup capabilities built into the system. Everyone who has already tried to change the Android phone or do on it full reset to the factory settings, know that it is enough to enter your google AccountHow all the data on your contacts will immediately be restored on the phone. However, all the applications and the games you had before, you need to install and configure again. New will have to introduce information about WiFi networks, Settings mobile Internet And other system settings. Well, if applications and games on the device have several pieces, and if there are several dozen, like most of us?
Here and comes to help the program for backup Android devices.
And first of all, we need two things.
Root rights on the device
- the program itself.
Why do we need rOOT rights? The fact is that android system initially does not provide its user and programs access, to system programs and folders in which all program data and device settings are stored. To the Titanium Backup program can copy everything you need, and then restore programs and data, it must have access rights to write to these system folders. And it can only get this opportunity after you get root rights on your phone.
Root rights give the Android device to the device great opportunities, and you can read about them in more detail in this article:
Now about the Titanium Backup program itself. There are two versions of the program: paid and free. In order to simply make a backup of your Android phone or tablet, and then restore it, it will be enough for us paid version programs. Free version Also allows you to make weekly copies of all or individual applications, move programs to the memory card and back, control backups and so on.
A paid version (just over $ 5, on our website - free of charge) has much more opportunities. You can "freeze" programs without them complete removal From the device, make several backup copies of the application in different time (This, for example, will allow you to restore your game with defined settings, and then restore the same game with the settings of another member of your family), convert system applications In the user application, store and restore backup copies on the Internet using Dropbox (useful when the SD card is lost or output) and much more.
Installing Titanium Backup.
As we have already mentioned, we will need root rights for the program, so first of all you will need to get root on the device. Before installing the program, do not forget to enable in the settings of your tablet or phone in the "Applications" section the ability to install applications from the "Unknown sources".
After installation, Titanium Backup When you first start, you will request superuser's rights. It will be necessary to provide them by clicking on the "Allow" button. Do not remove a check mark in front of the "Remember" item so that this window does not appear every time you start the program.

Everything. The program is installed. Before you proceed to work, do not rush to press all buttons in the program and open all the menus. Titanium Backup very powerful program and has full access to the system. Therefore, to not harm, read each menu item or the inscription on the button twice and think before making any actions.
Creating a backup of Android devices using Titanium Backup.
Make sure that there is an SD card in your device and there is a free space on it. The program will copy all data to it.
After Titanium Backup starts, you will see the main program window. Repeat yourself again "I will not do anything until I am sure that I do everything right" and proceed to creating a backup of your device.

1. Click the Backup Copies button at the top of the program screen.

2. Press the "Menu" button of your phone and select "Processing" in the menu at the bottom screen.

3. In the window that opens, in the "Backup" section, find item "Make R.K. Total user software and system data "and click on the" Start "button across from this item

4. In the window that opens, the program will prompt you to highlight all applications and close running applications. Here you can choose applications that will be copied, but as we need a complete copy of the system, we do not touch anything.

5. Run the backup process by pressing the "Start Batch Processing" button. Backup creation will begin. Depending on how much applications you have installed, the process will last from a few minutes to several dozen minutes.

6. After the copying is completed, you will come back in the "Backup" menu. Now instead of triangles in front of each application, you can see multi-colored emoticons and ticks. If you are interested in what they designate, you can call the menu and select the item "Designations".

If you do not see a single triangle with exclamation familiarSo everything went successfully (and why not).
Now, if you arrive in the / TitaniumBackup folder on your SD card, you can see a large number of files with backups. Copy the entire folder on your computer or in any other place to then in case of loss or failure of the SD card, you were able to restore all the contents and settings of your phone or tablet.
Congratulations! Your first backup is created. Now you can click the "Schedule" button to configure the frequency of automatic backup.
You can also back up and restore them for each individual program by clicking on the list of "Backup Copies" section.
Restore from backup.
When the time comes to restore the contents of your Android device, you have a few ways. You can recover all the contents - applications and settings. To do this, go through the menu to the "Processing" item and find the "Restore" section in the list of operations list, here you can select the "Restore All software" item to fully restore the status of your phone or tablet at the time of backup or any other item on Your discretion.

In addition, you can restore a separate application and its data (for example, you can recover Angry Birds levels). To do this, in the "Backup Copies" section, select a specific application from the list and click the Restore button.

Do not forget that after restoring system data, such as system settings, SMS, contact data, etc., you must restart your device to make changes to force.
In more complex cases, for example, after flashing a phone or tablet, it makes sense to restore, for example, only all system data, and then restore new versions of the user software. The program offers you enough options. android restoration devices and you can always return your Android tablet Or the phone to the original state (at the time of the backup), so that you would not have happened.
If you need to make a full copy operating system (current firmware) with all its settings and programs, you will have to use the Alternative CLOCKWORKMOD Recovery Recovery Menu or others like it.
If anything happens to the mobile device, restore the data that was on it will help the backup. But with what utilities and how to do it? We tried to answer this question throughout, now they are ready to sum up the final results. However, first will pay the attention of another program - Titanium Backup.
Let us give a list of previously reviewed applications in alphabetical order:
How can you see, the choice is really great, but what to stop on? Let's decide.
Titanium Backup.

Acquaintance
If you value installed games and programs, as well as their data, then it should be 100% to take care of creating a backup copy. And on this moment No one works with applications better than Titanium Backup. This is a unique tool for mobile devices, which we now will consider.
Advantages of Titanium Backup Pro compared with the usual version:
- Several backups in the application;
- Backup / restore SMS, MMS, calls, bookmarks, Wi-Fi AP;
- Freezing applications;
- Synchronization in / from Dropbox (manually / by scheduled);
- Synchronization in / from Box (manually / on scheduled);
- Synchronization in / from Google Drive (manually / on schedule);
- Web TB server;
- The ability to integrate application update into the system;
- Encryption support;
- Hypershell speed;
- Backing up applications without closing them;
- Creating your own update.zip containing applications and data;
- Restore individual applications and data from ADB, CWM and TWRP backups;
- Cleaning Dalvik cache;
- Integration of Dalvik cache elements into the system;
- Schedule;
- Changing the Android device ID, its recovery from a backup or after resetting to factory;
- Protection backup from removal;
- Sending backup (by email / to the clouds) and imports in just one click;
- Stop / freezing / launching applications in one click;
- CSV export any application in email or google docs;
- Convert application data in the rapid Wal format.
Beginning of work


Immediately after starting Titanium Backup, we turn out to be on the "review" screen. The tab is exclusively informational. It shows which functions work, and which are not. Below is a memory diagram: how much it remains and how much is busy.
Interestingly, if you click on these memory, we will open in more detailed statistics on established applications.

The second tab is "backup copies" - is the main one, it is she who attracts interest in the application. In the form of a list built in alphabetical order, all our applications are presented. The icon, name and version of the program, presence of a backup and installation location are displayed.
It is easy to notice that the names of some applications are white, in others are red, and thirds are generally yellow. Specifically, the color shows the "significance" of the program. Custom Application Names are written in white, system - red, and necessary for work. key functions Devices (as well as Titanium Backup) - yellow. That's how you can figure out the applications.


Now let's try to create a backup, for which you click on the application for us. If there are many such, but we do not want to scroll through the list, you can use the search and find the necessary.

After that, the copy made will be saved in the memory of the device along the path of Storage / TitaniumBackup in the form of three files: applications, application data and key file.

By the way, there are "special functions" in this menu, for this you need to swipe left. There are a lot of them, starting from the completion of the application, sending a backup and before converting an application from custom to systemic. It is incredibly useful.
And as far as I am grateful for the ability to integrate application updates to the firmware. This operation allows you to painlessly free up memory in user memory. Well, functionally.


But is it really necessary to do such operations with each program? No, especially for this in the upper right corner there is an appropriate key - "Package Actions".

Now we can make backups of all user applications or all user data, and it is all together. You can delete everything custom programs, freeze the system, clean the cache and all this literally two presses.
If you often reflash the device or use a specific software package, you can make a "update.zip" file based on the necessary backups. After it can be flashing through the Recovery menu in one click. 

Go to the last tab - "Schedule". You can create tasks, for example, make a backup copy of user data at such a time, on such a day.
Moreover, you can set more detailed values, again for example - to make backups when the gadget is connected to the memory or, on the contrary, upon completion of the backup, restart the device, or download backups to the cloud. Tasks can create an unlimited number and on any functions.


Additionally, you can open another menu by pressing on function key mobile device. A whole list of functions and all kinds of parameters will appear, the most interesting of which are: cleaning the Dalvik cache, creating a TB server for the exchange of backups.
All Titanium Backup actions are associated with file system and applications, create backup copies of incoming calls, messages and other personal data cannot be. But there is one trick, as you can reserve the book of incoming, messages and bookmarks of the browser. To do this, we reserve the data of the relevant applications, only for no hope - when moving from one android version OS On another conflicts may arise in the records and the data will not be deed.
Settings


The parameters for titanium backup configuration are very much, so we will consider only the most unusual and worthwhile attention.


All "backups" can be synchronized into the "cloud" dropbox, Box and Google Drive. Cloud synchronization is already good, and when there is still a choice where - just fine.


Backup copies can be encrypted using the highest-tech keys. As indicated in the application, "People with Managing Mania" can use a 4096-bit RSA and a 256-bit AES encryption. Naturally, there are less complex methods.

To save device memory, all backup copies can be compressed. There are three degrees of data compression. If you use the maximum compression algorithm, then we will be able to save up to 10-20% of memory, but you have to wait 5-7 seconds, although it all depends on the specific application and the power of the device. You should also consider the fact that without compression "backup" applications are done in the APK format, that is, it will be possible to install them without Titanium Backup.
Testing


Titanium Backup supports work with Gadgets on Android 1.6 and older, all existing processor architectures are supported, including X86.
There are no complaints about the quality of the application, it works fast enough. To create a "backup" from a hundred applications (file + data, the minimum compression ratio) of different volumes took about 5 minutes - quite a good indicator.
Conclusions by Titanium Backup
First of all, Titanium Backup is a serious tool for working with applications on Android devices, since you need to be able to use it to not harm. The program requests the rule of superuser (and for all types of operations), and it is worth considering, because they are not all.
But the utility itself is mainly configured to work with applications and the file system, it can freeze programs, make backup copies, restore applications, integrate into the system and much more. On the one hand, the functions and capabilities of the mass, on the other - Titanium Backup does not know how to reserve neither contacts nor reports nor other personal data (or rather can, but with some tricks, which should not be taken into account), so you have to stock other application.
Yes, the functionality of the considered program is not enough, because the most elementary it is just not able, but this is not the element of Titanium Backup. If you are an advanced user and have already mastered CM Backup, My Backup and other applications, you can pay attention to the Titanium Track product. Benefit, he has both free and paid versions. Naturally, the functionality is the last wider. But the price of $ 5 Titanium Backup fully justifies, and updates, improvements and bug fixes will not wait to wait.
Many users of Android devices are known that experiments with firmware, the installation of various additions and corrections quite often lead to the inability of the device, which is fixed only by installing the system well, and this process implies full cleaning Memory from all information. In the event that the user took care in advance about creating a backup copy of important data, and even better - a complete backup system, the restoration of the device to the state "as it was ..." takes a few minutes.
There are many ways to make a backup copy of certain user information or full backup Systems. What is the difference between these concepts, for which devices it is advisable to use this or that method will be discussed below.
Under the backup of personal information, it is implied to save data and content generated by the user during the operation of the Android device. Such information can be attributed to the list of installed applications, photos made by the device chamber or received from other users, contacts, notes, music and video files, bookmarks in the browser, etc.
One of the most reliable and most importantly simple ways Save Personal data contained in android device is to synchronize data from the memory of the apparatus with the cloud storage.

Full backup system
The above methods and action similar to them allow you to preserve the most valuable information. But when the devices are firmware, not only contacts, photos, etc. are often lost, because manipulation of the memory sections of devices implies their cleaning from absolutely all data. To leave the ability to return to the previous state of the software and data, only the full backup of the system is needed, i.e., a copy of all or certain sections of the device. In other words, a complete clone or locks of the program part are created into special files with the possibility of restoring the device to the previous state later. This will require a user of certain tools and knowledge from the user, but can guarantee the complete safety of absolutely all information.
Where to store backup? If we are talking about long-term storage, best way There will be cloud storage. In the process of saving information, the following methods are desired to use the memory card installed in the apparatus. If it is lacking, you can save the backup files into the internal memory of the device, but in this version it is recommended immediately after you create copy the backup files to a more reliable place, such as a PC disc.
Method 1: TWRP Recovery
The simplest from the point of view of the user by creating a backup is to use for this purpose a modified recovery environment - custom recovery. The most functional among such solutions is.


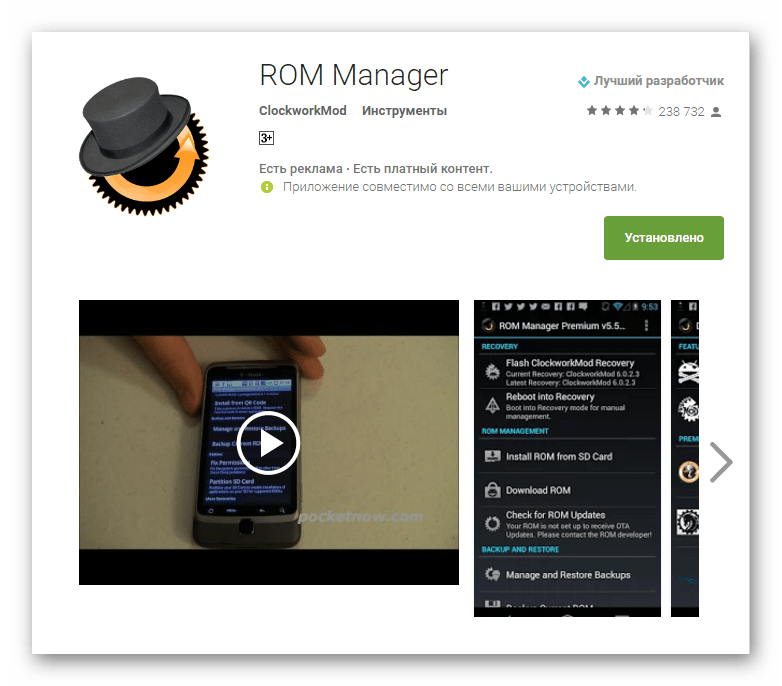
Method 2: CWM Recovery + Android-app ROM Manager
As in the last method, when creating a backup android firmware will be used a modified recovery environment, only from another developer - CLOCKWORKMOD commands. In general, the method is similar to the use of TWRP and provides no less functional results - i.e. Files backup firmware. Wherein, CWM Recovery. Does not have the necessary many users to manage the process of creating a backup process, for example, it is impossible to select individual sections to create a backup. But the developers offer their users a good android application Rom Manager, resorting to the functions of which, you can proceed to creating a backup directly from the operating system.


Method 3: Android application Titanium Backup
The Titanium Backup program is very powerful, but at the same time fairly easy to use a system for creating a backup system. Using the tool, you can save all installed applications and their data, as well as user information, including contacts, call logs, SMS, MMS, points access Wi-Fi and other.

Benefits include the ability to be widely set up parameters. For example, a selection of applications that and which will be saved are available. To create a full-fledged backup Titanium Backup, you must provide rort-rights, that is, for those devices that the superuser rights were not received, the method is not applicable.

It is extremely desirable to take care in advance about the reliable place to save the backup copies. Inner memory Smartphone can not be considered as such, it is recommended to use a PC disk for storing backups, cloud storage Or, as a last resort, the device's microSD card.
- Install and launch Titanium Backup.
- At the top of the program there is a tab "Backups", go to her.
- After opening the tab "Backups", you need to call the menu "Batch Actions"By clicking on the button with an image of a document with a check mark located in the upper corner of the application screen. Or press the touch button "Menu" Under the device screen and select the appropriate item.
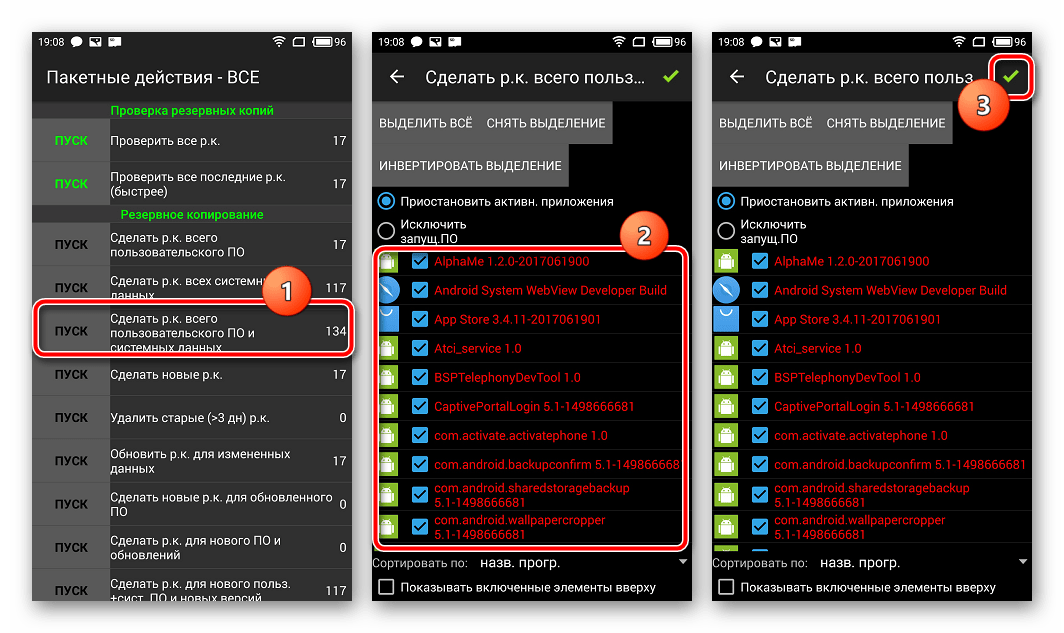
- Next Press the button "START"Located near the Option "Make R.K. Total custom software and system data »Over the screen with the list of applications that will be stored in a backup. Since there is a complete backup of the system, it does not need to be changed here, it is necessary to confirm the readiness for the beginning of the process by clicking on the green tick located in the upper right corner of the screen.
- The process of copying applications and data, accompanied by the deduction of information on the current progress and the name of the software component, the preservation of which is currently occurring. By the way, the application can be collaborated and continue using the device in as usual modeBut, in order to avoid failures, it is better not to do so and wait for the end of creating a copy, the process occurs quite quickly.
- At the end of the process, the tab opens "Backups". You can see that the icons located to the right of the app names have changed. Now these are peculiar emoticons of different colors, and under each name of the software component, an inscription appeared, testifying to the created backup of the date.
- The backup files are stored along the path specified in the program settings.

To avoid loss of information, for example, when formatting the memory before installing the system software, you should copy the folder with backups at least to the memory card. This action is feasible with any file Manager For Android. A good solution for the operations with files stored in the memory of android devices is.


Additionally
In addition to the usual copy of the backup folder created using Titanium Backup in a safe place, in order to reinsure from data loss, you can configure the tool so that the copies are created immediately on the microSD card.


Method 4: SP Flashtool + Mtk DroidTools
Using applications and is one of the most functional methods that allows you to create a truly full-fledged backup of all Android-device memory sections. Another advantage of the method is the optional presence of root-rights on the device. The method is applicable only for devices built on the MediaTek hardware platform, with the exception of 64-bit processors.
- To create a full copy of the firmware using SP FlashTools and MTK Dridtools, in addition to the applications themselves, you will need installed ADB drivers, drivers for the MEDIATEK load mode, as well as the application (can also be used, but the usual notepad is not suitable). We download everything you need and unpack the archives into a separate folder on the S: disk.
- Turn on the device mode "USB debugging" And connect it to the PC. To turn on debugging,
First activates the mode "For developers". For this we go along the way "Settings" — "About device" - and tapat five times on the item "Build number".
Then in the menu opened "For developers" activate with a switch or check mark "Allow debugging by usb", And when connecting the device to the PC, confirm the permission of operations using ADB.

- Next, you need to run MTK DroidTools, wait for the definition of the device in the program and click the button "Block Map".
- Previous manipulations are steps preceding the creation of a scatter file. To do this, in the window that opens, click the button "Create Scatter File".
- The next step is the definition of the address that will be needed to specify the SP FlashTools program when determining the range of blocks in the reader's memory. We open the scatter file received in the previous step in the NotePad ++ program and find the partition_name: cache line: under which the string with the linear_start_addr parameter is located just below. The value of this parameter (on the screenshot is highlighted in yellow) you need to record or copy to the clipboard.
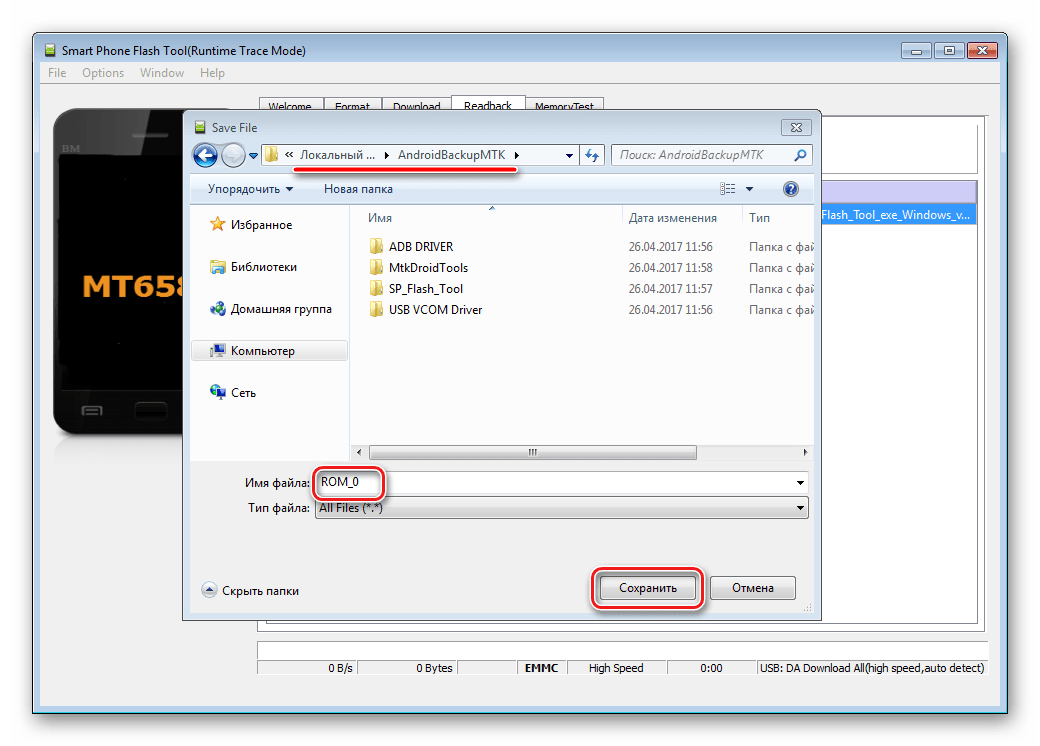
- Direct reading data from the memory of the device and saving them to the file is carried out using the SP FlashTools program. Run the application and go to the tab "READBACK". The smartphone or tablet should be disconnected from the PC. Press the button "Add".
- In the window that opens, the only string is observed. Click on it twice to set the reading range. Select the path to which the future dump file will be saved. The file name is better to leave unchanged.
- After determining the save path, a small window will open, in the field "Length:" which it is necessary to make the value of the linear_start_addr parameter, obtained in step 5 of this instruction. After adding the address, click the button "OK".

Press the button «READ BACK» Table of the same name in SP FlashTools and plug off (!) Device to the USB port.
- In the event that the user takes care of the installation of drivers in advance, SP FlashTools will automatically determine the device and starts the reading process, as evidenced by the filling of the blue execution indicator.

Upon completion of the procedure, the window is displayed «READBACK OK» With a green circle, inside of which a confirmation check mark is located.
- The result of the previous steps is file ROM_0., which is a complete dump of internal flash memory. In order for such data to be possible to carry out further manipulations, in particular, overpower firmware into the device, several more operations are needed using MTK DroidOls.
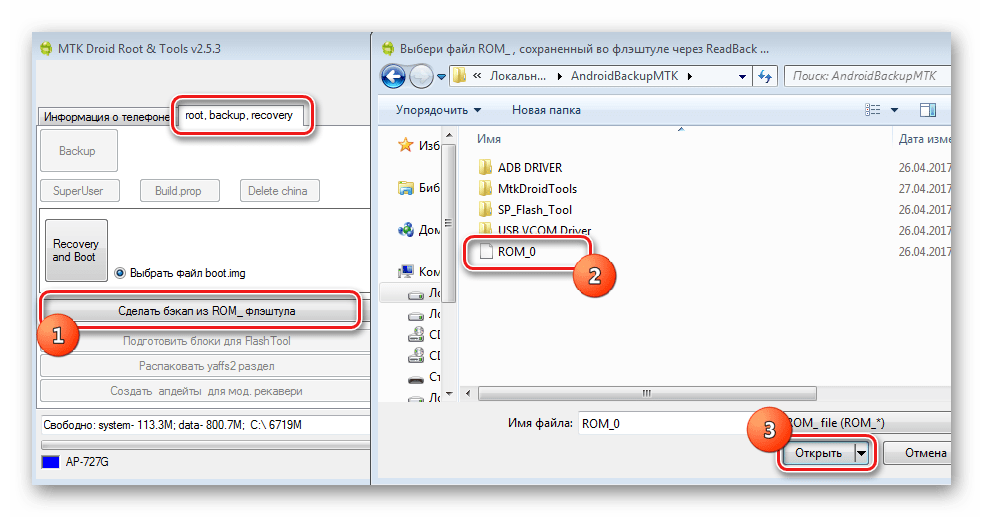
Turn on the device, load in android, check that "Debugging by yusb" Enabled and plug to the device to USB. Run MTK DroidTools and go to the tab ROOT, Backup, Recovery. Here you need a button "Make a backup from ROM_ Flashtula", Press it. Open the resulting 9 file ROM_0.. - Immediately after clicking on the button "Open" The process of separating the dump file to separate partition images and other data required during recovery. The process promotion data is displayed in the log area.

When the procedure for separating dump on separate files Complete, in the log field will display an inscription "Task Completed". This work is over, you can close the application window.
- The result of the program is a folder with file memory files of the device - this is our backup of the system.


And choose the path of saving the scatter.


Method 5: Bacup Systems with ADB
If it is impossible to use other methods or for other reasons, to create a full copy of the memory sections of almost any Android device, you can use the OS developer tool android component SDK -. In general, ADB provides all the possibilities for conducting the procedure, only the root rights on the device are needed.
It should be noted that the method considered is quite laborious, and also requires a rather high level of knowledge console teams ADB. To facilitate the process and automation of command, you can contact the wonderful shell application, it automates the process of entering commands and saves the mass of time.
- Preparatory procedures are to receive root rights on the device, turning on the debugging via USB, connecting the device to the port of YUSB, installation drivers ADB.. Next, load, install and run the application AdB Run.. After the above is completed, you can switch to the procedure for creating backups of sections.
- Run ADB Run and check that the device has been determined by the system in right mode. Paragraph 1 of the main menu - "DEVICE ATTACHED?", in the discontinued list we produce similar actions, we first select paragraph 1.

A positive answer to the question is whether the device is connected in ADB mode, the ADB RUN response to previous commands in the form of a serial number.
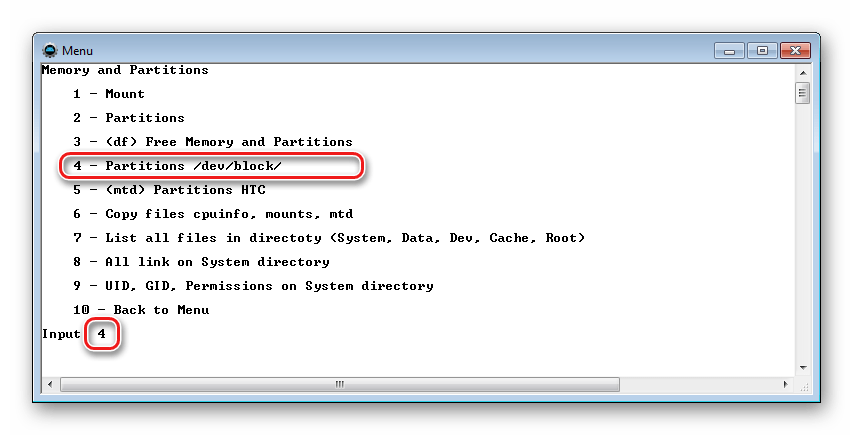
- For further manipulations, it is necessary to have a list of memory partitions, as well as information about how "disks" - / dev / block / Sections were mounted. With ADB Run get such a list is quite simple. Go to section "Memory and Partitions" (Clause 10 in the main menu of the application).
- In the menu that opens, select paragraph 4 - PARTITIONS / DEV / BLOCK / ».
- The list with the listing of methods will be attempted to read the necessary data. We try each item in order.

In case the method does not work, the following message is displayed:

Execution will have to continue before the full list of sections and / dev / block /:

The data obtained must be saved in any available way, automatic function Preservation in ADB RUN is not provided. Most in a convenient way Fix the displayed information is to create a screenshot of the window with a list of partitions.


How to make backup and restore data withTitanium Backup.:
1. Creating a backup of individual android applications
Open Titanium Backup. and go to the Backup Copies tab. Here will be displayed a list of installed applications on your smartphone or tablet.

A few words about the notation:
- triangle with an exclamation mark - the backup of the application is not created;
- phone icon - the application is stored in the phone's memory;
- memory card icon - The application is stored on an external SD memory card.
Semit need app You will see a pop-up menu with different options.

If you want to create a backup of the program, then click the "Save" button. After that, the triangle will change on a cheerful emoticon.

If you need to restore one of the applications, you should also click on it and select Restore item in the pop-up window. After that, you will receive a recovery request: "data only", "only by" or "software + data".

You can also easily delete the selected application, delete the previously created backup, erase all data or freeze the application (temporary shutdown). The latter function is only available in the paid version of the application, which you can buy on Google Play.
2. Creating a backup of all data
To perform backup The entire system must be pressed on the leaf image in the upper right corner of the screen.
In this window you can do the following: a full copy of all software, all system data or the other combined. Everything else has many other functions and settings, in the form of a backup update for modified data, new software or updates, as well as system programs.

If you need to make a copy of all installed applications and data, then you need to click on the word "Start", opposite item "Make RK Total custom software and system data. "

After that you will see a list with all the contents of your device. To start the backup process, click on a tick in the upper right corner of the display.
3. Restore data from previously created backups
Data recovery occurs similarly to the previous method. We go into the list of all batch actions, and then press the "Start", opposite the "Restore the missing + all system data" item.

After that, you can choose what exactly needs to be restored: "P + Data", "only by" or "only data". To start the recovery process, you need to click on the tick in the upper right corner.