 entrance
Restoring the original state of the Windows 10 computer. Manual deletion of updates
Often the restoration of the operating system or its rollback allows you to quickly and efficiently get rid of many serious problems, which, for example, appeared after installing updates. Unlike previous Windows variations, the 10 version offers five ways to help restore the performance of the graphic shell.
In which cases it is necessary to restore the system
Often users of personal computers resort to restoring the system after receiving new updates for the OS. Unfortunately, despite the quality of the operating system itself, Microsoft Corporation often produces "curves" of updates. After their installation there may be two development options:
- the first is the restoration and rollback of the OS;
- the second is the waiting for the patches. They appear pretty quickly, so immediately resort to so fundamental measures as the system rollback is not worth it (with the exception of rare cases when PC safety may suffer).
A more common reason why it is required to restore the OS, is to incorrect work software. For example, if the user installed any drivers, after which the programs have ceased to function properly, then optimal option Solutions of the problem will be the restoration.
More advanced PC users often try to make some changes to the system registry. This is a common practice, but in inexperienced hands, it may be meaningless and bring a lot of harm. As B. system Registry There is information about all applications, their data, including the data of the system itself, then do not make any adjustments here. If after the changes, the PC stopped working as before, it is necessary to use the OS recovery.
It should be noted that if the PC began to work out otherwise, an unknown kind errors appear, you can always use the recovery function. It will not harm the device, but will delete all the changes that were made after the date of creating the recovery point.
Ways to restore Windows 10 (if the system is loaded)
Microsoft B. latest version OS provided users with many options for restoring OS. The choice of one way or another directly depends on the user's capabilities, as well as the state of the device itself. Consider three options:
- using the recovery point;
- reset to factory settings;
- changing the history of files.
Point of recovery
One of the most useful features Operational windows systems 10 - recovery point. She was present in previous versions, but did not imply storing a set of variations of the state of the OS. As a rule, the recovery point was created either automatically after making changes to system files or drivers, or manually by the user. Now, if errors occur in the device, you can always use the optimal point of kickback.
Recovery points still contain only information about changes. As such, there is no operating system in this case. This means that if you independently created the recovery points, only those dates will be displayed in the list when changes are made in critical and system system files.
To begin with, you need to log in to the Windows 10 operating system recovery settings section. This can be done as follows:
- Use the combination with the Win + R button on the keyboard.
- Enter the "Restore" command in the field.
In the panel, click "Create a Recovery Point"
- In the window that appears, click the System Protection tab. In the "Protection Settings" section you can see all the available sections. hard disk. For each of them, separate recovery points are created. Pay attention to the "Protection" field. Choose the desired section and change its status using the "Configure" button.
Change the recovery point settings for the selected hard disk partition.
- Change the status of the option to "Enable System Protection". Also do not forget to specify the optimal amount of disk space. It will be used to create operating system recovery points in the future. Keep the changes made.
Activate the recovery point creation feature and specify the amount of memory to be used for these purposes.
By reaching specified number Memory The old recovery points will be removed and rewritten new.
To use existing recovery points, follow these steps:
- Right-click on the Start icon and select "Parameters".
- Find the Update and Security button in the list.
- On the left menu, go to the "Restore" section. Click the "Start System Recovery" button, after which the window with the parameters will appear. Here you can use two options:
- recommended recovery parameters. Used in cases where the likely cause of problems in the performance of the system is incorrect drivers, updates and other software;
Select Suitable Recovery Points: Recommended or Custom
- use the user-created recovery points. In case you did not create them, no option will be displayed in the list.
All dot points are displayed in the list from which the appropriate option is selected.
- recommended recovery parameters. Used in cases where the likely cause of problems in the performance of the system is incorrect drivers, updates and other software;
- After selecting a suitable recovery point, click the Next button and wait for the procedure to complete. It will take at least 5-20 minutes of time, which depends on the selected date and configuration of the PC. In this case, the computer will be automatically rebooted. When you log in again graphic shellThe system will report that recovery has passed successfully.
To independently create an OS recovery point:

Video: How to create a recovery point in Windows 10
Reset to factory settings
This feature is a kind of novelty, as in previous versions of the Windows operating system, the only thing that the user could do is reinstall OS. In this case, the presence of an appropriate CD or image was required.
When working with Windows 10, this is not required. The system will use the executable files saved on the hard disk to install. At the same time, the reset procedure itself will take on 20 or more minutes (directly depends on the device configuration).

The same can be done without logging into the graphics shell on the user selection screen. Hold down the SHIFT button and simultaneously press the "Restart" key in the right side of the window. A special window will appear, in which it will be necessary to use the "Diagnostics" tool, and then select "Return to the original state".
As analog you can use and new featurewhich appeared in Windows 10, called "Start Newly". This process is practically no different from the option described above, except that the operating system is net installation will be performed. It starts a few clicks and can take about 20 minutes, which depends on the computer. The distinctive advantage of this function is that, compared with the standard discharge, the additional software will be restored, which was installed after purchasing the device (antiviruses, programs from the manufacturer and much more).
To take this opportunity, do the following:
- Find in the tray Windows Defender"And activate it.
- Go to the "Device Response" tab.
- Find the "Start New" or " New start».
In the "New Start" section, click "Additional Information"
- Click "Additional Information", after which use the "Getting Started" button.
To activate the function, click the "Getting Started" button.
- A window will appear that warns the user about all possible changes. If you agree, click the "Next" button.
Activate the "Start New" function to start clean version Windows 10 and confirm its execution
- A list of all applications and programs will be displayed that will be exposed to uninstall. The last thing to be done is to confirm the procedure and wait for its completion. Upon completion, the file will appear on the desktop where all changes will be written in detail. There will also be a special catalog with old version operating system.
Video: How to reset to factory settings in Windows 10
History Files
For the first time, the "File Story" feature appeared in the Windows 8 operating system. It may be very useful, especially for non-professional users. This feature is useful if you accidentally deleted an important file or directory, incorrect changes or data of any program were affected by malicious software. In all these cases, the user can use the "File Story" feature, which allows you to restore the former, efficient state.
It is worth saying that this opportunity has its own settings. If the user did not make changes, the system will independently perform backup copies of such folders as "desktop", "Documents", "Images", "Music" and "Video". The storage time is also configured, but by default, these files will be stored for an unlimited amount of time.
To start settings and view this feature, use the standard powered by Windows 10, specifying in the "History of Files" field.
In the Storage Storage section, the user will see partitions of a hard disk and used drives, as well as the condition of the function itself. To activate it, it is enough to choose the appropriate section and click on the "Enable" button.
Enable file history recording feature on your computer
If you want to change the save options, use the " Extra options" Here you can configure the time interval through which the files will be saved, as well as their storage.
Change the parameters suitable for you by using the saving gap and file storage time
To use the recovery feature through the "File Story", open the directory where the necessary information was stored. In the "Home" tab, you will see the "File History" icon, which will be required in this case.
Go to the directory to restore the file and activate the input to the "File Story" section
To restore files and data, it is enough to enter into a "file history", select the appropriate document and click on the recovery button, after which it will reappear in the directory. The procedure itself is performed in minutes.
Select the file you want to restore and confirm the procedure.
Video: how to use the history of files in Windows 10
Advanced Restore Windows 10 (if the system is not loaded)
Some problems that any user may encounter personal computerare very serious and lead to the fact that the graphics shell does not at all load. In such cases, you are probably not able to use the methods described above.
Fortunately, Microsoft has provided such a variant of the development of events and added several functions that will allow the computer to return a computer to the computer in cases where it is not possible to log in to the OS.
Windows 10 recovery disk
Recovery disk - standard remedyallowing you to return the system into an efficient condition. Do not pay attention to the name itself: as a disk can not only act a CD or DVD drive, but also a regular flash drive.
The only drawback of this method is that the user needs to write in advance to the removable media information about the operating system and thereby create this recovery disk. In any case, you can use another computer or help familiar.
Recovery disk implies saving to removable carrier important information About the operating system (files and directories). This will allow them to use them in the future to replace damaged components.
To create a disc, do the following:
- Specify the search for the "Recovery disk" command in the Windows 10 embedded in Windows 10 and run the program.
- Install removable driveTo which all important information will be recorded.
Check the parameter and confirm the procedure
- Check the mark on the "Run backup ..." item.
- After clicking on the "Next" button, you will see the interaction menu. Here, select the "Diagnostics" option.
In the list of all options, select "Diagnostics"
- To troubleshoot a fault, use one of the above options:

- Choose the most appropriate recovery option and follow the instructions. Terms of solving the problem directly depend on the method you choose (from 20 or more minutes).
Video: How to create a Windows 10 recovery disk
Installation disk
Installation disk or other drive on which the image of the Windows 10 operating system is very useful. For example, in the case when the OS does not want to load, you can easily and quickly solve the problem with the help of such a drive.
If you do not have such a disc, use the built-in operating system tools to create it. This can be done as follows:
- In the search menu "Start", specify the "Control Panel" and open it.
- Change the display parameters of the items to "large icons" and select the "Restore" option.
In the "Control Panel" select the "Restore" parameter
- A window will appear where the user can create a recovery disk using the corresponding button.
In the list of options, select "Creating a recovery disk"
- Install the drive and select it in the working window. Confirm the creation procedure and wait for it.
Select from the list of installed drives suitable and use it to create a disk.
The last step is to change the order of loading components of the personal computer through the BIOS.
Activate the built-in medium when the device is loaded using the DEL button (combinations of the buttons depend on the manufacturer motherboard). Go to the Boot Configuration Features tab. Here change the procedure for loading components so that either the drive is installed as the first optical disksor USB. It depends on which drive was used to create boot disk.
It is very important to remember the order of loading the elements, especially if you are a beginner user. Otherwise, after making changes, the system will be loaded incorrectly.
Exit the BIOS and wait until the OS installation window appears. Here you can do any convenient way:
- to roll back the system using the recovery point;
- perform the system restore when loading;
- reinstall her and much more.
Error recovering Windows 10 0x80070091
A common problem with which PC users may be encountered during recovery - error 0x80070091. When it appears, you will not be able to use the device again, and the recovery process will not be completed.
It is necessary to warn in advance that it is extremely difficult to get rid of this problem and the user must realize that all measures to which he resorts is performed at their own risk. Probably some manipulations can lead to other malfunctions.
The reason for the occurrence of such an error is the contents of the Program Files folder, namely, WindowsApps. Usually, the fault appears after the next OS updates.
Solve problem is very simple. To do this, it is enough to delete the directory itself and subsequently use the recovery point. How to create it and used, was described above.
- Activate the "Command Line" with the administrator rights by clicking on it right-click and choosing in context menu "Run on behalf of the administrator"
- In the field, specify the TAKEOWN / F command "C: \\ Program Files \\ WidowsApps" / R / D Y.
Enter the command to renaming the folder in the field.
- After completing the process, activate the display hidden files And folders, putting a tick opposite the corresponding item in the "View" tab in the "Explorer" parameters.
Turn on the display of hidden files and folders through the "Explorer Parameters"
- To change the name of the system directory, download the Unlocker utility. It can be easily found in the search engine and install.
- Run the program and select the WindowsApps directory, then change your name and click the Unlock All button. After these changes, the error will be corrected.
Open the ability to change the WindowsApps directory and change it
How to restore the activation key to windows 10 yourself
At the first installation and activation of the operating system, the device specified by the user is automatically attributed to the device. It can also be saved to personal accountWhat can come in handy in the case when you, for example, are going to install the same OS on another computer.
Nevertheless, no one is immune from the fact that after the next updates license key just flies, and your windows version 10 will no longer work properly.
It is quite simple to restore it. It is here that we will help the function at which the key is literally attributed to the account. To restore the key, follow these steps:

The entire further process of working with this option is described above.
Note that upon completion of the procedure, the license key will return to the place, but some information will still be deleted. It will depend on the recovery method, which was selected.
How to restore screen resolution
After reinstalling the operating system or its recovery, the screen resolution becomes non-standard. For example, if you previously used 1920 × 1080, then it is probably after the specified procedures it will change to another.
The problem is solved in two ways:

Video: How to change screen resolution in Windows 10
Windows 10 recovery and reset
If you installed a password to enter an account on your computer, but for some reason you forgot it, use the recovery tools. The procedure directly depends on the type of account (local or Microsoft).
Reset password accounting microsoft records Performs online. It can be done even with a mobile phone.

If everything was specified correctly, follow the instructions on the screen. So you can easily and quickly return access to the computer.
Second possible method Eliminating a pressing problem - using the built-in administrator account. This option is most appropriate if you have forgotten the password from the local account.
An important feature of this option is the need to use a recovery disk. How to make it and use, was described above.
Change the computer component boot options via BIOS, which was described above. When the language selection window appears for installation, use the SHIFT + F10 key combination. Here, alternately, specify the commands:

Remember the name of the hard disk partition on which the directory is stored with the operating system, then it will be required. Enter the EXIT command to exit the DiskPart utility.
Also in the "Command Line" specify the following commands:

If the operations are performed without errors, go out and change the boot parameters in the BIOS.
It remains only to return to the account selection screen and in the section special features Select "Command Line". Specify in it the following information: NET User username New_pall. So you can change the password and with it to enter the graphics shell.
Video: How to restore or reset password account in Windows 10
The Windows 10 operating system recovery means, most of them can be used, even if the user does not have the ability to enter the computer's graphics shell. You can also resort to additional means as special programscreated by third-party developers but better to use standard set Tools in the system itself.
If you are interested in restoring Windows 10, then you hit the address.
We'll figure it out how to return the performance of Windows 10 without using third-party programs.
System Restore
This option will help correct the errors that appeared after installing software, Windows updates, changes in the registry and such actions.
The resumption feature allows you to return the registry settings and protected system files to the previously saved state - to one of the control points that Windows creates automatically.
User documents are not affected.
Regeneration points in "Dozens" are created before installing programs, drivers, system updates Or just every 7 days. In addition, the user can create them manually.
Procedure
- Go to the control panel, open the "Restore" applet and select the "Starting System Recovery" commands from the list.
- Select the checkpoint created before the failure, and click Finish.

- During the task, the computer will be rebooted. After 5-7 minutes, Windows 10 will return to the state, which preceded the problem.
The resumption of the system is available and then when Windows 10 does not start. If you violate the download instead of the welcome window, you will see the following:

By pressing the "Additional Recovery Options" button, you will be selected from the action. Here you need to click the item "Diagnostics".


After that, you will find a familiar window with a proposal to select a checkpoint. Follow the instructions and wait for the wizard's end.
Restoring a computer in the original condition
This option will help cope with errors that do not eliminate the resumption function, as well as in cases where suitable control points are missing or not created.
Restoring Windows 10 to the original state can be performed:
- With preservation custom files and a number of pre-installed programs. In this case, everything system settings, driver and software, user installedwill be reset.
- Without saving personal data, programs and settings. This option returns the system to a state, as after a clean installation. No custom information will remain in it.
Important! On computers and laptops, where Windows 10 has been installed by the manufacturer, the third option can be accessible - recovery to factory settings. At the same time, not only data and user settings are deleted, but also the contents of unsystematic hard disk partitions.
Return to the factory state without storing personal information is used as an extreme measure - alternative to reinstalling the system with difficult to store failures, as well as before selling a computer or transferring it to another user.
Procedure for returning Windows 10 to its original condition
- Open the Start menu and click the "Parameters" button.

- Select "Update and Safety" options.

- Next, select Restore.

- In the "Return Computer To Source Status" section, click the Start button.

- After that, select the option you want: "Save My Files" or "Delete All".

About 40-60 minutes of Windows 10 will be in the ranks again.
Rollback to the previous version of the system (Windows 7 or 8)
This method is available only to those who installed the "dozen" in order to update the previous OS - "seven" or "eight". And it is possible only within a month after the update.
This will save user files in personal folders, drivers, software and previous system settings, and everything that was in Windows 10 will be deleted.
To roll back to the initially installed OS, start the Settings application from the "Start" menu, open "Update and Security", then "Restore" and select "Back to Windows 8.1 (7)".

If there is no function in the list of parameters of this item, it means that the function is not available. It will also be unavailable if the user deleted the Windows.old folder from the system partition of the hard disk.
Reinstall Windows 10 from recovery disk
This option will be useful to those who have created a regeneration disk in advance. It retains a backup copy of the system with operational parameters.
To create a recovery disk, you must perform the following:
- prepare a clean DVD or USB flash drive (the minimum storage capacity is determined individually) and connect to the computer;
- open in the Control Panel "Restore", select the "Creating Recovery Disk" item and follow the instructions.

The finished medium with a backup copy of Windows needs to be stored in a safe place and not to use for anything else.
How to restore Windows 10 from backup
If the system is loaded, open the "Parameters" application -\u003e "Update and Security" -\u003e "Restore" and "Return a computer to the original state."
After rebooting to Recovery Wednesday, select "Diagnostics" and "Restore System Image".

Tip! If the system is not loaded, you need to start a computer from the disk with a distribution room, but instead of installation (install now) select "Repair Your Computer" (REPAIR Your Computer).

- Select the system image for the desired number.
- If necessary, specify additional parameters, for example, disk formatting.
- Confirm your consent to rollback and wait for it.
Automatic restoration of Windows will be completed with saving user files, software and settings. The system status will be the same as when creating a backup.
Windows 10 boot restore
Renewal windows bootloader 10 is also performed by running a PC with installation disk "Dozens".
Procedure Next:
- Connect the drive to the computer with distribution of Windows 10.
- Instead of installation, select "Restore Computer".
- In the "Select Action" window, click Diagnostics.
- Next, in the list of additional options, select "Restore when loading".

In some cases, automatic startup recovery does not give results. Then can help manual overwriting of bootloader files and boot section Winchester. How to do it:
- Open the command line in the Advanced Settings window.

- Follow the instruction bCDBoot.exe X: \\ Windowswhere X:- The letter of the system partition on the hard disk.
In the Recovery environment, the letters of sections often do not match those that are assigned to Windows. To determine them, you can use the console utility Diskpart. From the system distribution.
Dial B. command line Alternately:
Diskpart.
LIST DISK.
SEL DISK 0. (or 1, 2, 3 - depends on where the loader is located if there are several physical drives on the PC)
Detail Disk.

In our example, the boot partition is assigned a letter C, which means that the recovery command is written as follows: bCDBoot.exe C: \\ Windows.
To correct the load failure on hardware with MBR markup, you must perform 2 more commands in the console: bootrec / fixmbr and bootRec / FixBoot.The code of the boot partition will be overwritten.
How to restore Windows 10 system files
To restore protected system files Windows 10 uses the application SFC.exe.running on the command line with the parameter / Scannow.
Scanning and fix lasts about 20-40 minutes.

Upon completion of the SFC, a report will be created (CBS.log), which is stored in the C: \\ Windows \\ Logs folder. From it, you can find out which files were damaged and restored.
Windows 10 Recovery
Despite the fact that Windows 10 is characterized by high performance and stability, it may need to restore
Bios. - A set of utilities that installed in the motherboard, which make it possible to enable the device for installing the OS. With it occurs download windows 10, the selection of the data carrier is indicated by the range of thermal sensors, various parameters are configured. If the system has stopped being downloaded, errors fly out and perform recovery standard method You can not, you can via BIOS.
How to restore Windows 10 through BIOS.
But this method can only be used if there is an installation disk or flash drive with a distribution room of a licensed operating system with the version and the discharge that you have installed without external drive this option Not possible.
First you need to start with bIOS settings To read the disk immediately when you start the computer.
If preparation automatic recovery Does not allow you to restart the computer normally, you need to do it forcibly, clamping off the shutdown buttons for 10-15 seconds, immediately as a system started uploaded, you must press one of the keys: F1, F4, F3, DELETE, F8 (exactly what exactly you need to click It is impossible, as it depends on the model of the motherboard on your device).
In the instructions for a computer or on the manufacturer's website, you can search which key will be needed to enter. Most PCs use the "Delete" button, the "Ctrl + Alt + ESC" key combination can be used on laptops.
After the BIOS starts go to the Boot section.
It is necessary to find the 1st boot device parameter, which may be located in the section " Boot Device. Configuration, "Advanced Features", "Boot", "Boot Sequence. There will be required to set the parameter for the CDROM or PXE Und i disk to download from the flash drive: 
Press "F10" to save the result, insert a disk into the drive or connect a flash drive on which the distribution is stored, then restart the device.
After the computer will appear, the initial menu of the installation menu will appear, where it will be necessary to click on the "System Restore" button.
The "Select Action" menu opens, you need to select "Diagnostics". 
Then go to the "Advanced Parameters" item.
Next click on the "Restoration System" item. 
After clicking, the window will start with the selection of the recovery point. 
The "Recovery Recovery" function starts scanning a computer for errors and during their detection corrects. You can try to run the utility, but in most cases after the search usually gives a message that the computer failed to restore.
If your rollback has been provided for and your Windows after the specified actions has been successfully restored, the field will need to go to the BIOS and return the priority of loading the hard disk to the first place.
- How to restore Windows 10 through the command line.
If you did not create the control point, restore wINDOVS systems 10 You can try to execute through the command line. To do this, you will also need a boot disk or flash drive with the Windows operating system, which is installed on the computer.
In the "Advanced Settings" section, select the "Command Line" item. 
In the window that opens, printed "FixBoot". 
Then the action must be confirmed by pressing the "Y" key.
After restoring the Windows 10 bootloader, the system must be checked for damaged system files.
Options for solving problems with damaged system files
- Damaged boot sector operating system.
In the command prompt, you need to enter "FixBoot", click "Enter", then enter "FixMBr", press "ENTER". After that, the Windows boot sector will be restored. The computer can be restarted as usual. - Disappeared boot file. boot.ini.
In the line it is necessary to print "BootCFG / Rebuild", then click "ENTER". All possible system questions confirm by pressing the "Y" and "Enter" key. - CONFIG is damaged in the System32 folder.
In the drive, you must insert a disk with your version of the OS, enter on the "CD REPAIR COPY SYSTEM C: \\ Windows \\ System32 \\ Config command prompt", then press "ENTER". - There are no "NTLDR" or "NtDetect.com" files, the system gives the message: "NTLDR IS Missing when booting Windows".
- Enter in the command line "Copy x: \\ i386 \\ NTLDR C: \\", press "ENTER" (where x - the letter of your drive, and C - the letter of your system Discon which your OS is installed).
Restoring the system via the command line when the computer is enabled.
When reluctance, restart the computer, you can restore the system through the command line from Windows. To do this, you will need to insert the disk in the DVD-ROM when the PC is loaded. After that, run the command line by pressing the combination of hot keys "Win + R" and in a row of searching the "Run" window "SFC / SCANNOW" and click "OK". After that, the battered distributions of the system will be copied from the boot disk automatically. Restoration of the system, rollback passes rather quickly and the demon problem.
Extensive fragmentation of devices using the Windows 10 operating system leads to the fact that on some computers its updates can lead to various kinds of problems. Microsoft regularly releases updates for Windows, trying to adapt the system for all devices, but not always after a major update system works as it should. If there are errors after updating Windows 10, you can roll back the system to last stable version, and within the framework of the article we will deal with how to do this.
Table of contents:What errors may occur with windows 10 after the update
After updating the computer, various errors may occur in the system on the computer. Most often, users face the following issues:
- Some applications are not launched due to incompatibility with the updated version of the operating system;
- Incorrect video card drivers, sound card and other computer devices;
- The system brakes greatly when working - applications are started slowly, the Internet speed is significantly lagging behind the indicators before the update.
If, after Windows 10 updates, there are problems in the computer, first it is recommended to try to update the drivers by downloading them from the official sites of the Iron developers. When problems arise in the work of specific applications, it makes sense to try to update the program.
In a situation where updates do not help solve the problems that have arisen, you can roll back Windows 10 to the previous stable version.
Important: After updating, the Windows 10 failure function to the previous stable version is available for 10 days.
How to roll back Windows 10 after updating through parameters
Many operating system options that were previously damaged far in system utilities, Microsoft carried out in windows settings 10. Through them, including the system rollback to the last stable version. To do this, follow these steps:

After that, the process of roll back to Windows 10 to last stable version will begin.
How to roll back Windows 10 after updating through the recovery environment
Another way to restore a steadily working version of the operating system after the update is to use the recovery environment.
Note: The recovery environment can also be used in those situations when after Windows 10 updates stopped being loaded.
There are several ways to get on the recovery environment in Windows 10:
- When the operating system is working, it can be done through "Start". Click on the keyboard sHIFT keyAfter that, in the "Start" menu, click on the "Restart" option. The computer will boot in recovery mode;
- With the installation disk or flash drive. To do this, insert the drive into your computer and install the boot from it in the BIOS. You can also use the recovery disk.
Once in the recovery environment, follow these steps to roll back Windows 10 to the previous stable version:

After that, the recovery process will begin to last stable version of the system.
All computer owners occasionally face problems windows work After installing incorrect drivers or make changes to the operating system. Solve this problem allows the creation of system recovery points.
Point windows restoration 10 allows you to return the computer to the last stable state of the computer. When creating a Windows 10 recovery point saves a backup of system files. Thus, instead of fully reinstalling Windows after installed some incorrect driver or ratified the virus, you can simply roll back the system.
Recovery points are created before installation. windows updatesAnd also automatically with the frequency you will specify. The more free space on the hard disk you reserve under the recovery points, the more recovery dates you will have to choose from.
The system allows you to manually create Windows 10 recovery points. This may be required, for example, before installing programs that can somehow disrupt the system. In case something goes wrong, the owner of the computer can always roll back the system on the date when everything worked properly.
Note, the recovery points contain only backup copies of the system windows files 10, which affect the loading of the operating system. Personal folders and files are not included in backups. If you want to reserve more and personal files, then you need to make a complete image of the system.
Windows 10 recovery settings
In order to watch the current recovery settings on your computer, right-click on the Start menu and go to the Control Panel.

Go to the "System and Security" section.

Go to the "System" section.

Click on the left column "System Protection".

The window that opens shows the protection parameters for your disks. The status is disabled means that the recovery points for this disk are not made, but turned on when the recovery points are made.

In my case, the recovery points are made only for the C disc on which it is installed. operating system. In order to change the settings of the security settings, select the disk you are interested in and click the "Configure" button.

At the top of the window, you can enable or disable the creation of windows 10 recovery points, and in the bottom to specify which amount of disk space you are ready to reserve these storage backups. The larger volume you specify, the more recovery points will be stored. As this volume is filling out, the old recovery points will be stitched to free the place for new ones. Usually, it is enough to store 2-3 recovery points of the system.
In order to free up a hard disk space, you can click the Delete button to delete all saved recovery points.
Creating a Windows 10 recovery point manually
In order to create a Windows 10 recovery point on the previous "System Protection" tab, click the Create button.

A window will pop up in which you must somehow call the recovery point, in my case for example, I called it "Restoring point before installing an incomprehensible driver." At the same time, the date and time of creating a point will be added automatically. After that, click the "Create" button.

The process of creating a recovery point will begin. Usually it takes less than a minute. After completing the "Recovery Point Successful" window appears (see the picture above). Now you can install that incomprehensible driver, because of which I worked and in case of problems, roll back the system using the recovery point.
Customize automatic creation of recovery points
As already written above, Windows 10 automatically creates recovery points before setting up updates, and also makes it possible to do it manually. But for the safety net, it makes sense to configure automatic creation Points Recovery to the time you specified, for example, every day.
Right-click on the Start menu and go to the Control Panel.

In the "Control Panel" in the upper right corner, select "View" - "Minor Icons" and click on the "Administration" section.

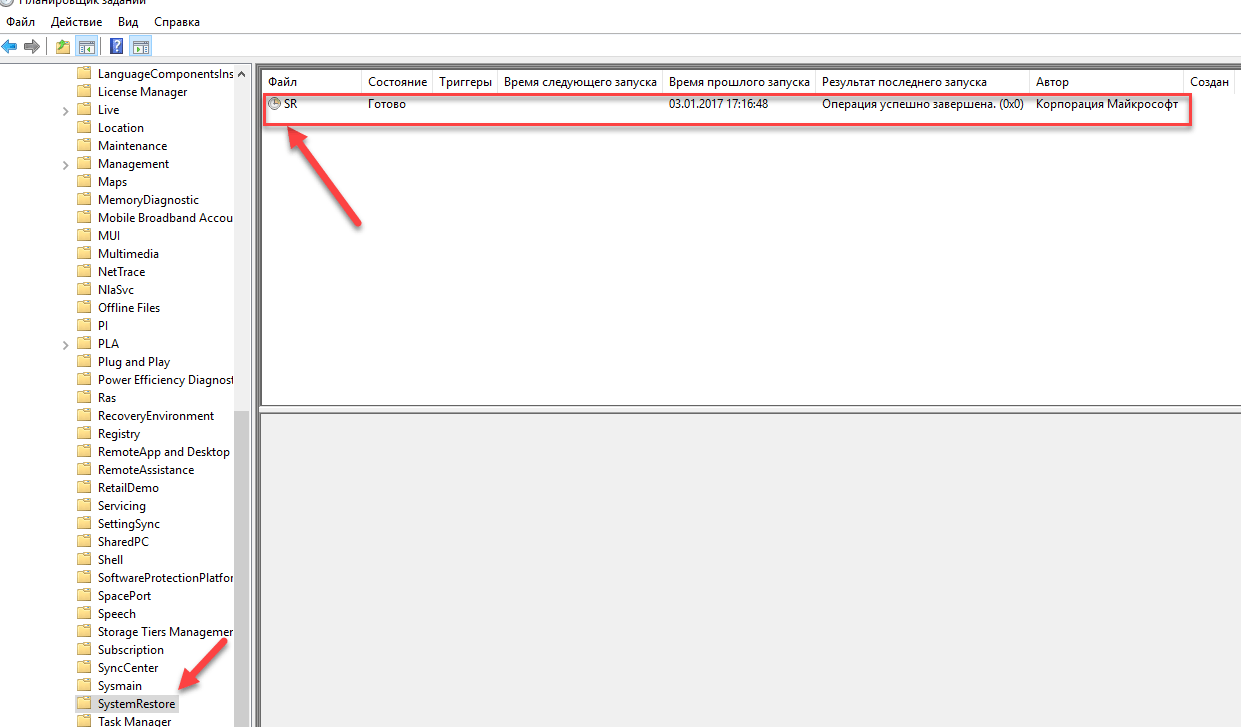
Open the job scheduler.

Alternately click double-click Mice on the items "Library of Planner Jobs" - "Microsoft" - "Windows" - " System Restore.».

In the System Restore branch, the SR rule has already been created to create Windows 10 recovery points. We can only specify the interval through which this rule will work. Click two times on SR rule.
In the window that opens, go to the Triggers tab and click "Create".

In the next window, you can set the period when Windows 10 recovery will be created. You can specify a daily creation, weekly, monthly, when you start a computer or when it is turned off and so on.
You should choose a period of creating points on the reserved area on the hard disk for storing backups, since when filling out this volume, the newest recovery points will wash the oldest.

After you have selected a period of creating recovery points, click OK.
Rollback of Windows 10 to the recovery point
Now, when we learned how to create recovery points manually and automatically, tell you how to restore the system after a failure.
You can roll back the system using recovery points in several ways - with windows interface 10, using the command line, as well as with the help of diagnostic tools.
System rollback via Windows interface
Most light wayThis is when you can run Windows 10. In this case, we do everything as at the beginning of the article. Right-click on the Start menu and go to the Control Panel. Next, go to the System and Security section - "System" - "System Protection". In the System Protection window, click the Restore button.

The system file restore wizard opens. Click "Next".

In the next window, put a checkbox at the show "show other recovery points". This list displays all possible recovery points. The left column shows the dates of creating recovery points. In the middle column, the description is described so that we can identify the point.
As can be seen in the screenshot below, the recovery point called "Point Recovery to the Unclear Driver", which I created in the second chapter of this article is present in the list as the last created.
Finally, the right column indicates the type of recovery point (manually, system or installation), that is, under what circumstances a backup has been created.

Also, you can click on the recovery point of interest and click "search for affected programs." The window that opens will display a list of programs that will affect rollback to this recovery point.
When you chose a recovery point to which we want to make the system rollback click "Next".

In the last window, we must confirm the selected recovery point. After pressing the "Finish" button, the system will start the recovery process.
System rollback using diagnostic tools
If Windows 10 does not start and the desktop is not loaded, then the system rollback can be performed using a special wednesdays Windows 10 to restore the system. When the computer starts, instead of the desktop, you will see a warning that the Windows system boot incorrectly. Click "Additional Recovery Options".


In the "Advanced Parameters" window, click on the "Restore System" item.

You will fall into the already familiar window for selecting recovery points where you should choose the last stable state of the system and click OK.
System rollback using the command line
If working windows table 10 Not loaded, you can roll back Windows 10 to the last recovery point using the command line.
To do this, during your computer, press F8 until you appear a list of computer boot options. Select " Safe mode With command line support. "

In the command prompt write write rstrui.exe., After that press ENTER.

As a result of this command, you have to start the standard system recovery wizard to the recovery point in the graphical interface.
Video on the topic Creating a Windows 10 recovery point
Well, finally, I suggest you to see a few videos, how to create a recovery point and roll back to Windows 10 to the last stable version.