 entrance
What is the interface for ssd macbook air. Replacing and installing SSD on MacBook Pro Retina
Step-by-step instructions with spare parts and necessary tools using the example of Samsung 960 EVO in Macbook Pro 13 "Early 2015
Step-by-step instruction
![]()
Introduction
Depending on the circumstances, whether it’s getting out of a standing SSD or an insufficient number of gigabytes, replacement may be required. solid state drive... The price of original SSDs or analogs from Transcend or OWC is very biting, so we will tell you how to save money and, most importantly, increase performance.
Important: NVME support appeared in MacOS in High Sierra, so before installing this type of drive, you need to update to it or to a new one MacOS Mojave early.
Work should be carried out with antistatic gloves or anti-static bracelet.


Bootable USB stick
Let's start by creating a bootable USB stick. To do this, download the installation distribution from App Store to be in "Applications". We format a blank flash drive with a volume of at least 8GB in Mac OS Extended (journaled) with GUID partitions and call it, say, youroptibay. Open "Terminal" and enter the command sudo / Applications / Install \ macOS \ High \ Sierra.app/Contents/Resources/createinstallmedia --volume / Volumes / youroptibay --applicationpath / Applications / Install \ macOS \ High \ Sierra.app - nointeraction(In Mojave we enter
sudo / Applications / Installation \ macOS High Sierra.app/Contents/Resources/createinstallmedia --volume / Volumes / youroptibay --applicationpath / Applications / Installation \ macOS High Sierra.app --nointeraction)
We are waiting for the Done inscription and proceed with the installation.


Removing the back cover
Remove the highlighted ten screws that secure the bottom cover to the chassis:2.3 mm Pentalobe screw * 1.2 - 2 pcs.
3mm Pentalobe screw * 1.2 - 8 pcs.


Disconnecting the battery
Disconnect the battery connector in order to de-energize the MacBook and not accidentally short-circuit anything.

Preparing the adapter
We are preparing the adapter. It is necessary to insulate a number of contacts, as shown in the photo, in order to avoid shorting the metal connector on the motherboard.


Installing an M.2 SSD
To install the adapter, you need to make a little effort. Insert the adapter into the connector and, resting one finger on reverse side connector, push it in until it clicks. Install the NVME drive into the adapter and secure it. Next, we connect the battery and fasten the cover. This completes the mechanical work, all other actions are software.


Installation start
We put the USB flash drive created in the first paragraph, turn on the poppy and hold down Alt. This will allow you to select the download source, in our case "Installing MacOS High Sierra". Select and press Enter.
Installing macOS
After loading, a window will appear in which we select and run "Disk Utility". Further, the installation process is purely individual and the data differs depending on the model of the poppy and the year of manufacture. We will consider all possible options and problem solving.


Installing macOS
On Macbook Pro Retina 13 "Early 2015, in our case, the disk was immediately displayed in disk utility but this may not happen. In this case, click on the icon in the upper left corner and check the "show all devices" checkbox. Still not showing up? We go to the disk utility and check whether the poppy sees it in principle, using the command diskutil list... In the list that appears, it will be at the very top as / dev / disk0 (internal). (If it is not there, we disassemble the poppy, check the insulation of the adapter, look again). Next, mount it with the command diskutil mountdisk disk0(due to the software features of High Sierra, it may not connect the first time and the command must be entered two or three times). We leave the terminal.He gave Apple lovers hope to update the entire line of professional computers.
May your beloved SD card slots and USB-A connectors never return to your MacBook, but behold the most comfortable keyboard instead of a sticky "butterfly", we still waited.
In six months or a year, it will be possible to replace the old Retina models with updated laptops. To give a second life to the “oldies” and work for them for some more time, we suggest making a simple upgrade.
Only models that support installation will be considered macOS Catalina:
▸ MacBook Pro Mid 2012 or newer
▸ MacBook Air Mid 2012 or newer
▸ MacBook Retina Early 2015 or newer
Upgrade impossible on the 12-inch MacBook from 2015 to 2017, but on the new 2019-2020 MacBook Air and on the 2016 MacBook Pro (TouchBar / Type-C).
The instruction does not work for newer Macs with a T2 chip either. Such manipulations require
Older devices (MacBook Pro Retina and MacBook Air) can replace the SSD. Upgrade random access memory could be carried out on the previous generation of laptops in a unibody case (laptops from 2008 to 2012 without a Retina display).
MacBook Pro Retina
Models that were produced between mid 2012 and mid 2015 are considered to be the third generation of the MacBook Pro. This entire line is also called Retina.
It includes 7 modifications with 13 "and 15" screen sizes:
Mid 2012: MC975LL / A, MC976LL / A, MD831LL / A
Late 2012: MD212LL / A, MD213LL / A, Z0N43LL / A
Early 2013: ME662LL / A, ME664LL / A, ME665LL / A
Late 2013: ME864LL / A, ME865LL / A, ME866LL / A, ME293LL / A, ME294LL / A, ME874LL / A
Mid 2014: MGX72LL / A, MGX82LL / A, MGX92LL / A, MGXA2LL / A, MGXC2LL / A
Early 2015: MF839LL / A, MF840LL / A, MF841LL / A
Mid 2015: MJLQ2LL / A, MJLT2LL / A
MacBook Air

From "air" laptops, devices that were released from mid-2012 to mid-2017 are suitable for us.
The upgrade is possible on any of the five modifications 11 "and 13":
Mid 2012: MD223LL / A, MD224LL / A, MD231LL / A, MD232LL / A
Mid 2013: MD711LL / A, MD712LL / A, MD760LL / A, MD761LL / A
Early 2014: MD711LL / B, MD712LL / B, MD760LL / B, MD761LL / B
Early 2015: MJVM2LL / A, MJVP2LL / A, MJVE2LL / A, MJVG2LL / A, MMGF2LL / A, MMGG2LL / A
Mid 2017: MQD32LL / A, MQD42LL / A
Which drive to choose
Cupertinos have done everything to make upgrading a drive in a laptop problematic. The replacement procedure itself is not too complicated, it is more difficult to choose the right SSD.
These generations of MacBook Pros and MacBook Airs have a slot-specific SSD that is different from most M2 SSDs.
The upgrade can be done as follows:
▸ Find an original Apple SSD of the required size that was removed from another MacBook. Such discs are rarely found on sale.
▸ Find third-party SSDs with the same connector. There is more choice here, but prices still bite. There are several models of the OWC brand: Aura Pro X2 and Aura Pro 6G, Transcend has similar drives: JetDrive 725 or JetDrive 850
▸ connect a regular SSD drive M2 format through a special adapter: this or this.
In the first case, it is best to order the necessary components in the USA at eBay... In the second case good option there will be a model from Transcend, along with the drive you will receive an adapter for connecting a disk via USB, so you can quickly deploy a system backup to an SSD before installing it in a MacBook. After the upgrade, you can put the old SSD into the adapter and make it too external USB disk.

When choosing a model from another manufacturer, a similar dock can be purchased on AliExpress.
In the case of an adapter, you should carefully select the model of the adapter itself and the model of the SSD suitable for it. The choice is very large, but you can be wrong.
Attention! For different models the presented laptops fit SSD miscellaneous type and size. With the first, everything is simple: MacBook models up to the beginning of 2013, inclusive, work with drives mSATA and newer devices (from mid 2013) need disks m2 format. The physical dimensions of the SSD depend on specific model... A bar that is too large or wide will simply not fit into the space allotted to it inside the case.

To avoid errors, check the drive dimensions for your MacBook Pro or MacBook Air at iFixit.
Only after that select a new SSD and an adapter for it.

For those who are looking at Transcend drives, a convenient table has been placed on the company's website. Here you can find the right disk model for your laptop.
How to replace an SSD
1. Create a system backup via Time machine or using.
If you purchased a replacement drive with an external dock, you can immediately connect it via USB, format it in the disk utility and deploy the backup to it.
2. Create a USB stick for a clean install of macOS.
3. Turn off your laptop to start replacing the SSD.

4. Take off back cover laptop. This will require a screwdriver with a bit. P5.
5. Using plastic objects, carefully disconnect the battery connection cable.

6. With a screwdriver T5 unscrew the bracket for the standard SSD and carefully remove it.

7. Replace the new drives and reassemble the laptop in reverse order.
Apple has always been pricing in storage in its devices. For iPhones, iPads, and MacBooks, every step of increasing storage media costs a pretty penny. And gigabytes from Apple are significantly more expensive than the market average. There is no doubt, usually these are very fast gigabytes, and you don't have to regret the overpayment. Yet sometimes the toad chokes. And you buy an option with a smaller drive. You hope to shrink and somehow interrupt. But always, absolutely always, you are faced with a lack of volume.
In the case of the iPhone and iPad, the problem is partly, but on relatively old MacBooks (up to 2016), you can change the SSD. But in the case of using original components, this is a very expensive pleasure. For example, a 256-gigabyte drive will cost 30 thousand rubles, if you take a new one, and 18-20 thousand for a used one. It bites, you know. Meanwhile, "just an SSD" of this size is sold for 9-10 thousand. For 16-18 thousand, you can take a 512 gigabyte model. The proprietary Apple connector is bypassed with an adapter, which costs about 1000 rubles on Aliexpress, and 2-3 thousand in Russian stores.
An autopsy showed ...
I will tell you about my own experience with the MacBook Pro 13, model Early 2015. I got it from a 128 gigabyte SSD, which, in general, was enough, but still somehow itching - suddenly it will be necessary to mount some incendiary video, and not enough space? For some reason I didn't want to spend 30 thousand. But even with non-native SSDs, everything is not so simple. The fact is that Apple has its own troubles, due to which disks from other manufacturers are seen by the operating system only after dancing with a tambourine, to enable TRIM, shamanism is also required, and there are still problems with hibernation, which you have to disable.
In particular, such overlays happen with the Samsung 960 EVO, which is often bought for upgrading MacBooks. I didn't want to face something like that.
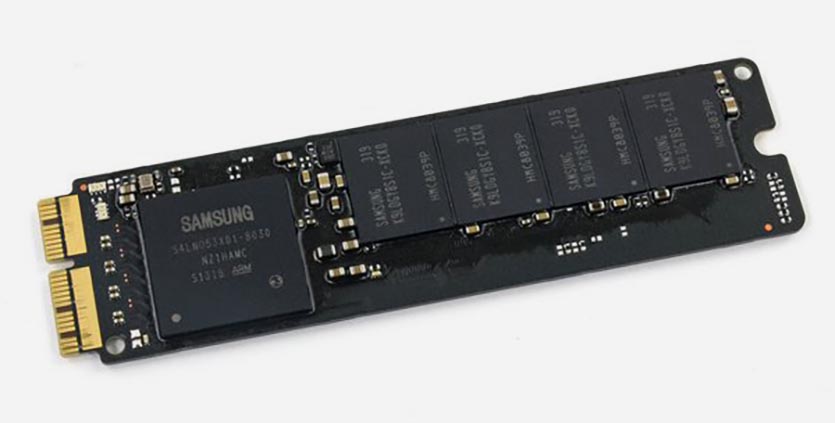
 It's even funny that Samsung SSDs are trying to fail in MacBooks, because, as you can easily see, the original SSD (pictured below) was made by someone.
 Deep googling revealed that Kingston KC1000 is considered one of the least problematic SSDs for MacBook Pro Early 2015. The 240 GB model (I certainly don't need more) costs an average of 8,500 rubles. For this we get a drive with the declared read speed of 2700 MB / s, and 900 MB / s writing. For comparison, the original Apple SSD gives out 1200/700 read and write respectively. Here it is worth mentioning that Kingston's recording is relatively slow only on the junior model, and already from 480 GB it grows to 1600 MB / s. But, again, I do not need such a volume, and the overpayment would not make any sense.
Considering that I had never upgraded MacBooks before, I asked the guys from the Fixed.One service for help in this matter. Running a little ahead, I will say that if you have special screwdrivers (five- and hexagonal stars), the operation can be done at home.
Let's go. First, we unscrew the back cover and admire how everything is beautifully arranged inside. The SSD is secured with one screw. Easy movement - and the slot is free.
 Above a Kingston SSD with an adapter already installed
 The adapter came from China, it looks modest, but, on the other hand, it doesn't need to do miracles. There is no electronics on it - everything is limited only to redirecting contacts from the Apple connector to a regular M.2 connector. Something similar happened with proprietary Sony cards: it quickly became clear that ordinary microSD cards can be perfectly inserted into a portable PSP console through a penny adapter.
The installation procedure is as follows: first, insert an adapter into the connector, then a new SSD into it. If we are talking about a capacious model (for example, per terabyte), it makes sense to wrap the contact point with thermal tape for secure attachment and additional heat dissipation. But in our case, it would be clearly unnecessary, because this Kingston model heats up very moderately, and in conjunction with the existing adapter protrudes above the board a little higher than the original and perfectly contacts the thermal interface on the lid. In length, the match is complete, so the KC1000 was fixed with a screw from its predecessor.

When turned on, the MacBook expectedly swore at the absence boot disk, but after inserting a flash drive with the High Sierra distribution kit, I immediately saw a new SSD and offered to install the OS on it. Highly important point: install without upgrading to High Sierra third party drive impossible, and it is necessary to upgrade the operating system BEFORE replacing the drive.

The installation took place without the slightest overlays. That's real - there is even nothing to tell. Upon completion, I restored all data from a copy of Time Machine on a flash drive. It turned out to be significantly faster than by air, but still slow relative to the capabilities of the flash drive. It can transfer up to 300 megabytes per second, and the restoration proceeded at an average speed of 20 megabytes, only occasionally increasing to 40-50 megabytes.
Immediately after the recovery, I launched the benchmark and, frankly, was pretty discouraged: according to its data, the read and write speed was below 400 MB / s. At the same time, the speed of work was the same. Launching applications, switching between them - that's it. I had a suspicion that the matter was in background tasks with which the system loads the disk, and in particular - the Spotlight indexing service. The latter works furiously in the first days after installing a new drive, re-examining files, letters, contacts, etc., which leads not only to slowdowns, but also to increased energy consumption. You can disable indexing by entering the command in the Terminal sudo mdutil -a -i off... But it’s probably better to just wait until the system realizes itself again and calms down.

Actually, the very next day the benchmark showed completely different, more pleasing numbers. This is not at the peak of the SSD's capabilities, but is noticeably higher than on the original drive, released, let me remind you, three years ago.
What pitfalls can arise? First, with a non-native SSD, the MacBook Pro tends to wake up incorrectly from hibernation - it crashes and goes into reboot. I've had this a couple of times, but only on the first day, when FileVault data was encrypted in the background. After its completion (pah-pah-pah) everything became normal. If you have the same problem, you need to type the command in the terminal sudo pmset -a hibernatemode 25... But the best thing, experts say, is to reset your laptop and set it up from scratch, rather than restore it from Time Machine. Then there will be no problems getting out of sleep. I haven't checked it myself yet, but I believe in experts.
Secondly, the drive may not work to its fullest. This is also stated in honest descriptions of adapters: they do not pump more than 2 GB / s. Plus, not all lines can work PCI Express, for example, only two instead of the maximum four. In my own diagnostic utility, x2 and x4 are shown. This does not affect performance. And by the way, I don't even know - maybe the original SSD also jumped.
But in general, especially after the release of High Sierra 10.13.3, third-party SSDs work decently, and if you are lucky with the adapter, you will save a very significant amount. To be lucky, it is still better to buy it in Russia and in companies that conduct preliminary testing of this kind of hardware.

Many thanks to Fixed.One for helping with the upgrade. The Kingston KC1000 has shown complete suitability for use in a MacBook, and given the fact that they have a maximum capacity of 960 GB, this will allow someone to increase the storage volume to a very impressive size at a very reasonable cost.
Views: 12 889
Remember the good old days when you changed the battery in a couple of minutes, added RAM and installed additional storage? If you Apple user This is all a thing of the past for you, but upgrading your hard drive is still possible, and Apple is still letting us do it. In 2010, Apple introduced its proprietary solid state drives, the "blade" SSD. The company touts their read / write speed and reliability, but rarely explains the details of the technology used in SSDs, since these drives are only intended for Apple computers.
After many questions, the specialists of the Eptibey service center decided to conduct their own research on the equipment. They had to become "apple detectives" to uncover the secrets of these discs, because the deeper they looked, the more surprises they discovered. Details and results are below.
Each HDD or a solid state drive you've been using for the past 10 years probably used the SATA interface, and recently the PCI Express interface has become common. If you are using an old computer and think that many minutes of loading and long waiting for a program response is the norm, then you are probably still using a SATA disk. Time to speed up!
What is SATA?
SATA is the technology standard for connecting hard drives, solid state drives and optical drives to the motherboard. The SATA standard has been in use for many years and is the most common interface for connecting internal storage... The SATA standard has undergone three major changes, resulting in identical connectors (for backward compatibility) with double the bandwidth.
This may cause some confusion when connected. hard disk that supports the SATA III standard to the SATA II connector, since the second generation interface will limit the potential bandwidth of the drive. And in the case of SSDs, using SATA II means depriving yourself of more than 200 additional MB / s for reading. But even when connected to SATA III, the memory capabilities of solid state drives are not fully revealed.

What is PCIe?
Peripheral Component Interconnect Express (PCIe) is a very high bandwidth computer bus standard and is the fastest bus available to most computers. Unsurprisingly, manufacturers have switched to PCIe technology for SSDs.
Like the SATA standard, PCIe has undergone many changes over the years and is still evolving at breakneck speed. PCIe 2.0 (probably the most widespread PCIe version) reaches a maximum speed of ~ 500MB / s with one lane bandwidth... This speed is slightly slower than SATA III, but PCIe has the advantage of using multiple lanes to run connected peripherals.

Lacking 2 channels of bandwidth (~ 1 GB / s)? Double the number of channels to 4 and if the connected device allows you to use them, you get twice the data transfer rate. PCIe bandwidth can be increased to 16 and even 32 lanes for a single device, but this is rarely seen in SSDs as it is primarily used for graphics cards. Most PCIe drives will have 2 or 4 lanes of bandwidth.
In 2011, PCIe 3.0 was released, in which the speed was increased not only by adding additional channels. PCIe 1.0 and 2.0 use 8b / 10b encoding for data transfers (just like SATA), which means every 8 bits of data sent is sent in a 10-bit line code. In other words, 2 out of 10 bits are just overhead data needed to transfer the rest of the data. These 20% of "idle" costs eat up the real bandwidth of the interface, as a result of which it decreases by the same 20%.
PCIe 3.0 introduced a much more efficient 128b / 130b encoding, bringing the efficiency closer to 100% - the cost of potential bandwidth is only 1.5%.
AHCI vs NVMe
The Advanced Host Controller Interface (AHCI) was created for SATA HDDs. This mechanism allows built-in command queuing and hot swapping. AHCI became a versatile enough interface to work with SSDs when they were just getting started, but for several years now it has hampered data transfer rates.
Now about NVMe or Non-Volatile Memory Express. NVMe was created specifically to work with SSDs, reducing latency and allowing large amounts of data to be transferred per unit of time, making it more efficient to use modern multi-core processors. By the time PCIe 3.0 was released, the NVMe specification had become essential to harness the full potential of storage bandwidth.
Original Apple Connectors
When Apple released its first slim solid state drive in the MacBook Air in late 2010, it was still in use traditional technology SATA interface, while Apple abandoned traditional form factors SATA and mSATA, which were in most laptops of the time, choosing instead their own connector, which was never used by other developers, neither before nor after. With the release of the MacBook Air in 2010, Apple ushered in a new trend in proprietary connectors and form factors that eventually captured the entire the lineup Apple ushered in the era of storage devices that, along with easy replacement, were difficult to buy.
Many people mistakenly think that connectors are one of the M.2 variants found in many PCs, but in fact Apple never used it. And unlike the pinout called M.2, Apple did not give names to its connectors, so from now on we will simply refer to the connectors by the location of their pins, as shown in the figure below.

Apple SSD release history
1 Apple generation SSD: MacBook Air (Late 2010 - Mid 2011)
For MacBook Air 11 ″ (Model A1370) and MacBook Air 13 ″ (Model A1369) Late 2010 - Mid 2011 editions. Apple's desire to reduce the thickness of the already thin MacBook Air necessitated a move to a thinner drive. Instead of using a 2.5-inch SATA SSD like the rest of Apple's product lines, or even a 1.8-inch SSD like the MacBook Air Original, Apple started using an even thinner drive. This Gen 1 drive used a proprietary 6 + 12-pin connector, redesigned mSATA III, limited to 6 Gb / s.
The first generation SSDs were made by Samsung and Toshiba, but Samsung's drives were found to be significantly faster. Both drives worked according to Apple's stated specifications, but MacBook Air buyers were in the SSD lottery as laptop owners with drives Samsung reading and recording was about 1.5-2 times faster than Air owners with Toshiba drives. Apple seems to have learned from this, and subsequent generations of SSDs have never had such a big difference between drives from different manufacturers.
In MacBook Air of these years, it is possible to install third-party SATA drives with an M.2 connector and a size of 2280 - for example, the Samsung 860 EVO, through a special adapter.

2nd generation Apple SSD
The second generation of Apple SSDs began to be used in iMac laptops and desktops. The second generation drives were faster than the previous generation, but still used the mSATA III interface - very close to its maximum bandwidth.
The discs were characterized by the use of two completely different shapes; the shorter and wider Gen 2A drive used in MacBook Pros and iMacs; and the longer and thinner Gen 2B drive used in the MacBook Air. Both 2A and 2B drives use the same mSATA 3 interface and the same type of 7 + 17 connector pins. Despite using the same connectors and interfaces, the drives are not fully compatible because the space allocated for the drive on each computer is simply not designed for a different type of drive.
MacBook Pro (Mid 2012 - Early 2013)
With release the first MacBook Pro with Retina Display Apple has included the SSD standard in the MacBook Pro lineup and is now effectively the only storage device with a 7 + 17-pin drive. The Gen 2A SSDs used in these MacBook Pros came in 128GB, 256GB, 512GB, and 768GB capacities from Samsung and SanDisk.
Both 13-inch and 15-inch MacBook Pro laptops use the same drives, and any of the four SSDs can be installed on either laptop.
iMac (Late 2012)
With the iMac Late 2012, things were a little different. The SSDs were only bundled with the Fusion Drive and were bundled into the same array with the traditional 3.5 "and 2.5" standard SATA III hard drives. Apple's Fusion Drive optimizes file storage so that more frequently accessed files and system files are stored on the SSD, while most of the rest is stored on the hard drive.
Physically, this system is implemented using a standard SATA connector and a proprietary 7 + 17-pin. Fusion Drive can be disassembled in software and used individually, or in hardware - the SSD connector can use any of the Gen 2A options (128GB, 256GB, 512GB, or 768GB), while the SATA connector can accommodate any SATA hard drive, or SSD 2.5 ", and iMac 27" and 3.5 ".
Important clarification: The 27-inch iMac always has a 7 + 17-pin connector on board, and the 21.5 ″ model is guaranteed to have this connector only if the iMac originally came with Fusion Drive. Otherwise, you will only find an empty space instead of the proprietary mSATA connector. However, iMac 21.5 '', which are sold in Russia without Fusion Drive, often come with an SSD slot.
In such iMac and Macbook Pro Retina 2012 - Early 2013, you can install a third-party SSD drive - for example, a Samsung 860 series with an mSATA connector through such an adapter or M.2 drives of 2260 size through this.

MacBook Air (Mid 2012)
As stated above, Gen 2B drives are shaped differently, but use the same interface and connector as their Gen 2A counterparts. The 2B read / write speed is noticeably slower, probably due to technical limitations and the smaller disk space of 2B drives.
Another result of technical limitations is the inability to install a 768 GB drive. Samsung and Toshiba made Gen 2B drives in 64GB, 128GB, 256GB and 512GB variants, all of which are interchangeable in the Mid 2012 MacBook Air 11 ″ (model A1465) and MacBook Air 13 ″ (model A1466) models.
Here you can also use an adapter and install at least 2TB SATA M.2.

3rd generation PCI-e Apple SSD
With the second generation drives, it became clear that the 600MB / s limit for mSATA would not allow for faster speeds, so in the next generation of drives, Apple began to use the PCIe 2.0 × 2 interface, which led to a very significant increase in performance. Performance varies greatly between devices and drives, but the fastest third generation configurations can run more than twice as fast as the fastest fast disks second generation.
The third generation also saw a consolidation of drive types, with virtually all drives being compatible with all Apple computer models from mid-2013 to mid-2015.
SSDs are not only compatible between various devices; actually different computers have the same discs. The SSDs were manufactured by Samsung, SanDisk, and Toshiba, and the same manufacturer part numbers were found on the drives received from all computers. Samsung, perhaps, added unique endings (/ 0A2, / 0A4, / 0A6, etc.) to the drives used in different devices but all drives use the same flash controller and testing has shown no performance differences between them.
Solid state third generation drives have the same form factor(let's call it 3A), with the exception of a 1TB SSD (generation 3B), which is about twice the width for the same length. All 3G drives use the same 12 + 16-pin connector and share a common PCIe 2.0 × 2 interface, with the exception of a 1TB SSD with PCIe 2.0 × 4 interface, which is most likely due to the large physical size drive that allows you to introduce fewer engineering constraints.
All third-generation drives use AHCI technology, but computers themselves shipped with third-generation drives also support NVMe SSDs, allowing you to upgrade to later generation NVMe drives.
MacBook Air (Mid 2013 - Early 2014)
These MacBook Airs, both 11 ″ and 13 ″, use the same storage capacities of 128GB, 256GB, and 512GB, apart from the 64GB option found in earlier MacBook Airs.
Interestingly, while all drives are PCIe 2.0 × 2 limited, all MacBook Air motherboards support PCIe 2.0 × 4, making it possible to upgrade to faster 4-lane Gen 4 drives.
Mac Pro (Late 2013)
The Mac Pro in late 2013 was the first desktop model from Apple to have a PCIe SSD and, to the disappointment of many users, the first model to support only one internal organization data storage.
Mac Pro supports all drives (128GB - 1TB) Gen 3 SSDs, but the stock version came with drives with radiators attached with an extremely strong heat-conducting adhesive. Apparently, if Apple engineers decided that it is necessary, then it is necessary. If you are of the same opinion, you can stick a heatsink on the SSD. But it's worth mentioning that everything works fine without it, and internal tests showed absolutely no difference in SSD temperature when using a drive with and without a heatsink, even under the conditions of an extremely tough test.
Interface SSD connections Like the MacBook Air, the Mac Pro motherboard supports PCIe 2.0 × 4 connectivity, which improves performance with later 4-channel drives. Black Cylinder also supports NVMe SSDs and can be upgraded to Gen 5 drives when running macOS 10.13 or later.
MacBook Pro (Late 2013 - Mid 2014)
MacBook Pro Late 2013 - Mid 2014 Supports all Gen 3 drive options, as does the MacBook Air, and while PCIe 2.0 × 2 drives are included, all LUNs support 4-lane PCIe connections.
The MacBook Pro also supports the NVMe protocol and, like the Mac Pro, requires macOS 10.13 or later.
iMac (Late 2013 - Late 2015)
In stock versions, the 21.5-inch iMac was equipped with either a rigid SATA drive 1TB, or 1TB Fusion Drive (128GB PCIe SSD + 1TB HDD SATA III), or a standalone 256GB SSD. The 27-inch iMac offered the same options, plus a 3TB Fusion Drive (128GB SSD and 3TB SATA HDD) and a separate 256GB, 512GB, or 1TB SSD.
Since the iMac has more free space than other Apple computers, you can easily fit a wider 1TB SSD from 27 "to 21". As with the previous generation, the 27-inch iMac always has a PCIe slot on motherboard, regardless of version. And its younger 21.5-inch sibling is not so lucky. A 100% PCIe slot is only available if it was originally configured with a Fusion Drive or standalone SSD. If there is no connector on the motherboard, you won't be able to solder it just like that. There were attempts to solder the connector in the iMac 21.5 '' in 2014, but not everything is so simple, there are not enough electronic components on the board to start the disk, and there are no circuits, you need a donor. Or change the whole motherboard.
iMac 21.5 ″ and 27 ″ from late 2013 to 2014 support NVMe drives provided macOS 10.13 or later is installed, but the PCIe 2.0 × 2 connection width negates all the speed advantages over ACHI.
Mac mini (late 2014)
At the end of 2014, the first Mac mini with a PCIe SSD from Apple, but its internal design did not allow the drive to be directly connected to the motherboard. The Mac mini found storage space on the back of the plastic hard drive casing, on top of the motherboard, which required an SSD flex cable.


The ribbon cable has a 12 + 16-pin female connector on one side and a 40-pin connector that attaches to the motherboard. This was the first and last time that Apple used such a PCIe connector in its computers.
The connector is present on the board regardless of which storage configuration was originally ordered, so a PCIe SSD can be added for everyone Mac computers mini end of 2014, including through a PCI-e adapter for installing another manufacturer's SSD. The only thing is that in a complete set without Fusion Drive, the flex cable must be purchased separately.
Mac mini 2014 allows you to install NVMe drives starting from Mac OS High Sierra, but like the iMac 21.5 ", the PCIe 2.0 × 2 interface will not allow them to overclock at full speed. The speed increase is a modest 10-15%.
4th Generation PCIe Apple SSD
With the release of the MacBook Air and MacBook Pro laptops in early 2015, Apple introduced its 4th generation of SSD blades with the same 12 + 16-pin connector as the 3rd generation. So these discs can slightly overclock the previous generation Macs.
All 4th generation SSDs used the PCIe 3.0 × 4 interface, with the exception of the drive in the MacBook Air 11 ″, which was equipped with PCIe 2.0 × 2 (let's call it 4C) from the previous generation. You can refer to Gen 4 128GB drives, 256GB drives, and 512GB drives as Gen 4A, and the larger 1TB drive as Gen 4B.
Gen 4 has roughly doubled read and write speeds over Gen 3 models. In general, the fourth generation of drives has become the next qualitative stage in the evolution of the Apple SSD.
This time SSDs were exclusively manufactured by Samsung, with the exception of the 4C Gen for the 11 ″ MacBook Air, which was manufactured by Toshiba. Samsung drives are typically referenced by their flash controller ID, UBX, or SSUBX as indicated on the drive. This is a quick and easy way to tell the difference between Gen 4 drives and Samsung drives third generation, which are marked with the SSUAX identifier.
MacBook Air (Early 2015 - Mid 2017)
The latest release of the 11 ″ MacBook Air in early 2015 brought minor upgrades to some components with little or no change to the SSD. These drives were the only ones in Apple's 2015 product line to retain the PCIe 2.0 × 2 interface from the previous generation. The new drives were now identified by the system as "Apple," although the flash memory chips on the SSD indicate that the manufacturers were Toshiba and SanDisk. Despite being a 2-channel drive, the motherboard of the 11 ″ MacBook Air 2015 supports 4-lane PCIe 2.0 connections. can be upgraded with Gen 4A drives from other devices in this year's line. The exception is MacBook Air 11 ”with 512 GB SSD from the factory. It has the 4A SSD generation.
The 13 "MacBook Air used generation 4A drives, but the motherboard, like the 11" sibling, used a PCIe 2.0 × 4 interface. Despite this, the read / write speed was 90-120% faster than the 2013/2014 models.
These laptops don't have enough space for 1TB and are limited to 128GB, 256GB and 512GB options.
MacBook Pro (Early 2015 - Mid 2015)
MacBook Pro laptops in 2015 also had relatively minor upgrades, but SSDs still led to a significant increase in speed, especially for the 15 ″ model A1398, where PCIe 3.0 × 4 is up to 8 GB / s.
Both the 13 "and 15" MacBook Pros support NVMe, and the upgrade to a Gen 5 SSD results in a slight increase in speed for the 13 "A1502, and the 15" A1398 with PCIe 3.0 does indeed take full advantage of NVMe technology. The read speed increases by ~ 40%, and the write speed can increase by ~ 60%. This year's lineup has become the most stable when upgrading to a third-party SSD via an M.2 to Apple SSD adapter. It's better not to skimp here and take Samsung's fast PCIe 3.0. Below in the photo is an adapter kit with a Samsung 970 Evo disk.

iMac (Late 2015)
The iMac released in late 2015 shares many of the same trends as its predecessors. The 21.5 ″ model necessarily has a PCIe slot on the board only if the computer was originally configured with a Fusion Drive or a stand-alone SSD, otherwise it may not appear, especially in computers from the United States. Unfortunately for many, the 1TB Fusion Drive now includes a 24GB SSD paired with a 1TB SATA hard drive. It is possible to choose the option of a stand-alone 256 GB SSD.
The 27 ″ has a Fusion Drive with a 1 TB HDD and a 24 GB SSD, while a 2 TB and 3 TB Fusion Drive with a 128 GB SSD. The 27 ″ iMac also comes with 256GB, 512GB, or 1TB standalone SSDs.
Fun Fact: This year a 24GB PCIe 3.0x4 SSD for FD is also Apple's first NVMe drive! The disk capacity is actually 32GB, but 25% of the available space is reserved and unusable by the user. Apparently, this is done to use this space for dead blocks, since the SSD is used more often than in a regular system.
Fifth Generation
Apple's fifth generation SSD introduces several major changes. First, removable solid state drives are only available in the iMac and Macbook Pro 13 ”WITHOUT Touch Bar. Secondly, all these drives support the NVMe protocol, and all devices support PCIe 3.0 × 4 connections. This means that the entire line has excellent read / write performance and is approximately equal.
There were also changes in the form factor, there were models with different types of SSD. Let's call one type 5A, it uses a completely new, significantly smaller form factor and a new 22 + 34-pin connector. Generation 5B drives use a 12 + 16-pin connector, just like previous generations. Despite the larger slot on the Gen 5A drive, which can improve performance, the speeds are roughly the same. On iMac Pro installed SSD with 12 + 23 pin connector, have a smaller size, we will call them 5C.
MacBook Pro (Late 2016 - Mid 2017)
In late 2016, Apple began shipping two versions of the MacBook Pro: a non-touchpad version and a touchpad (TB) version. Only the 13 ″ MacBook Pro A1708 was offered in a version without the Touch Bar, and this is the only MacBook Pro in this release to feature a removable SSD. In the rest, the drive is soldered to the motherboard and cannot be dismantled and replaced. The only way to increase storage on a MacBook Pro with Touch Bar is by replacing the motherboard.
The MacBook Pro A1708 without Touch Bar and Removable SSD uses the new 5A generation of storage. At the end of 2016, the MacBook Pro offered 256GB, 512GB, or 1TB SSDs, and the 128GB option was added in the mid-2017 release. Reading speed ~ 2000 MB / s, writing ~ 1900 MB / s. There are no third-party replacement solutions or adapters available at this time.

iMac (Mid 2017)
These devices use the already familiar 12 + 16-pin connectors, the motherboard has a PCIe 3.0 × 4 connection interface, the drives use the NVMe protocol and operate at the highest possible speeds. There is an important difference between this generation of iMacs from previous ones - there is a PCIe slot ONLY in the version with Fusion Drive or SSD blade. And that goes for the 27 ”model too. The place of production also does not matter, so when purchasing an iMac for a further upgrade, it is worth considering this nuance. Drive speed for reading ~ 2200 MB / s, for writing ~ 2000 MB / s. The speeds on Samsung drives are much higher - 2800 MB / s for reading.
iMac Pro
At the moment, the only iMac Pro is equipped with two PCIe 3.0 NVMe drives. Reading speed ~ 2500 MB / s, writing ~ 3000 MB / s. These are unique SSDs of their kind, since, as such, in the usual sense, they are not. These two removable cards contain only memory chips, while the T2 coprocessor took over the role of the PCIe / NVMe controller. This means that replacing and upgrading can result in the iMac not starting up as the IDs of the new SSDs will not match those in the T2 controller's memory.
conclusions
In almost all Apple computers, you can replace the SSD with a faster one, or simply expand the disk space. For example, the MacBook Air 2010 has a fairly slow drive, although the laptop supports SATA III. It's sad that in the latest versions of the MacBook Pro with the Touch Bar nothing can be changed - perhaps nothing at all because of the T2 chip. For those who have read to the end, a nice bonus - 10% discount with Insider promo code for all types of work and spare parts for upgrading your Mac from the Eptibey service center in Moscow and St. Petersburg.