 entrance
How to open the TP LINK router settings. Connecting and configuring a TP LINK router
If you purchased TP-LINK TL-WR841N Router, but do not know how to configure it correctly, then this article is for you. Thanks to stepgy detailed instructionsThe TP-LINK TL-WR841N router setting will take you at no more than 15 minutes. By the way, this model won tremendous popularity worldwide. Due to the safe use, high-quality signal, high data transfer rates and low cost, the device can be called one of the best solutions at a ratio of price - quality in its category.
First stage - acquaintance
Let's start with the basic acquaintance. The router has two antennas - it allows you to significantly increase the range and signal stability. The rear view of our device is represented by six connectors and buttons:
- Power on / off button.
- Connector for power cable connecting the device with a socket.
- Ethernet port is used to connect the Internet cable.
- LAN - connector connects the router and laptop / computer to the local network.
- Quick Security Setup - button (fast secure installation) - an analogue of WPS, is a distinctive feature of the TP LINK company.
- Reset button to factory settings (Reset).
TP-LINK TL-WR841N video overview:
Second Stage - Connecting Device
This stage consists in connecting all cable required for the operation.
Step-by-step instruction:

Third Stage - Software Setup
There are two ways:
Via CD
Insert the disk into the drive, we expect autoload easy applications Setup Assistant. If a minute later, nothing appears, open yourself. We go to the "computer", open CD: 
As an example, the TL-WR740N router is used, but the installation is identical. In the menu that appears, click on the "Master fast settings». 
Select the best language for you, click "Start". 
Check if the LAN cable is connected to a computer and a router. Also check the Internet cable. The same applies to the power adapter.
Carefully read this text, check if everything corresponds. 
In this menu, select your stay, city / region, enter the name of the Internet service provider, and in the connection type, use a dynamic IP address. 
If you want to have a static IP address, then you need to enter the data provided by your provider. These data must be spelled out in the contract. Did not find - refer to hot lineCall at the house of the company's service specialist. 
Item "I did not find suitable settings" Use only if your country is missing in the list, or you do not know the name of the provider's server. 
Enter the desired name for the future Wi-Fi network. 
Be sure to select the highest level of protection (WPA2-PSK) from the proposed options. The column below is the default password, you can change it at your discretion. 
Just in case, click the offended point below, it will save the data on the type of connection and protection, name, as well as a password in a separate text Document. 
If everything is entered correctly, the inscription will appear about the successful completion of checking and setting. Wi-Fi Routerbut. Click "Next". 
Excellent, installation with a CD is completed.
In browser
To configure the TP-LINK TL-WR841N router with this method, you just need to connect your laptop to the Wi-Fi network provided by it immediately after power on. The network name must match the name of the model, Wi-Fi will not have a password.
Important! You can use for this purpose not only a laptop, but also a phone or tablet- Only access to the Internet is important.
We start setting up:
- For avoidance possible problems At first, we recommend to make a reset to the factory settings - press and hold seconds 7 RESET key on the router.
- Now open the browser convenient for you ( Google Chrome., Opera, Mozilla Firefox. Or others), and in the site string, enter 192.168.1.1 or 192.168.0.1, press ENTER - this will provide login to the router.
- In the window that appears, enter the same login and password value - Admin, press OK.

- First of all, for great security, we recommend changing standard login and password. The procedure is optional, but will provide greater protection of your network.
 To enlarge, click on the picture
 - Next, you can connect a dynamic IP address to get a Wi-Fi. This will allow you to set the IP address for all devices that will connect to the router automatically.
 To enlarge, click on the picture
 - However, if a static IP address is recommended in the contract with the provider, we select the appropriate type in subparagraph, and using data written in the contract, fill the fields such as IP address, subnet mask, Main Gateway, Primary and Secondary DNS Address manually.
 To enlarge, click on the picture
 - Another option: Select in the PPPoE connection type - enter the login and password, and the choice, dynamic (exercise automatically) or static (some providers provide for this mandatory to fill IP and network mask).
 To enlarge, click on the picture
 - It rarely, but it happens that Internet service providers request the user's network card binding to the MAC address. To do this, go to the item "Network", then "cloning a MAC address" and click "Cloning the MAC address". After these actions, the network will receive access to the Internet.
 To enlarge, click on the picture
 The note! Specify this procedure from the supplier, it is possible for you not needed.
- Usually, the purpose of this setting is simply receiving access to the Internet for family use, for which it is necessary to deal with the sub-clause menu "Settings wireless mode" Specify in it the desired name of the Wi-Fi network and the region of your stay. In the column "Mode", it is desirable to select "11BGN mixed", it is suitable for 99% of users. The width of the canal and the channel also recommend to leave in authors. In the maximum transmission rate, select the highest number on the principle of "the more, the better" (300 Mbps).
Interesting! If in domestic use is located modern smartphones, laptops or computers are not older than 3– 4 years old (who have new type network cards), then in the column mode, you can choose« 11N.» - This will ensure a greater streaming data transfer rate, and will also make both antennas in constant mode.
If you want to stabilize and at the same time a little to increase the speed of the Internet - select the channel manually. Many people live in multi-storey houses, and use the Internet from a single provider, so automatic mode Channel selection, some can coincide, thereby reducing speed. To select the optimal, install the application on Android "Wi-Fi Analyzer" and find the less used channel - and select it in the setting.
 To enlarge, click on the picture
 One of the key points of use wireless network is his defense.
 To enlarge, click on the picture
 If you want to have the maximum speed of work on a portable device, then be sure to place a password in the "Protection of the Wireless Mode", because people wanting to use someone else's Internet full. Next, check in the version "Version" WPA2-PSK - the most modern and secure type of protection. In the encryption column, select AES. Enter your preferred password - it is it that you will be entered when connected to this Wi-Fi.
Save.
Now you need to restart the router, for this you can turn it off for 10 seconds from the power button using the POWER button, and turn on. After that, you can connect all your portable devices to a fully configured Wi-Fi network.
Video to work with Wi-Fi Analyzer utility:
Setup completed. I hope you made sure that the TP-LINK TL WR-841N router is completely simple.
Instruction
In fact, all TP-Link models have similar parameters and connection, so this will help you configure the WiFi TP-LINK router under any number, for example, WR841N or WR740N. First, make sure that you have a customized wire DSL connection to the Internet (the apartment will stretch the network cord, and you have a login and password to connect issued by the provider). Unpack the router: a short dual network cord must be present in the kit, a cable for connecting to a socket and instruction.
The widespread distribution of laptops, netbooks and other devices capable of entering the Internet using Wi-Fi wireless data transmission technology, the era of wired internet gradually comes to an end. Many houses have already appeared routers - devices that create miniature points access Wi-Fi. Naturally, one installation routher. The apartment is not enough to create a wireless network. You must also be able to properly configure. modes His works and other parameters.
You will need
- Wi-Fi Router
- Network cable
Instruction
Connect the router to the connection cable that provides you, the Internet or WAN port. Insert a network cable to any free LAN slot, and connect it to the computer or. In the address bar of the browser http://192.168.0.1. You will open the settings window. Select an internet connection point and enter all the data required by your provider.

Open the item responsible for settings by the wireless network. Specify the following parameters:
- Network Name (SSID) and Password.
- Required data encryption option. Start settings and restart the router. Sometimes it takes full for 15-20 seconds.

To provide best protection You can register the allowable network MAC addresses to which the wireless network will be allowed. You can see the MAC addresses of laptops as follows: Press WIN + R, enter in the "CMD" line, in the console appeared, write "IPCONFIG / ALL".

Video on the topic
Sources:
- 7 iOS functions that can be disabled and extend iPhone
TP-LINK devices are not only reliable and durable, they are also very simple in the setting. Connect and establish a connection to the Internet even a beginner user will be able to connect.

The TP-LINK manufacturer releases routers of different modifications, so the names of the connectors for connecting and commands of the program menu can vary depending on the model or version of the firmware. In general, the control interface software Router is quite simple and understandable.
Entrance to the router control panel
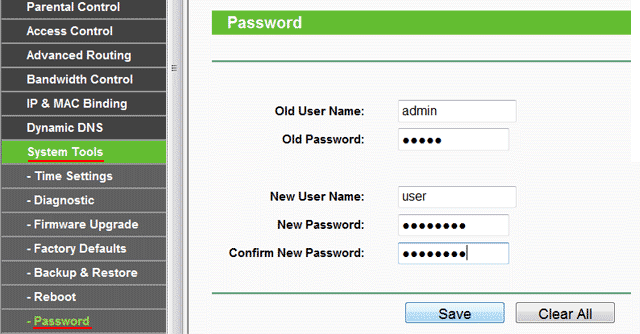
To enter the settings menu, you must connect the router to the computer via the port of the local LAN connection using network cable with the RJ-45 connector. The connector is located on the rear wall of the router and can either have a digital designation or be signed by LAN. Usually such connectors are painted in yellow or orange. After connecting the cable to the router, the latter must be included in the network and wait for the stable operation of the power indicator.IN address line Browser need to enter IP-: 192.168.1.1 or 192.168.0.1, depending on the firmware version. In the window that opens, you must enter authorization data set by default. Admin login and Admin password are used in most models. After logging in, you can see the main menu located on the left side of the screen. It needs to select System Tools and press Password in the drop-down list. In the window that opens, you must replace the standard password, then click the Save button to save the changes.
Connecting Internet connection
The Internet cable must be connected to the WAN or Internet connector on the rear wall of the router, after which you can proceed to setting the parameters. When you select the Network menu and click on the WAN item, a window will open to enter the parameters of the Internet connection. The values \u200b\u200bof the parameters must be clarified by the provider. After entering parameters, they will need to save. Next, you need to click on Mac Clone in the same item, click the Clone Mac Adress button and save the changes.Wireless connection parameters
In the Wireless menu tab, select Wireless Settings. In the window that opens, you will need to fill empty fields and set values \u200b\u200bfor some parameters. For example, Wireless Network Name is the desired wireless name. In the Region drop-down list, you must select the accommodation country, and to set the AUTO value for the Channel parameter. Values \u200b\u200bThe remaining parameters can be left by default.To configure the security of the wireless connection, select the Wireless Security menu item. In the window that opens, you must install the security protocol type by switching the toggle switch to the WPA / WPA2 position, then set the security settings:
For version (protocol type) set the WPA2-PSK value;
- for the Encryption parameter (encryption type) set the TKIP value;
- In the PSK Password field, enter a network security key consisting of eight characters.
Video on the topic
TP-LINK routers are inexpensive and popular, they allow you to install wireless Internet connection at home. To properly configure the Wi-Fi TP-LINK router, some simple simple actions should be performed.
Turn on the router into the outlet and click the start button, the front indicators should turn around. Connect your main DSL cable to the router WAN connector (usually it is from the edge and is highlighted with a blue or other frame). Connect the short circuit cord from the kit to any of the four LAN connections in one end, and insert into the network connector of your computer or laptop into the network connector.
Now, to enter the device settings and configure the WiFi TP-LINK router, open any installed Internet browser (for example, Internet Explorer.), enter the address 192.168.0.1 or 192.168.1.1 in the address bar or 192.168.1.1. About which of them is a worker, you can learn from the instructions in the configuration to your TP-LINK router model. If none of the specified addresses fit (when you click on ENTER, it does not open anything), reset the current settings of the device, holding the RESET button for a few seconds (or inserting a needle to the appropriate hole, depending on the model). After entering the corresponding address in the browser, the router settings menu should open.
Configure the main network connection of the router. Go to the Network settings section and specify the type of your home network (for example, PPOE). It can be viewed in the contract with the provider or call the support service. The provider must also provide such data as the presence of a dynamic or static IP address, server name, IP and DNS. Enter your login and password for wired Internet connection, select Connect Automatically and save the settings. Now, when booting and availability of a connected router, your computer or laptop will automatically connect to the Internet.
It remains only to configure the Wi-Fi TP-LINK router to have a home wireless network connection. Go to Wireless section. Enter the desired name Wi-Fi connection And ask any password convenient for you, saving settings. Now try searching available. wireless connections or smartphone. Among the found it should be the connection you created. Select it, enter the password and check the Internet operation by opening any site in the browser.
Good afternoon dear readers!
Today I will tell you how to configure the TP-LINK router on the example of the TL-WR841N model (D)
My thoughts about this model:
I believe that this model has been very successful with TP-Link, as it is easy to set up, it has a good price / quality. It is perfect for an ordinary home user who needs simply to be the Internet and Wi-Fi. I advise you to take this model if you are the same simple user who is not required from the router. Many of my acquaintances have this model (on my recommendation) for more than 3 years. It works stably, its function performs on 5+
!
So, if you have already purchased this router, let's set it up. Our procedure:
- Setting the Wi-Fi network on TL-WR841N (D)
Connecting the router TL-WR841N (D) to PC
To begin with, connect the power supply to the router and stack it into the outlet. If you do not touch on it indicators (on the router), then turn it on with the back button.
You probably noticed the disk that comes in a set with the router, so we will configure without Its use.

The second end of the wire insert into network card Laptop / computer from which we will configure the router.

If you did everything right, we can move to the next item.
Configuring an Internet connection (WAN Connection Setting) on \u200b\u200bTL-WR841N (D)
We need to go to the TL-WR841N (D) router settings. To do this, on the computer to which it is connected, open any browser, and in the address bar, go to the address 192.168.1.1 , or 192.168.0.1 . The username and password can appear. Specify admin. and admin. (standard password and username). By the way, how to enter the router settings, standard IP and standard login / password are shown from the bottom of the router on the sticker

So, we all entered the right, entered the login and password. We must open the Routher Settings page.
The most important thing is to customize the router to work with your Internet provider. If this is not done, or do wrong, then the Internet will not work through the router. The Wi-Fi network will appear, but without access to the Internet.
In the settings, go to the tab Network - Wan.. We are in the drop-down list Wan Connection Type You need to select the connection type that your Internet provider uses. It can be: Dynamic IP, Static IP, PPPoe, L2TP, or PPTP. I personally have for example PPPoe (The most common type of connection).

Setting up PPPOE, L2TP, and PPTP
If your provider uses one of the above connection methods, we select the desired, and set the necessary parameters that the provider must be issued: username, Password, IP Address. It already depends on the type of connection and provider you have chosen.

The main thing is that you need to get from the settings on this page, so that this router connects to the Internet and began to distribute it. If the Internet works, then click on the button Save.and continue. If you can't configure, call your Internet provider, and check all the data from it that is necessary to configure the router.
If you have a customized high-speed connection To the Internet, then it is no longer necessary for us. It is not necessary to run it. We now router will run such a connection. You can remove it at all.
It may also be that the provider makes binding on the MAC address (you need to specify the provider), in this case, you can clone Mac in the router settings on the tab Network - Mac Clone. Or, there you can change the Mac address of the router. You can also call the provider and ask to remove from binding. old Mac., and tie your new MAC address.

If the router connected to the provider and distributes the Internet, you can continue the setting. To check if the Internet distributes the Internet, just try to go to any site from a computer that you set up a router (which is connected to the router in the port Lan.)
Setting up Wi-Fi network on TL-WR841N (D) and installing a password on Wi-Fi
For wi-Fi settings need to open the tab on the settings page Wireless - Wireless Settings. On this page we need to be in the field Wireless Network Name. come up with and record a name for your Wi-Fi network, and in the drop-down menu of the Region choose the country where you live. The remaining settings, leave both in my screenshot below.

To protect our wireless network password, go to the tab Wireless - Wireless Security. There you need to highlight the type of security WPA / WPA2 - Personal (Recommended).
In field Psk password. Come up and write down the password that will protect your Wi-Fi net.
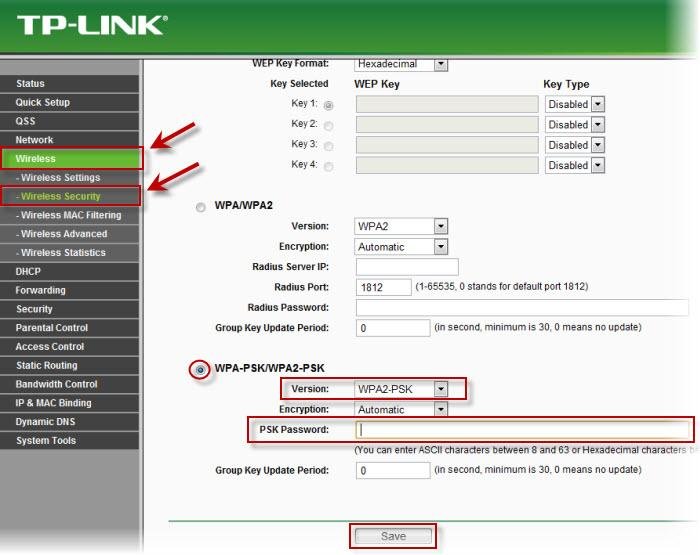
Save the settings by clicking the button Save..
Changing standard Admin user password
While we are in the settings TP-LINK TL-WR841NI advise you to immediately change the standard password, which is set to protect your router settings. Whatever all who will connect to your network, they could not enable the router settings and change them (for example, we gave a password from Wi-Fi to a neighbor / friend).
Open tab System Tools - Password. Specify first the old username and password (default - admin.). Then, below specify a new username (you can leave admin.) I. new password. I advise you to record this password somewhere to forget. Save the button settings Save..
That's all, the TP-LINK TL-WR841N router setting is completed.
It remains only to restart the router. This can be done by shutdown / power on, or from the settings, on the tab System Tools - Rebootneed to click on the button Reboot.
After setting up, and reboot will appear Wi-Fi Network, with the name we installed during the setup process. And to connect to a wireless network, use the password that we also installed when setting up the router.
I hope this article helped you! I did my best. If you are questions, ask them in the comments to the record. If you have an offer, you can direct them to the post
In the next article, I will tell you
Thanks for attention! To new meetings!
Modern mobile devices have ceased to be exclusively a means of communication, most of them are multifunctional devices that can connect to the Internet using the built-in Wi-Fi module. In closed rooms wireless connection The global network "Internet" is provided through routers.
A good solution for obtaining high-speed Internet with a wide range of action is Wi-Fi TP-LINK routers. They are easy to use and allow you to get rid of unnecessary wires in the house, providing access to the Internet at once mobile devices. But for this you need to know about the rules for using the device, connect the Wi-Fi router TP-LINK it is possible to only take advantage of our step by instructions. In this article, tell about proper connection Router to PC with subsequent setting.
How to connect to PC?
After purchasing the TP-Link modem, you must open the packaging and check the kit for compliance with the description in the documentation. In addition to the device itself, the power supply unit, cables, disk software and instructions should be in the box.
After you have seen that the device is fully equipped, you should choose a suitable place to install it. In any case, it must be close to the computer, since the LAN cable is short. If necessary, you will have to buy an additional long cord. In principle, this is not a problem, because It costs it is inexpensive and sold in each trading point of electrical engineering and accessories.
Before connecting the router, it is important to familiarize yourself with its connectors and buttons. There are several of them:
- power button;
- connector for connecting the power supply cable;
- WAN connector, designed to connect the router to the Internet;
- lAN connectors are several of them (mainly 4) and are designed to connect computers by means of a network cable;
- off / incl. QSS-option button;
- button designed to reset the settings.
As soon as we figured out the assignment of the connectors, one end of the power supply should be connected to the router, and the other to the power outlet. The Internet wire conducted by the provider is inserted into the WAN jack (i.e., access to the Internet is provided). Usually the WAN connector on the device is highlighted in blue. One end of the LAN cable is connected to the router (you can use any of four ports), the second to the appropriate computer socket.
Setting
Even if we are dealing with a completely new TP-LINK router purchased in the store (there it can be tested by the trading point), specialists advise to pre-execute resetting the installation to factory parameters.
After reboot, you can go to step-by-step setting Router. For this you need to personal Computer Open the browser and in the address bar to register the numbers 192.168.0.1. or 192.168.1.1 (choosing taking into account the firmware version) and click on "ENTER". Next, the "Settings Wizard" page opens.
To begin with, you need to write a login and password in the respective graphs (Admin).
It is better to change the password that secures the TP-Link router from unwanted use by your Internet neighbors (especially if you live in an apartment building).
In the case when the provider uses a dynamic IP, or the router is connected via the modem, then after its connection, the Internet on the computer and other devices can earn immediately. But in this case, you will have to configure Wi-Faya and installing a new secret code.
To do this, you need to enter the tab, System Tools by clicking on it, and click on Password. In the fields of the old password and the login, you need to register Admin, and the new password and login to enter into the appropriate graphs (New Password and User Name). Change user name is optional, only password is important. After entering new data, you must confirm the actions by clicking on the Confirm New Password. Next to save updates to SAVE.
Experts advise, on the Settings page, you should update the firmware, downloading last version. This is done using System Tools by clicking on it, go to Firmware Upgrade. Next → "Overview" → Open the downloaded firmware file for the TP-LINK router you are downloaded from TP-linkru.com. Then you need to go to Upgrade. Note that the licensed firmware download is free of charge only from official sources.
Further step is to configure the Internet in the TP LINK router. This is done using the Network and WAN tabs. First, you should select the type of network, information about this can be obtained using the HOT-LINE provider, whose Internet you use. Selecting a network type requires saving (click on Save).
Setting up Wi-Fi network
To start setting the Wi-Fi, go to the Wireless tab. We register in the Count Wireless Network Name Name Name. In addition to the column, you can enter the country. All changes must be saved by clicking on the SAVE button.
To protect the wireless connection from someone else's access, you need to go to the Wireless Security system and come up with a difficult, but memorable word for you, enter it in the PSK Password field. After saving all changes, the device should be reloaded by clicking on the System Tools Reboot buttons. This action, like the rest, requires confirmation.
And so, the Wi-Fi connection of the TP-LINK router consists of the following main steps:
- Log in to the "Settings" tab;
- Change Password;
- Firmware update;
- Network selection;
- Setting the Wi-Fi;
Perhaps you video instructions are more convenient:
After performing all the above actions, you can easily configure the router to yourself, the disposal of time and money on the service of the master.
TP-LINK The largest manufacturer of Wi-Fi routers and a number of another computer equipment. TP-LINK TL WR741ND is a widespread model of routers for home and office use. Next, consider how to set up a router to access the Internet using different species connections, and also give an example of setting up Wi-Fi.
Since you are going to completely reconfigure the TP-LINK router of the TL WR741ND model, it is best to immediately reset its settings to factory values. To do this, take a small object with a needle thick (the tip of the ballpoint handle is suitable), and then press the RESET button with it (see the figure below), located in the rear of the router, and hold for a few seconds. The router at this point must be enabled.
If you notice that all the front light bulbs of the device simultaneously caught fire, and then worst, it means software setup The default is reset - you can continue.
Before configuring the modem, connect the cable to it, which is used to access the Internet. It must be connected to the WAN port, which is blue (in the figure is indicated as the Internet). Now consider how the configuration itself will be made.
Since TP-LINK TL WR741ND is a wireless type router, you can connect to it by means of a Wi-Fi connection. For this, the router is enough to include, after which you connect to the Wi-Fi network through a computer or other communication device - smartphone, tablet or other. If the modem is purchased just that or you reset its settings, then the network name will be the same as the name of the model itself Router. Password in this case will not need.
If you cannot connect to the router for any reason by Wi-Fi, it remains only to use the cable connections. To do this, one end of the network cable is connected to any of the ports. router Link. TL WR741ND, which has a yellow color, the other end is a computer network card. After that, the computer must notify about connecting to local networkAnd on the router will flood the light under the number of the LAN port in which the cable was connected. However, this does not always happen, so the connection is better to configure in manual mode. Alternately enter:


If the exchange does not happen, and command line It seems that the "expectation interval is exceeded", you can try again to reset the router settings, check the correctness of the wire connection to it and re-configure the IP address of the computer's network card.
The router is configured by a web interface.
Open your Internet Explorer, enter "192.168.0.1" in the address bar. A small dialog appears in the browser window, in which you need to enter a login and password. Both and the other by default - admin. Enter them and click "OK". 
TP-LINK TL WR741ND supports several types of internet connection
Before tuning the device, it is necessary to figure out which connection technology with global Network Used by your Internet provider. Below will be considered the most likely connection options, one of which will definitely match your case.
Go to the Network section on the left side of the modem interface, then in WAN. We are interested in Wan Connection Type. Setting on this or that type of connection always starts from here.
Static IP.
Technology is not used very often. Here you can find enough from the provider 5 IP network addresses (shown in the picture below). Enter them in the appropriate fields and press SAVE - the setting is completed. 
PPPOE / RUSSIA PPPOE
Technology involves using a login and password to enter the network. If you know the data, bring them to the appropriate fields: User Name (Login), Password (Password) and Confirm Password.
PPPoE technology is often used with static IP. If your provider gives its customers these addresses, they will also need to be introduced. To do this, in the Secondary Connection section, move the switch to Static IP and enter the IP address provided by the provider and the subnet mask. 
Click Save.
L2TP / RUSSIA L2TP
By default, the connection type requires specifying the server address, login and password, as well as (not always) additional network addresses issued by the provider individually to each client.
We first enter the data in the User Name and Password fields. Then in the "Server IP Address / Name" fit the server address (also issued by the supplier). It may look like a regular IP address or, for example, "adres.provaydera.ru". If your provider was issued additional network addresses, Turn on the Static IP item and fill the fields, as in the case of the STAGIC IP paragraph. 
Click Save.
PPTP / RUSSIA PPTP
Another common connection type. Here for connecting to the provider is used VPN Network. The settings are exactly the same as in the case of L2TP / RUSSIA L2TP, described in the previous paragraph. You just have to call your provider to clarify the type of connections used by them. 
In the case of TP-LINK TL WR741ND, Wi-Fi is installed simply:

All other items can be left as it is.
Click Save. TP-LINK TL WR741ND ready! It remains only to check the connection.
In contact with