 entrance
Windows 7 update download does not start. Windows update version kb3213986 is not installed
Operating Windows system 10 constant updates are necessary for competent work. With each new patch, Microsoft improves the system in terms of security, as well as adds new features to it. But the Windows update does not always go smoothly, and sometimes users have to face errors. After downloading the update operating system, the computer traditionally needs to be rebooted for them to be installed and take effect. However, during the update installation phase after a reboot, the user may encounter one of the following errors:

Both of these errors make it clear that something went wrong during the system update process. In this article, we will look at what to do if these errors occur, and how to fix them.
What to do if Windows update fails to complete
When the Windows update fails to complete, the user sees a message on the screen that the changes made to the system will be reversed. You just need to wait for the computer to return the system to the state in which it was before the installation of the latest update.
However, it often happens that the message “We were unable to configure Windows updates»Hangs or appears for a long time even after the computer automatically restarts. In such a situation, turn off your computer only as a last resort. It is recommended to wait until all changes are canceled. This may require more than one, not two, or even three system reboots. Sometimes the cancellation of the changes made is delayed for several hours.
Please note: The length of time for undoing changes depends on many parameters, but primarily on the speed work hard disk and the amount of information on it. For example, on laptops with slow hard drives, canceling a Windows update can take 5 hours or more.
How to complete Windows update if an error occurs
It is not recommended to leave your computer without an update - this can lead to errors in the future when you try to launch applications, reduces the level of security and can lead to various problems. There are several options for what to do if Windows update fails, and we'll talk about them below.
Removing the Windows 10 update cache
The first thing to try if you are unable to configure Windows update is to clear the SoftwareDistribution folder, which accumulates the operating system update cache, or delete content from it. Depending on the "behavior" of the computer, this will have to be done in different ways.


After completing the above steps in the first or second method, make sure in the system settings that Windows downloads and installs the update without errors. Next, restart your computer for the update to apply. Please note: If no further errors have occurred, you can delete the SoftwareDistribution.old folder, which contains the unnecessary update cache.
Checking the computer with diagnostic tools
If the above method did not help to fix the problem that prevents the Windows update from completing, you can try using the built-in diagnostic utilities of the operating system. As with the solution above, the steps will depend on whether or not you can boot Windows.
If the computer finishes undoing the changes and allows the system to boot

If the computer does not complete the undo and keeps restarting
- Open a command prompt with bootable flash drive(the detailed process of how to do this is described above in the instructions for deleting the update cache);
- Write and apply the following command to restart your computer in safe mode: bcdedit / set (default) safeboot minimal
- When the computer restarts in safe mode, run the commands to run the diagnostic tools through the command line. To do this, in the command line, write in turn: msdt / id BitsDiagnostic msdt / id WindowsUpdateDiagnostic
- Next, enter the command to disable safe mode: bcdedit / deletevalue (default) safeboot
- After rebooting, the error "We were unable to complete the updates" should no longer be a concern.
Checking user profiles
Another reason for the "Failed to complete update" error in Windows 10 is a problem in the registry with user profiles. It can be eliminated in two ways. The easiest is to execute. A more complex option involves making changes to the registry yourself as follows:

Important: Before proceeding with deleting or changing registry settings, we recommend.
Other ways to fix the "We were unable to configure updates" error
If none of the above methods helped to fix the error that occurs when trying to install Windows updates, you can try the following steps.
On this moment There are three different issues that Windows 10 users face when installing updates. Firstly, it is an error downloading an update or a freeze in the download process. Secondly, these are problems during the installation of the update, and finally, the system crash with BSOD after reboot. Below are a few possible solutions for troubleshooting.
Fixing the problem of downloading the Windows 10 update
If the cumulative update won't load, try the following steps:

If a cumulative update hangs during download or installation fails, then something went wrong with the update files. After clearing the folder containing the update files, Windows Update will try to download the update components again. Navigate to the following location:
C: \ Windows \ SoftwareDistribution \ Download

Delete all files / folders, but do not delete the Download folder itself. Select all files and folders using CTRL + A and press the Delete key to delete. Restart your computer and run the update procedure again.
If the cumulative update freezes during download, try the next solution:

- Enter Services
- Scroll to Service Delivery optimization.
- Right click on the service and select Properties.
- Change the Startup Type to Manual.
- Reboot your computer.
- If Windows 10 update still freezes, change the startup type to Automatic (Delayed Start).
Stop Windows Update
If stopping the Delivery Optimization service does not solve the problem, additionally try stopping Windows Update. If Windows 10 update hangs during the “Initializing ...” phase, try the following solution:

- Click on the "Start" menu icon.
- Enter Services and launch the classic application of the same name.
- Scroll to Service Windows Update.
- Right click on the service and select Stop.
- Reboot your computer.
- Check for new updates.
- The update should proceed normally.
Windows Update Reset Script

Will completely reset the Windows Update client settings. It has been tested on Windows 7, 8, 10 and Server 2012 R2. The script will configure the services and registry keys related to Windows Update, restoring the default settings. It will also clean up files related to Windows Update.
Fixing the problem of installing Windows 10 update
In some cases, you may face a problem installing an update. If the update installation is stuck at some point, then try the next solution.
If your computer freezes at the stage, then follow the instructions below.

- While holding the power button, turn off the machine.
- Restart your computer and boot into Safe Mode.
- Sign in account(if nessesary).
- Before proceeding, make sure all antivirus scanners disabled.
- In the start menu, type Recovery and select the corresponding classic app.
- Click on Launching System Restore.
- Select an earlier restore point and then click Next.
- Follow the instructions to start the system restore.
- Wait while your computer completes the system restore process.
- Regardless of whether the recovery succeeds or fails, you are most likely a freeze error rescuer at the “Prepare for Windows setup... Do not turn off your computer. "
- Sign in to your account if required.
- Disable virus scanners before proceeding.
- Start the Windows update process.
- The update should now install without problems.
Some users may encounter a stop error causing the display blue screen death (BSOD) during system reboot.

If you encounter a BSOD crash while updating Windows 10, check out this article:
Other problems updating Windows 10
After installing Windows 10 updates, you may encounter some issues like internet connection errors.
To fix these problems, you need to run the following commands from the command line (cmd.exe). In the search box on the taskbar, type Command line, press and hold (or right-click) "Command Prompt" and select "Run as administrator". After opening command line enter the following commands one by one:
netsh winsock reset catalog
netsh int ipv4 reset reset.log
If you are still facing “No Internet Connection” issue, please update your computer's IP address. To do this, open Command Prompt (Win + R, type cmd.exe and press Enter) and enter the following command:
ipconfig / renew
Disable Windows 10 and driver updates
Sometimes, you may need to disable the installation of Windows 10 updates on your computer. Windows 10 Pro users can delay updates for a certain period of time, but Windows users 10 Home, there is no such possibility.
Microsoft provided separate tool Show or Hide Updates to disable cumulative updates or even drivers.

DISM Commands to Check Windows 10 Issues
you can use official teams DISM to repair Windows image to fix any issue with your updates .. Before you start, it's a good idea to make a full system backup or create a system restore point in case something goes wrong.

Using the CheckHealth option in DISM
Command / CheckHealth DISM allows you to detect potential corruption. This command is used only for troubleshooting purposes, but does not perform any troubleshooting operations.
Command line, right-click on the link that appears and select "Run as Administrator" because Device Administrator rights are required to run DISM.
DISM / Online / Cleanup-Image / CheckHealth
UsageoptionsScanHealth'sDISM
Command / ScanHealth DISM allows you to scan a Windows image for any damage. Unlike / CheckHealth, checking / ScanHealth can take up to 10 minutes.
To run this command, follow these steps:
1. Enter the Start menu in the search Command line
2. In the "Command Prompt" enter the following command and press Enter:
DISM / Online / Cleanup-Image / ScanHealth
UsageoptionsRestoreHealth inDISM
Command / RestoreHealth in DISM allows you to automatically perform the procedure for repairing damaged Windows images. Unlike / ScanHealth, checking / RestoreHealth can take up to 10 minutes.
To run this command, follow these steps:
1. Enter the Start menu in the search Command line, right-click on the link that appears and select "Run as administrator".
2. In the "Command Prompt" enter the following command and press Enter:
DISM / Online / Cleanup-Image / RestoreHealth
Note: during the startup of / RestoreHealth or / ScanHealth, you may notice that the procedure hangs between 20% or 40% - this is absolutely normal behavior.
Found a typo? Highlight and press Ctrl + Enter
From the first minutes of working on a computer, each user is slowly discovering a completely new world of computer capabilities. It has a place for the endless expanses of the Internet, and a bunch of ultra-modern programs, applications, games, thanks to which life becomes much easier and more interesting. At the same time, in the computer "barrel of honey" there is also grabbing of its spoons with tar in the form of system failures, glitches and errors, from the elimination of which sometimes the head is spinning. Here's what to do if Windows 7 updates are not installed on your PC? How can one explain this behavior of his?
Reason # 1: Incorrect download of updates
As practice shows, the update package for Windows 7 is most often not installed on the system due to problems with downloading it. The essence of the process is that it is initially loaded into the cache and stored there until the user gives the go-ahead to the Windows Update service to install these files on the computer.
As a result, if they are downloaded incorrectly, it becomes impossible to install them on the system. At the same time, a new attempt to download updates will also be unsuccessful, because the files downloaded with an error will be displayed in the cache that Windows 7 will access.
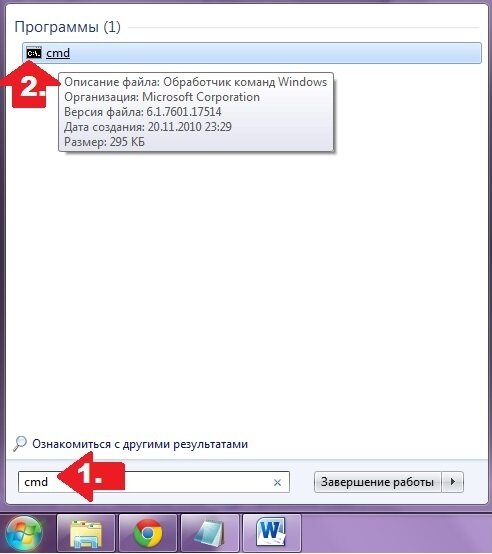
What is the way out of this situation? Right! Delete updates from the cache, download them again and then install them on your computer without any problems. Our favorite command line will help us with this. We launch it through the "Start" menu, driving in three English letters cmd and clicking with the mouse the value that appears in the "Programs" line:
After that, enter the following commands into the command line, alternating with pressing Enter:
- net stop wuauserv
- ren% windir% \ SoftwareDistribution SoftwareDistribution.OLD
- net start wuauserv

After completing them, go to the "Update Center ..." and manually update the system. If desired, here you can also remove previously installed problem files from the update package:

Reason # 2: Windows Registry Issues
More than half of all failures in installing updates on 7-ku are accompanied by the appearance of error 80070308, which in turn can be caused by incorrect work Windows Registry.
How to deal with this problem? First you need to call the "Run" utility by pressing + R, type the regedit command into it and click the OK button. Then go to the HKEY_LOCAL_MACHINE section, select the COMPONENTS tab and delete the PendingRequired item in it:

After that, all that remains is to restart the system and re-download the updates.
Reason # 3: Failure of the update service
Problems installing updates on a Windows 7 computer can also be caused by a problem with the corresponding service. How to bring her back to life? To begin with, in the "Start" menu, drive in the search query "Services" and click the appropriate program in the list that appears. Then, in the displayed list of services, you need to find the "Update Center ..." tab, click on it and stop the service by clicking the "Stop" button:

Further, without closing the system window, on the hard disk, you will need to find the SoftwareDistribution folder in the Windows directory and manually delete all the data stored in it. After that, you need to return to the "Services" window, re-find the "Update Center ..." item, right-click on it and select the "Run" option. Having done this, all that remains is to restart your computer and search for and install updates.
Note that the Fix it utility can also help in this case:

She works in automatic mode, so there shouldn't be any difficulties when working with it. If it still does not help, try rolling back the system:

Other reasons and solutions
As trite as it may sound, errors in installing updates on a Windows 7 PC can also be associated with a lack of free space on the hard drive. So, in order for the system to fully update without the appearance of frightening messages about system failures, you need to have at least 5 Gb of free memory on your hard disk. If the mark moves towards this indicator, you do not even have to ask why it is suddenly, when installing updates, the system freezes, and I can not do anything with it at all.
What kind of solution can there be? Easier, of course, to remove from the hard drive unnecessary files and forget about the problem. If this is not possible, you will either have to abandon the idea with the update, or buy removable hard disk and throw all the information on it. But maybe you still need to delete the unnecessary, huh?
Meanwhile, problems with Windows update 7 may also occur due to lack of internet connection or proxy server errors. The solution here is simple - we check the Internet settings, reconnect to the network and update the system. At the same time, it would be nice to check the work. antivirus software/ firewall: Does it accidentally block update files and access to the Microsoft site. If so, you will need to either disable it for a while, or delete it if the process repeats.
Updating the system to the current state is a very important factor in its correct operation and security. Let's consider the reasons why there may be problems installing updates, as well as ways to solve them.
The reasons that updates are not downloaded to the PC can be both system failures and simply setting the settings by the user himself, which prevent the system from updating. Consider all possible options for this problem and its solutions, starting with the most simple cases and ending with complex glitches.
Reason 1: Disabling a feature in Windows Update
The simplest reason why new components are not loaded and installed in Windows 7 is to disable this feature in Windows Update... Naturally, if the user wants the OS to be always up to date, then this function must be enabled.


But for some reason, even if the function is turned off, the above icon may not be present in the system tray. Then there is another possibility of solving the problem.
- Push "Start"... Move to "Control Panel".
- Click "System and safety".
- In the window that appears, click "Turn automatic updates on or off".

You can also get there by entering the command in the window "Run"... For many, this path seems faster and more convenient. Dial Win + R... Will appear "Run"... Enter:
Push "OK".
- Will open "Update centre"... In the side menu, click "Settings".
- For any of the two above-described options, a window for selecting a method for installing new components will appear. If in the field "Important Updates" the parameter is set "Do not check for updates" then this is the reason why the system is not updated. Then the components are not only not installed, but not even downloaded or searched for.
- You must click on this area. A list of four modes will open. It is recommended to set the parameter "Install updates automatically"... When selecting modes "Search for updates ..." or "Download updates ..." the user will have to install them manually.
- In the same window, make sure that the checkboxes are checked next to all the parameters. Push "OK".


Reason 2: stopping the service
The cause of the problem under study may also be the disabling of the corresponding service. This can be caused both by manually disabling it by one of the users, and system failure... You need to enable it.
- Push "Start"... Click "Control Panel".
- Click "System and safety".
- Sign in "Administration".
- A wide range of system utilities is presented here. Click "Services".

V Service Manager you can get there in another way. To do this, call "Run" (Win + R) and enter:
Click "OK".
- A window appears "Services"... Click on the name of the field "Name" to arrange the list of services in alphabetical order. Look for the name Windows Update... Check it out. If in the field "State" not worth the value "Works" then this means that the service is disabled. Moreover, if in the field "Startup type" set to any value other than "Disabled", then the service can be started by simply clicking on the inscription "Run" on the left side of the window.

If in the field "Startup type" there is a parameter "Disabled", then the above method will not start the service, since the inscription "Run" will simply be absent in the right place.

If in the field "Startup type" option installed "Manually", then of course it is possible to activate it in the way described above, but every time after starting the computer you will have to do it manually, which is not good enough.
- So, in cases where the field "Startup type" set to "Disabled" or "Manually", click on the name of the service twice with the left mouse button.
- The properties window appears. Click on the area "Startup type".
- In the list that opens, select .
- Then click "Run" and "OK".

But in some situations the button "Run" may be inactive. This happens when in the field "Startup type" the previous meaning was "Disabled"... In this case, set the parameter "Automatic (delayed start)" and press "OK".
- We return to Service Manager... Highlight the name of the service and press "Run".
- The function will be enabled. Now opposite the name of the service in the fields "State" and "Startup type" should display values accordingly "Works" and "Automatically".


Reason 3: problems with the service
But there is a situation when the service seems to be running, but, nevertheless, does not work correctly. Of course, it will not be possible to check whether this is the case, but if standard methods enabling the function did not help, then we do the following manipulations.
- Go to Service Manager... Highlight Windows Update... Click on Stop Service.
- Now you need to go to the directory "SoftwareDistribution" to delete all data in there. This can be done using the window "Run"... Call it by pressing Win + R... Enter:
SoftwareDistribution
Click "OK".
- Folder opens "SoftwareDistribution" in the window "Explorer"... In order to select all its contents, type Ctrl + A... Once highlighted, press the key to delete it. Delete.
- A window appears in which you should confirm your intentions by pressing "Yes".
- After completing the deletion, return to Service Manager and start the service according to the scenario that was already described above.
- After that, restart your computer and try updating the system manually, so as not to wait for it to complete this procedure automatically. Go to Windows Update and press "Checking for updates".
- The system will carry out the search procedure.
- After its completion, if missing components are found, the window will offer to install them. Click for this "Install updates".
- After that, the components should be installed.


Reason 4: lack of free disk space
The reason for the inability to update the system can simply be the fact that there is not enough free space on the disk that hosts Windows. Then the disk must be cleaned of unnecessary information.
Of course, the easiest way is to simply delete certain files or move them to another drive. Remember to clean after removing "Basket"... Otherwise, even if the files disappear, they can continue to take up disk space. But there are also situations when there seems to be nothing to delete or on the disk C there is only important content, and there is nowhere to move it to other disks, since they are also all “crammed” to the eyeballs. In this case, use the following procedure.
- Click "Start"... In the menu, go to the name "A computer".
- A window opens with a list of storage media connected to this computer... We will be interested in the group « Hard drives»
... It contains a list of logical drives connected to the computer. We need the disk on which Windows 7 is installed. As a rule, this is the disk C.
The amount of free space on it is indicated under the name of the disk. If it is less than 1 GB (and it is recommended to have 3 GB or more free space), then this may be the reason for the impossibility of updating the system. The red indicator is also a sign of disk overflow.
- Click on the name of the disc with the right mouse button ( PKM). Select from the list "Properties".
- A properties window appears. In the tab "General" push Disk Cleanup.
- After that, an operation will be performed to estimate the amount of space that can be freed.
- After its completion, the tool will appear Disk Cleanup... It will tell you how much space can be cleaned up by deleting a particular group of temporary files. By setting the checkboxes, you can yourself specify which files should be deleted and which should be kept. However, you can leave these settings by default. If you are satisfied with the amount of data to be deleted, then click "OK", otherwise press "Clear system files» .
- In the first case, it will immediately clean up, and in the second, the tool for collecting information will start again to estimate the amount of space that can be freed. This time it will scan system directories as well.
- The window will open again Disk Cleanup... This time, it will contain a larger amount of deleted objects, since some system files will also be taken into account. Again, place the checkboxes at your discretion, depending on what exactly you want to delete, and then click "OK".
- A window will appear asking if the user is really ready to permanently delete the selected files. If you are confident in your actions, then click "Delete files".
- Then the disk cleanup procedure starts.
- After it finishes, restart your PC. Back out the window "A computer", the user will be able to verify how much the amount of free space on the system disk has increased. If it was his overcrowding that caused the inability to update the OS, now it has been eliminated.


Reason 5: failure to load components
The reason for the failure to update the system may be a boot failure. This can be caused by system error or a banal clipping of the Internet. This situation leads to the fact that the component is not fully loaded, and this, in turn, leads to the impossibility of installing other components. In this case, you need to clear the download cache for the component to load again.

Reason 6: registry errors
Failure to update the system may be caused by a glitch in the system registry. In particular, this is evidenced by the error 80070308 ... To resolve this issue, follow a series of steps. Before starting to manipulate the registry, it is recommended to either form it.

Other reasons
There are a number of more general reasons why it is impossible to update the system. First of all, these can be failures on the Microsoft website itself or problems in the work of the provider. In the first case, it remains only to wait, and in the second, the maximum that can be done is to change the Internet service provider.
In addition, the problem we are studying may arise due to the penetration of viruses. Therefore, in any case, it is recommended to check your computer with an anti-virus utility, for example.
Rarely, but there are also cases when the standard antivirus blocks the ability to update Windows. If you could not find the cause of the problem, then temporarily disable the antivirus and try downloading. If the download and installation of the components was successful, then in this case, either do additional settings antivirus utilities by adding the Microsoft website to the exclusions, or change the antivirus altogether.
If the listed methods of solving the problem did not help, then you can try to roll back the system to a restore point created at a time when the updates were performed normally. This is, of course, if such a restore point exists on a specific computer. As a last resort, you can reinstall the system.
As you can see, there are quite a few reasons why the system cannot be updated. And each of them has an option, or even several options to correct the situation that has arisen. The main thing here is not to break the wood and move from the most simple ways to more radical, and not vice versa. After all, the reason may be quite trifling.
Windows 7 users periodically face the following problem: Windows has stopped receiving updates. The error is that the "patches" are not downloaded or installed. Someone will spit on this and continue to use the system as if nothing had happened, while for others it will cause serious and well-founded concern. After all, this is, in fact, a hefty security hole. If Windows 7 is not updated, it means that antivirus patches are not being downloaded. Updates of this kind are best installed - Windows does not forgive frivolity about viruses. When an error occurs, "Update Center" Windows may throw out a window similar to the following:
What is the reason for this strange behavior of the operating system? Is it possible to somehow fix the problem without doing reinstalling Windows? Apparently Windows is looking for and not finding updates. Or is there another catch? There are three main reasons for this behavior of the OS:
- Updates are not downloading correctly.
- V Windows registry there are specific bugs.
- Problems in the operation of the Windows update service itself.
Let's consider these alternatives in order.
Wrong boot order
This is the most common cause of problems installing Windows updates. The download is performed into a special system cache, and if any failure occurs during the download process, then the same update cannot be downloaded again.
The solution to the problem looms by itself: you must first clear the cache, and then repeat the download.
This is all done through the command Windows string... You can start a command prompt window by typing cmd in the Run window of the Start menu. After that, in the console window, you need to enter three commands (after typing each command, you must press the "Enter" key), as in the figure below:
 As you can see, the result of their execution is a message about the normal start of Windows Update. If the patches are installed without problems, then the reason was precisely in the cache. After that, you need to go to the "Center" and manually perform all the necessary operations to update the system. 90% of all problems of this kind are in the cache, so do all of the above operations first.
Glitches in the system registry
The Windows registry is a well-known source of a huge number of errors. If service packs are not installed, be sure to check it for one tricky error. It is very likely that it was precisely because of glitches in the Windows registry that it began to behave in such a way that updates are not installed. The problem is this: probably in the HKEY_LOCAL_MACHINE / COMPONENTS node a key called PendingRequired was found - this is the reason for our sorrows. Just remove this key and restart your computer. Then everything should be installed normally.
If you don't know what is system registry and how to use its editor, we advise you to urgently update your knowledge. The registry is a special database that stores operating system and software settings. Therefore, any incorrect writing to this database can lead to major or minor troubles. To edit the registry, use special program regedit.exe. It can be called from the "Run" window of the "Start" menu without even specifying the file extension - just by typing regedit in it. A window similar to this will open:
 This is where all operations need to be performed. You can also use the search menu in the registry window.
Service malfunctioning
The third reason why service packs are not installed in Windows is the incorrect operation of the corresponding service. Like many other services of the operating system, "Update Center" is implemented as a Windows service. Sometimes there are collisions in its operation, which can be eliminated by restarting the service and cleaning some system folders. Why did the "Center" stop working normally and gives errors? Looking for and not finding patches? Or finds, but they are not installed? Because the corresponding Windows service has stopped working adequately.
To fix this problem you need to open a window Windows services(you can get to it through the "Control Panel"), find our "Center" there and stop this service. Then go to system folder named SoftwareDistribution is a subfolder Windows folders- and clean it completely. Then turn on the "Center" service again. Now the system searches and finds everything it needs.
 To address the above issues, a special software... For example, the "Fix It" utility. With its help, troubleshooting of this kind of problem is especially easy. It is always useful to have such service programs at hand.