 entrance
What are Windows user accounts. Their creation and configuration
Windows Phone 7 appeared on sale at all for a long time and in order to help those who ordered him to Russia, understand it in the first days after the acquisition, we will cover various topics by setting it. Today we will dwell on e-mail - this is one of the first things that you set up when purchasing a WP7 smartphone.
Configuring Windows Live ID account
For launch Windows Phone for the first time you will be prompted to customize the account Windows Live. ID. At this stage you can decide to use your Windows Live ID on your phone or refuse to use it and related services. If you do not have Windows Live ID, but you need you, you can create it on the phone.
To the direction of Windows Live ID, come responsibly, since you will then not be able to delete it after the phone is completed. Among other things, Live ID will give you the opportunity to use Xbox Live and Zune on your phone. If you do not use Xbox Live and Zune, you can log in with your Windows Live ID and use only for email.

If you do not know whether you need a Windows Live ID or which one of your use for your phone, you can skip this setting step when you first start the phone. You always have the ability to add Windows Live ID on the phone later. You can also add multiple Windows Live IDs, but only on the first of them will be displayed on Xbox Live and Zune accounts.
If you have not configured Windows Live ID at the first start, you can configure it later by passing these steps:
- Click "Add Account" and select "Windows Live"
- Enter your Windows Live ID in the appropriate field
- Enter the password from the account
- Click "Login"
If you entered the data correctly, the mail, contacts, photos, the calendar will be synchronized with the phone. Also synchronized your data in Xbox Live and Zune if you use these services.
Creating Additional Email Accounts
Email can be automatically configured to the following services: Windows Live, Outlook / Exchange, Yahoo and Gmail. For them, you just enter the email address and password, the phone will automatically select the corresponding settings for the server.
If you have an email account on a personal domain or a provider, you can configure standard IMAP and POP server for email records. Advanced settings are also available for those who have unique server settings or problems in the automatic configuration process. Recommendations for setting different types Email accounts read below.
Configure email accounts for services having presets

Most people use such systems as the main account for email as the main account as: Gmail, Yahoo or Exchange. Windows Phone is designed to meet this and offers a set of pre-configured email services. All you need is your username and password, the phone will do everything else itself. Perform the following steps to configure such accounts:
- Being on the home screen, swipe left to the left, to go to the list of applications. Go to "Settings" and then select "Email and Accounts"
- Click "Add Account" and select the appropriate service (Google, Exchange, Yahoo, Windows Live, etc.)
- Enter the password from the account
- Click "Login"
Your PHONE will contact the selected service, will receive the server settings and synchronizes the contents. What exactly will synchronize depends on the selected service, so Google will synchronize email, contacts and calendar (only the main calendar, and not secondary), Yahoo will synchronize only email. You can have multiple accounts for each service.
In some cases, the phone will not be able to automatically configure your email, in this case you will have to configure your account manually using the method described below in the "What to do if nothing happened."
Setting up POP and IMAP for email accounts
Many are used for mail not only Google and Yahoo Services, have mail on a personal domain or a provider. For these accounts, you must manually configure server settings by following the following steps:
- Being on the home screen, swipe left to the left, to go to the list of applications. Go to "Settings" and then select "Email and Accounts"
- Click "Add Account" and select Other
- Enter the username of your account in the post box address window
- Enter the password from the account
- Click "Login"
The phone will automatically try to determine the POP and IMAP server for these servers, if it does not work, then you need to do this manually.
What to do if nothing happened

Sometimes the phone will not be able to determine the necessary parameters yourself, then you will have to manually specify the servers for receiving and sending messages:
- Account Type (POP or IMAP)
- Incoming email server address
- Outgoing server (SMTP) email
- Server authentication settings
- SSL requirements for incoming mail and outgoing email
- Domain (for Exchange Accounts)
Usually this information You can find on the site of the service you use, and for the settings of the Exchange work record, you need to contact your network administrator. Make these settings can be followed by these steps:
- Being on the home screen, swipe left to the left, to go to the list of applications. Go to "Settings" and then select "Email and Accounts"
- Click "Add Account" and select " Extended setting»
- Enter the username of your account in the post box address window
- Enter the password from the account
- Click "Next"
- Select "Exchange ActiveSync" if you configure an Exchange account or select an email address on the Internet if you configure your personal or provider email provided by the provider
- Fill in text fields with information obtained earlier. For Exchange Accounts, you can choose elements for synchronization, including email, contacts and calendar
- Click "Log in" to save the settings
Parameters for email accounts

After setting up the technical parameters of the account, you can go to the optional setting by following the following steps:
- Being on the home screen, swipe left to the left, to go to the list of applications. Go to "Settings" and then select "Email and Accounts"
- Select the configured email account
- In this section you can change:
- account name
- download frequency (as arrived, 15 minutes, 30 minutes, etc.)
- period for downloading old messages (last 3 days, for 7 days, etc.)
- select elements for synchronization, for example - email, contacts or calendar
- username, Password or Email Server Settings
- When the settings are completed, click the Edit button.
Notifications, another important aspect of email, configure in the "Melodies and Sound Settings" section. Unfortunately, Windows Phone 7 is not so flexible in the settings of the tunes for accounts as BlackBerry. You can only assign one notification for all email accounts.
If you acquire an Android smartphone, then work with this device when you first turn on, you must start with the connection of Google account. To do this, you will need Gmail email address. Mail Gmail. It is a google account, so if you already have it, just enter it. To make you a little easier to connect an account, you are offered a step-by-step instruction.
You will need:
- The presence of a smartphone based on the Android operating system;
- Connected SIM card of an arbitrary mobile operator;
- Exit B. Mobile Internet or Wi-Fi network connection.
Connecting and configuring Google account
First you need to go to the menu " Applications».

Go to the menu " Accounts»/« Accounts and synchronization»:


Choose Google:

The question will be displayed on the screen: " Add Existing Account Or create new? " If you are already registered on Gmail, choose: " Existing", If not - Press the button" New».

Before you appear fields to fill the name and surnamethat will be your signature in letters:


Now you need enter the box name. If your chosen name is already anyone else, then you have to come up with one more or choose one of the options that the program will offer.

When specifying the name of the email box, click " Further":

You need to come up passwordwhose length should be not less than 8 characters. Also, your password must include the numbers and letters of different registers (capital and lowercase), only so reliability it can be guaranteed.


You will be offered to choose the appropriate option. question And specify answerso that in case of losing password you could restore account.


You can join users social network "Google+"Or skip this step (you can connect later).

Now you need tune Web search history, as well as decide whether you need to include notifications about news from Google to the mailbox you created.

At this stage you will be asked to enter the proposed phrase from the image.


It is necessary to decide whether to bind your credit card to the account for the purchase of acquisitions in the future (this step is also you can postpone on then).

Now, after a successful entry into account, you will fall into the section " Synchronization"Where you need to put a tick everywhere.

This registration process has been successfully completed.
Now you can at any time when you connect to the Internet to use Gmail created by mail and contacts, view google maps Maps, participate in the Google Talk chat, go to YouTube and watch videos, download various applications from Play Market., enjoy search engine Google and synchronize the calendar records on your smartphone with Google Calendar.
If you have any questions, take advantage of the comment! Thank you!
Site administration website Thanks for the author Lileya..
In one of my articles, I already wrote that you can add and change the properties of user account properties through the "Control Panel" - "User Accounts". but this method More suitable for simple users. But the system administrator will be more convenient to manage accounts through the Console "Computer Management" - "Local Users and Groups".
To get into the Computer Management Console, right-click on the My Computer icon on the desktop and select "Control". Next, expand the "Service Programs" section and select "Local Users and Groups".
Snap "" is designed to create new users and groups, account management, tasks and reset user passwords.  Local user
- This is an account that certain permissions and rights on your computer can be provided. Account Always has its name and password (the password can be empty). You can also hear a different name of the user account - accountt.
and instead of the "username" often say login
.
Local user
- This is an account that certain permissions and rights on your computer can be provided. Account Always has its name and password (the password can be empty). You can also hear a different name of the user account - accountt.
and instead of the "username" often say login
.
The dial node "Local Users and Groups" displays a list of user accounts: built-in accounts (for example, "administrator" and "guest"), as well as the accounts created by the accounts of real users of the PC. 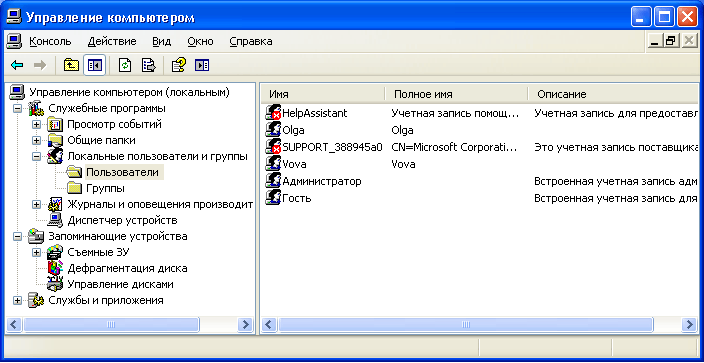 Built-in user accounts are created automatically when windows installation And can not be removed. When creating a new user, you will need to assign a name and password to it (preferably), and also determine which group will enter new user. Each user can enter one or more groups.
The node displays both the built-in groups and the administrator created (that is, you). Built-in groups are created automatically when installing Windows.  Belonging to the group provides the user with certain rights to perform various actions on the computer. Group users Administrators
possess unlimited rights. It is recommended to use administrative access Only to perform the following actions:
Belonging to the group provides the user with certain rights to perform various actions on the computer. Group users Administrators
possess unlimited rights. It is recommended to use administrative access Only to perform the following actions:
- installation of the operating system and its components (drivers of devices, system Services, update packs);
- updates and restore the operating system;
- installation of programs and applications;
- settings of the most important parameters operating system (password policies, access control, etc.);
- management of security and audit logs;
- archiving and recovery of the system, etc.
How are you system Administratormust have an account included in the Administrators group. All other computer users must have accounts that are included in either the "Users" group, or to the group " Experienced users”.
Adding users to a group Userand It is most safe, since the permissions provided by this group do not allow users to change the operating system parameters or other users, the installation of some software, but also do not allow the execution of outdated applications. I myself have repeatedly encountered a situation where the old Dosov programs did not work under the account of the Member Participant.
Group Experienced users mainly supported for compatibility with previous versions Windows, to perform non-certified and outdated applications. "Experienced users" have more permissions than members of the "Users" group, and less than "administrators". The default permissions provided by this group allow the group members to change some of the computer parameters. If support is needed not certified under Windows applicationsUsers must be members of the "Experienced Users" group.
Account the guest Provides access to a computer to any user who does not have an account. To enhance the security of the computer, it is recommended to disable the guest account and configure access to the PC shared resources to existing users.
Now let's see how the account is creating through the Computer Management Console - "Local Users and Groups".
Create an account
When installing the original windows version XP (mean not the assembly from Zver Or etc.) It is proposed to create computer user accounts. You must create at least one account, under which you can log in to the system when you first start. But, as a rule, in real life you need to create multiple accounts for each user working at a computer or for a group of users united by a common task and access permissions.
To add a new account, discover the "Local Users and Group" snap-in - select the "Users" folder - then in the right window, right-click on the right mouse button - select "New User":  In the window that appears, set the username and description. Also specify a password for the user (how to come up reliable password For account you can read).
Then configure advanced options - place it or uncheck the checkboxes opposite the necessary items: 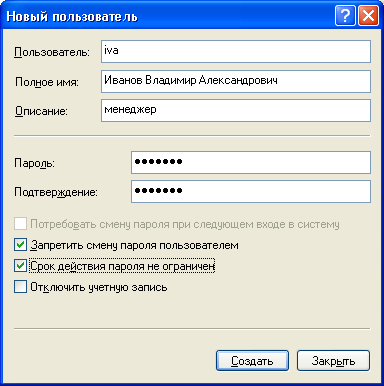 You can uncheck the box next to the item "To change the password when you next log in" and check the boxes on the contrary "to prohibit the password change" and the "password duration is not limited." In this case, the user will not be able to change the password for his account. This can only do you, working under the administrator account.
After pressing the "Create" button in the list of users a new account will appear. Click on it twice with the mouse and in the window that opens, go to the "Membership in groups" tab. Here, click "Add" - "Advanced" - "Search". Then select the group to which the user must include (the "Users" or "Experienced Users" group is recommended and click "OK" in all displayed windows. After that, in the tab "Membership in groups", delete all groups from the list, except for the one that you have just chosen. Click "OK":  Thus, you created a new account and included it in the group.
Now inform the user (in our case Ivanov) the name of his account ( iVA.) And the password so that it can log in. On all network computers, the resources of which Ivanov are needed access, you will need to create the same account with similar parameters. If there is no account for Ivanov on any network computer, and the guest account will be disconnected, Ivanov will not be able to view the general network resources of this computer.
If the user account is no longer needed, you can delete it. But in order to avoid various kinds of problems, user accounts are recommended first to be disconnected. To do this, right-click on the account name - select "Properties" - In the Account Properties window, select the box next to "Disable Account" and click "OK". Making sure that it did not cause trouble (watch the network for several days), you can safely delete an account: Right-click on the name of the account and in context menu Select "Delete". Remote user account and all data associated with it cannot be restored.
Access control
So, let's say, several users work at one computer, and you have created your account for each of the rules described above. But suddenly there was a need to close access to some folders or files on a computer for certain users. This task is solved by assigning certain access rights to computer resources.
Access control It is to provide users, groups and computers of certain rights to access objects (files, folders, programs, etc.) over the network and on the local machine.
User Access Control local computerbut is carried out by changing the parameters on the tab " Safety"In the" Properties "window:

Security Setup for My Documents folder
Tab " Access"The same window is used to control network access For general objects (files, folders and printers) on network computers.
In this article we will talk about delimiting access local users To objects local computer
. This feature Available only in the NTFS file system. If on the computer file system NTFS, but the Safety tab is not displayed, go to "Start" - "Control Panel" - "Folder Properties". On the View tab in the section " Extra options"Uncheck the checkbox" Use simple general access to files (recommended)"And click" OK ": 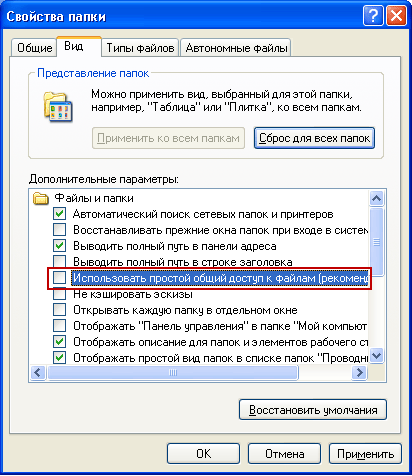 The basic concept associated with access management is Permissions
.
The basic concept associated with access management is Permissions
.
Permissions determine the type of user access or group to the object or its properties. Permissions apply to files, folders, printers, registry objects. To install or change permissions for an object, click on its name right-click and select the Properties command in the context menu. On the Safety tab, you can change the permissions for a file or folder by installing or removing the checkboxes on the right points in the permissions list.
For each user you can set your permissions. First you need to highlight the user in the list, and then specify permissions for this user. For example, one user can only be allowed to read the contents of a certain file (resolution " Reading"), To another - make changes to the file (resolution" Change"), And all other users do not care for this file (remove all flags under item" Allow", Or put all the checkboxes" Ban”).
To view all the current permissions for files and local computer folders, select "Properties" - "Security" - "Advance" - "Existing Permissions" - "Select" - "Advance" - "Search", highlight the name of the desired user and click "OK ". Points marked with flags and there are permissions for this user:  In the same window, you can familiarize yourself with the tabs "Permissions", "Audit", "Owner". I will not dwell on them in detail in this article, because She is so obtained too voluminous.
If in the list of users on the Safety tab, there is no user to whom to assign permissions, click the following buttons on the Safety tab: " Add” – “Additionally” – “Search". From the list, select the name of the user account name to which you want to assign permissions and click OK. Instead of a separate user, you can choose a group - permissions will be applied to all users included in this group. Remember these buttons well. Such a procedure you will be made in all cases when you need to add a new user to the list of permits, audit, ownership, network access etc.
Access control applies not only to users local computerbut also to access common files, folders and printers over the network. I already talked about the delimitation of access rights for users of the network in the article.
On each computer with the installed operating windows system There are user accounts. Thanks to the accounts for one computer, different people can work with different programs and settings. In this article you will learn how to create, change, configure or delete account windows recording.
What is an account
Using the account, the rights of users on the computer are delimited. In addition, certain settings are installed and parameters for each individual user (for example, a desktop background, software installed, files and folders).
Thus, through accounts, different people can work at one computer, while having their own individual settings, programs and data.
On any computer there are at least one account. Now we will configure the account, under which you have now entered the computer.
Account Setup
Let's try to configure your current account. Open the Start menu. In the left column of this menu at the very top there will be a big icon. I have a flower on it, but you may have another image.

Click on this icon once the left mouse button. The folder will open with Windows accounts.

Your current account is displayed here. I have "Vitaly". Below the name of the account is specified its type (administrator) and that it is protected by a password.
All Windows Accounts are divided into "Administrator" and "Normal Access". User with an account with the type "Administrator" can Perform any changes to the computer and affect the work of other accounts. Inexperienced users who enter the entry with the administrator type can reduce computer security. User with Recording "Normal Access" can not Change other accounts and affect computer security.
For the purpose of security, it is recommended to create 2 accounts on your computer: one "administrator", and other "normal access" and work under the account with the type "Normal Access". A little later, we are practicing creating accounts.
A password for the account is needed to protect your account from outsiders. Not knowing the password, it will be extremely problematic to go under your account. What to create a reliable password Use password generator.
Change the type of account and set the password we will, when we try to create a Windows account, but for now let's change the drawing of your account.
To the left of the title of your account there is a column with which you can change the account. Find a line "Changing your drawing" in it and press it once the left mouse button.

A window will open with all available pictures. Select anyone (click on it with the right mouse button) and click on the "Change Figure" button. The picture window closes automatically, and the drawing of your account will change.

What would change the account name Locate the "Changing Your Account Name" line and click on it with the left mouse button. The window will then appear in which you need to enter a new account name and click "Rename".

How to Create Windows Account
What would create a new account Click in the accounts window on the "Managing Another Account" line. In this window, you can create new accounts or modify others.

To create a new Windows Account, click on the "Create Account". Now you need to enter the name of the account and specify its type. Press the "Account Card" button.

In the opened window, you need to specify the name of the new account and its type. It remains only to click on the "Create Account" button. Account has been created.

How to set a password to account
In the "Account Management" section (Start - icon in the upper right corner - managing another account) Select the necessary Windows account and click on it once the left mouse button.
We find the line "Creating a password" and click on it. You must enter the password twice. Create a password with password generator. In addition to the password, you can enter a hint to recall the password (for example, a clock of a cat or phone number).

As you can see, set the password to the account is quite simple.
Working with multiple accounts
Now, when the computer is loaded, you will need to select an account through which the input will be included in the operating system. In a new account, as in your current, you can change the drawing, set the password or change the name.
What will switch from one account to another you need to open the "Start" menu. Click on the arrow next to the "Shutdown" button and select the "Change User" item.

How to delete Windows Account
Open account management again (Start - icon in the upper right corner - managing another account). Select the desired account (which we want to delete) and click on the "Delete Account" line.

Conclusion
In this lesson, you learned what user accounts are and how to work with them. The use of multiple accounts is very convenient if several people work at one computer. Remember that in case of inexperienced users, it is better to sit under the account with the "Normal Access" type. If you have any questions or something is unclear, then write your questions in the comments.
There were only three options for setting up accounts, but in Windows 10 there are already five of them, and in general the system has become noticeably thoughtful.
To configure accounts, you need to open the "Settings" interface and select the "Accounts" section there.

The very first item in this section is "Your Account". Here you can, among other things, proceed to managing your Microsoft account, change the avatar and other parameters.

To manage the Microsoft account, you must go to the site - locally settings can not be changed. You can, however, make a local account, about the lower.

Microsoft account allows you to synchronize the settings between different computers. Applications, picture profile, Color selection and other settings are loaded into the cloud and when entering from any other device apply to it. At the same time, of course, the mass of personal data gets to Microsoft, that some users may not like.
Fortunately, there is still the ability to start a local account. Just click the "Log in instead with a local account" (Sign in with Local Account Instead).

Neither the email address nor the phone nor other data will be needed - it will be enough to come up with a username and password. To go to the created local account, you will need to exit the Microsoft account, so do not forget to pre-save any open documents.

In the "Your Account" section, you can not only create a new account, but also make new photo For profile, if there is a webcam.

You can add another Microsoft account or a working or training account by reference at the bottom of the "Your Account" section.

We will briefly tell about the working and study records of the workbooks later, but for now let's stop on the entry parameters.
Input parameters
In the "Sign-in Options" Parameters, you can configure whether to enter a password when exiting sleep mode. Here you can also change the password from your account - remember this useful fact.

To facilitate the login, you can come up with a PIN code, but it is less reliable way Account protection, so we advise you to use it with great care.

You can also create graphic passwordwhich is a series of gestures (brushing, circles, etc.) over the selected photo. It is very convenient if there is a touchscreen.
Finally, if the computer is equipped with a fingerprint scanner or smart card reader, in the same section you can configure the input with their help.
Worker access
Work Access (Work Access) Most users are most likely without needful, but we will still briefly tell about it - just for information.
In this point, you can connect a computer to a working or school network to have access to applications, network resources and an organization's mail.

To connect, you must specify the data of the working or training account.

Most likely, the staff assist technical support at work or in educational institution. He will be able to tell in detail how to connect.
Family and other users
If you need to quickly add accounts of family members or other users, you can do this in the "Family and Other Users" (Family & Other Users).
If you have children, you can create children's accounts for them and track them using means parental control Microsoft. This will allow you to control which sites a child attends, how much time he spends at the computer, in which games it can be played and what applications to use.

Here you can add other users who are not members of the family. They will be able to log in with their accounts, so you do not have to share your account with them.

Here you can also configure limited access, which allows you to use only one application from Windows Store. It turns out something like a digital kiosk. You can exit the limited access account using the ++ keys.

Limited access can be useful if you need to ensure that the child can use only one program or play. Also, this access mode is relevant in any other situations where it is required to limit the functionality of the system with one application. You can, for example, submit a restaurant menu on the tablets. Or use a computer to fill out a questionnaire. In such situations, limited access is the perfect solution.
Synchronization
The last paragraph in the "Accounts" section is "sync your settings" (Sync Your Settings). Here you can specify which settings of this computer will be synchronized with other devices.

A Microsoft account is required to synchronize. You can disable the synchronization completely or select individual data.
New account settings in Windows 10 differ from Windows 8.1 not radically, however, important changes are still enough. You can still choose between the local account and Microsoft account and the three login options are preserved. But those who missed Windows 8, it is worth dealing with new settings as soon as possible.
Account settings in the control panel are now hardly used. There are practically no actual settings left. Most users are quite enough will be a new interface for control not only with its own, but also in other people's accounts.
If you have additional information or recommendations on this topic, share them in the comments!
| Materials |