 entrance
Win 10 Download options. How to go to Boot Menu on a laptop and computer? Option: Use application settings
In Windows 10, consolidated various download options in one window called the menu " Extra options". This menu provides access to repair tools, as well as to such options as a change. windows startup And you can enable debugging, boot in safe mode and run on the recovery environment. Note: In this article we show windows screenshots 10, but the process is largely the same in Windows 8. We will indicate any differences.
What can you do in the Advanced Settings menu
"Extended Menu" - provides a number of actions that can be taken to troubleshoot or repair your PC:
System Restore: Running the system Restore Utility, which allows you to fix some types of failures and errors by restoring settings, drivers and applications to the recovery point, which was created earlier. Check our Recovery Guide for more information.
Restoring the image image: Allows you to restore backup Your PC. Check our System Image Recovery Guide and archiving it in more information Windows 10.
Running repair: Running Windows with an integrated recovery tool when loading, which tries to automatically fix the launch problems. Check out our problem repair manuals when you start Windows, repair tool and what to do if Windows is not loaded for more information.
Command line: restart your computer and loads the simple window command line To troubleshoot.
Launch parameters: Allows you to access alternative loading and tools, such as safe mode, in low-resolution video mode and download logging.
Come back to previous version: Allows you to delete Windows and return to the previous version that you use if you updated it in the last 30 days.
After selecting these most parameters, restart Windows, and then download it in (or tool) you selected.
And now, when you know how you can use the "Advanced Options" menu, let's take a look at how to get to it.
1 Option: Holding SHIFT, Click Restart

If your computer can run Windows in as usual mode, you can quickly get into the "extended menu", just holding sHIFT key, and click on the "Restart" option. You can do it on the login screen (see above) or in the Start menu (see below).

When you do it, your computer will not immediately reboot. Instead, it will show you a menu that allows you to continue windows session, Get access to troubleshooting tools, or turn off your computer. Click the "Diagnostics" button.

On the Troubleshooting screen, click the "Advanced Settings" button.

And finally, you will fall in the "Advanced Parameters" menu.
Please note that if your computer cannot run Windows as usual two times in a row, it should show you the "Advanced Settings" menu automatically. If not, you can try to download the computer from the USB drive.
2 Option: Use Application Settings
If you do not want to jump through several windows, simply pressing SHIFT + reboot, you can also start the "Advanced Options" menu through the setup application. Click Windows + i to open the setup application, and then

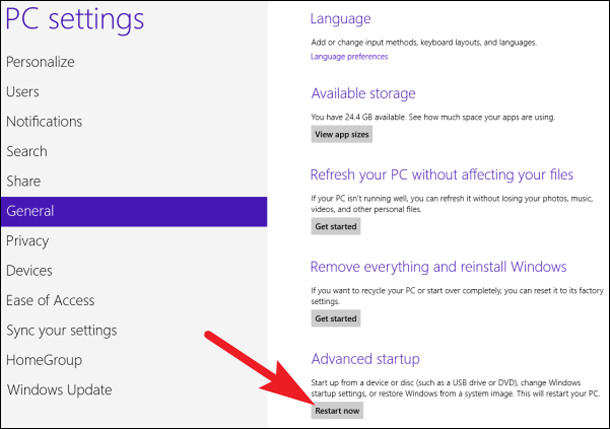
Select "Update and Security".
In the left pane, switch to the Recovery tab. In the right pane, scroll down a bit, and then click the Restart Now button in the "Special Download options".

If you use Windows 8, you must switch to the General tab, and then click on the Restart button in the "Special Download Options".
Third option: Enter the command in PowerShell (or command line)
You can also get to the "extended menu" by entering a command using PowerShell or command line. We will use PowerShell, but these commands are exactly the same in any case. You can also create a batch script with this command so that you can access the "Advanced parameters" menu more easily in the future.
Run PowerShell on behalf of the administrator by clicking on Windows + X, and then pressing the button in the User menu "Windows PowerShell (Admin".

In the command prompt, enter (or copy and paste) the following command and press Enter:
Shutdown.exe / r / o 
A message appears warning that you are going to be signed.

The Windows is then restarted automatically after about a minute, and delivers you to the "Extended Menu".
Using setting parameters windows downloads You can call a secure mode in Windows 10. To open the Windows load settings, you need to start the selection window, and you can do this in two ways:
- Using the SHIFT key and the system reboot buttons.
- Using the system recovery parameters.
When you first press the keyboard, press the key Shift. and not releasing it click on the taskbar on the button Start and choose in the menu opened Reboot.
With the second way, open the parameters by clicking the button on the taskbar Start and choosing Parameters In the form of a gear.
How to go through a secure mode in Windows 10
Switch to category in the parameters Update and security.
 In Windows 10 input to secure mode through parameters
  How to restart windows 10 in safe mode
 After performing any of the above actions after a few seconds, the window called the selection of action opens. In this window you need to select item Troubleshooting.
 Restart windows 10 in safe mode
 The following window will appear called Diagnostics. In this window you need to select item Extra options.
 To go to safe windows mode 10 open additional parameters
 The following window called Advanced Options. In this window you need to select item Download options.
 How to restart Windows 10 in secure mode in additional parameters
 The following window appears called the download parameters. In this window you need to press the button. Reboot.
 How to make a secure mode on windows 10
 After that, the computer will restart and the window will open during the system loading in which you can select the download option you want.
 Run the computer in the secure mode of Windows 10 keys F4, F5, F6
 Selecting for example Safe Mode using the F4 key you want to click on the ENTER keyboard. After that, the computer is turned on in safe mode Windows 10.
Installation on a computer of several operating systems negates the effort of manufacturers computer deviceshaving achieved accelerated Windows starts due to the configuration of modern PCs and laptops motherboard C and SSD drives as an alternative to slow HDD. Running Windows if you are installed at least two on the computer, without the user intervention, when the operating system is selected in the loader list, it will be delayed for 30 seconds - the preset timer value before starting the system that is standing in the first load list. How to edit a few windows download menu and set your own parameters? Including that when starting a computer, do not be distracted by the selection of the system used predominantly, while maintaining the possibility of accessing the second (or several) Windows.
1. Editing Windows 8.1 and 10 download menu in the bootloader window
Menu windows bootloader 7 provides for only the selection of a system or another to start, all editing operations of this menu can be carried out only inside the system.
But if the latest on the computer was installed versions of Windows 8.1 and 10, we obtain and more attractive outwardly, and the more functional menu of the loader. Some parameters of the loading of several systems can be changed directly in the bootloader window.

Opening the boot menu options, we will get the ability to run, as well as change the timer value Before loading the default system and select the default system itself - Windows facing the first and starting list automatically after the timer expires.

True, the choice of values \u200b\u200bfor the timer is small.

To flexibly configure the menu of loading multiple Windows, you can only inside one of the systems.
2. Editing multiple Windows download menu inside the system
Editing Windows boot menu is carried out in the properties of the system. Click the Win + Pause keys and select "Advanced Parameters".

The system properties window appears, here you must click the "Parameters" button at the bottom, in the "Load and Recovery" column.

What are we offered? We can choose Windows that will be loaded by default.

We can establish a different timer value, but this time you already enter an arbitrary number of seconds during which the Multi-Windows loader menu will be displayed on the screen.

To shorten the boot time of the main Windows, you can also remove the loader menu of several systems. To do this, you must remove the checkbox with the option displaying the OS list.

In this case, the loader menu will disappear, and the main Windows will be loaded immediately. At the same time, the second system does not go anywhere. To get into it, you will need to just set a tick back, and the next time you start the menu of the loader of several systems will be displayed again. This option is convenient for cases when the second system is rarely used.
Upon completion of the loader menu editing, click "OK" below.
3. Full removal of the second Windows
Process complete removal The second Windows system, including the removal of the download record from the bootloader menu, is described in.
Excellent day!
You can run the "System Configuration" utility using the search task built into the taskbl. Just enter the query and click on the most top string In the search results. In the window that appears, go to the "Load" tab and check the "Minimum" item. Confirm your choice by pressing the "OK" button. You will have a dialog box with a question whether you want to restart the computer right now. After your consent operating windows system 10 will be loaded in safe mode.
Method 2. Command Line
Users with experience should remember that you can download the system in safe mode by holding the F8 key when you start the launch of the computer. However, in Windows 10, this feature has been disabled to speed up the start of the system. To fix this "Improvement", you must enter only one command on the command prompt.

- Right-click on the "start" on the taskbar and select "Command Line (Administrator)" in the menu that appears.
- Enter the following command in the command line window: BCDEDIT / SET (Default) BootMenupoCy Legacy
- Click "Enter". Close the terminal window and restart the computer. Now, when you press the F8 key while starting the system, a dialog for selecting the boot method should appear again.
If you want to return everything in the future, it can be done using the following command:
BCDEDIT / SET (DEFAULT) BootMenupolicy Standard
Method 3. Special download options
This method will not require any tricks from you and is lying on the surface. However, many can boast that in the wilds windows settings 10 independently found this useful opportunity? Therefore, I decided to enable this method of loading in the article too.
So, open the "Start" menu, click the "Parameters" link, and then follow the address: "Update and Security" → "Restore" → "Special download options". Click on the "Restart Now" button. After that, you will get to the "Selection of action" screen. It offers three options from which we are interested in the "Diagnostics" clause.

On the next screen, press the "Advanced Settings" button, and then "Download Options". At the end of this long path, we are waiting for the desired option called "Enable Safe Mode". By the way, it is possible to significantly reduce this journey, if you simply hold the SHIFT button when you click on the "Shutdown" command in the "Start" menu.

If your operating system stopped loaded, errors appeared in its work or viruses, only a safe mode will help to cope with them (in English sounds like Safe Mode). Use this option to download the system. Unlike the usual launch of the OS, in safe mode, a number of functions simply disabled, which allows you to access system files And find a fault. In the article, we will understand in detail how to enable secure mode in Windows 10, what it is and why it is generally needed.
Safe mode is special option Startup OS Windows family. With it, you can do what it will not work as usual, for example, to correct the problems with the start of the system or its work. SAFE MODE mode presents only the main functions, services and programs. Only the basic components of the drivers that are needed for windows work. As soon as the system starts in safe mode, you will see the appropriate inscriptions on the desktop PC. Sometimes the video driver is not loaded, as evidenced by the wrong permission of the monitor.
What is it needed for
With the help of a secure mode, it is often possible to download the system when normal option No longer works. For example, one of your drivers "broke". The system is trying to boot and when it comes to an inoperative component, it fails. In safe mode, this driver is simply not loaded - you can log in and fix it. It is possible to look for the problem by exclusion. It is necessary to turn off the various components alternately and try to restart the PC in normal mode until the failure source is detected. Just turn on and disable various programs and drivers, and when it comes to faulty, Windows will again boot and the problem will be solved.
Methods of activation
After we realized what a safe mode is and for which it is needed at all, it has come a turn to move to the instructions for its activation. In past windows versions It was easier with that. Previously, to enter the secure Windows mode (up to 10 version), it was enough to simply press the F8 key while the computer turns on. In the latest edition of Windows this feature was disabled by developers. Now getting to the settings is more difficult, but still there are 5 ways for this. We will look at each of them in detail.
Windows 10 launch options in SafeMode:
- through a reboot;
- using the msconfig utility;
- using the command line;
- special download options;
- using a Windows flash drive or a disk.
Attention! At the bottom of the article there is a video structure describing the entry process into the regime we need.
We use the reboot key to get to SafeMode
This method is most simple and convenient, which is why we put it in the first place. The sequence of actions will be as follows:
- We do everything as with a regular PC restart: open the "Start" menu and select the reboot menu, but at the same time you climb the "SHIFT" button. After that, the picture on the screen will change the color and the notification will appear that you need to wait a bit.


- We will be offered a few points. The first allows you to start the OS in normal mode, the second opens a new menu, and the third just completes the work. We need the second way. It is called: "Troubleshooting".


- In the next step, select "Advanced Parameters".

- Many different options appear, we also need the download parameters. Click on the item marked in the screenshot.

- Everything is ready, you can now run Windows 10 in safe mode. It remains only to restart our system. We click "Reload".


- We will have a screen with a choice of option. There are 3 secure modes at once, this is: just SafeMode, with network support and command line. To select the desired, press the corresponding digit on the keyboard.


- Windows will restart in a secure mode.


- Voila! SafeMode has been launched, as evidenced by the inscriptions at the corners of the desktop. You can move to solving the problem that bothers you.

Run with MSCONFIG
The msconfig utility is a very useful and functional tool in the Windows. It is she who will help us to visit a safe mode if the previous way for some reason did not work. Start.
- To start the utility, we will use the "Run" tool, which is part of Windows. This program is able to launch a set useful featureswhich many users do not even guess. We run "execute" by simultaneously by pressing two Win + R buttons and enter the "msconfig" window appearing in the window that appears, then click the key with the inscription OK.


Note: Find the "Run" tool and through the "Start" menu or windows search.
- The system setup window has opened. There are 5 tabs here, in each of which focused different functions. We need a "Download" section - it is from here that you can activate the safe mode at the next start.


- To begin with, let's choose the operating system that we want to run in light mode. To do this, just click the left mouse button according to its name. In our case, it is only one entry. In the "Download Settings section you need to check the box next to the" Safe Mode "entry. There are several of its variations, it is: minimal, other shell, restore Active Directory and network.


- Soft mode loading can be supplemented with some options, such as shutdown. graphic shell GUI, download logging, basic video or output OS. A little to the right is the ability to set the time to delay SAFEMODE.


- After you have completed the configuration of the safe mode, you can press the "OK" button. The system will notify us that you need to restart the PC. This can be done later. We click "Reboot."


- Will begin windows reboot 10, and we still have a little wait.

- Ready! Safe mode is running and ready for troubleshooting on your computer.


Now you can exit the safe mode of Windows 10. Return the MSCONFIG settings to the original position and start the system.
Using the command line
We describe another way to restart the PC or laptop to safe mode. For this time we will use a more sophisticated way, namely, the command line.
- You can run it different waysBut we will choose the easiest. Click on the left mouse button on the search button (icon in the form of a magnifying glass on the taskbar) and enter the "Command Line" word in the search field. You should run the instrument in the administrator mode, otherwise we simply do not have enough powers. For this, call context menu And choose "Run on behalf of the administrator."

- The program you need opens. We enter the following command to it (copy the text and paste): BCDEDIT / COPY (CURRENT) / D "Your Name". Instead of "safe mode", write anything (called for you).


- This command will add to the "Download" section MSCONFIG utilities new parameterwhich will be called as you prescribed it in quotes when entering into the command line.

- Now you can reboot into secure mode through the recording you created. You no longer need to change the download option. Let's check how it works. Select the added mode and click "OK". We will again offer to restart Windows immediately or postpone the action.


- The computer will restart and the next time you will start two at once. oSOne of which will be created by us through the command line. We choose it and go back to the reboot.

- As you can see, everything works. We once again fell into a safe mode that activated via the command line.


- This feature will be present on your PC or laptop on an ongoing basis. Now it will be much more convenient for you to reboot into a safe mode (it may be often needed when Windows debugging). But after we correct the system, you need to turn off the secure mode and the second OS. To do this, start the msconfig utility and go to the "Load" section.


- We allocate the recording created by us and click the key with the inscription "Delete".


After that, the unnecessary mode will disappear, and the system will start automatically, without its choice.
How to enter the F8
The described methods are good because, if one of them did not work, it will help the second, the second does not work, which means the third. But how to fix an annoying misunderstanding and revive the safe mode of Windows 10 when loading on F8? Let's deal with this issue, but will help us again the command line, naturally running in the administrator mode.
In order to return the launch of the mode of the F8 desired by us, you need to make some changes to the Register "Dozens".
- Run a command line with administrator privileges. To do this, in the search for Windows 10, located on the left side of the taskbar, enter the "Command Line" phrase. Click on the entry found and select the "Run from the administrator" item.


- Insert the following contents: "BCDEDIT / DELETEVALUE (CURRENT) BOOTMENUPOLICY" (without quotes) and click Enter.. If we did everything right, the message "Operation is successful" will appear.


- Now you can close the window and restart the computer. As soon as the system starts, click the F8 key until you enter the Windows start setting mode. From here you can choose the safe mode you need. Select it arrows on the keyboard and press ENTER.

To cancel Windows 10 downloads in SafeMode by pressing the F8 button, you need to open the favorite command line again and insert the BootMenupoCi Standart code into it (do not forget to remove quotes). After pressing Enter, the system will no longer respond to the F8 key.
Special download options
For completeness, we describe and another version of Windows 10 start in safe mode.
- We need to open the system settings. To do this, we deploy the center of notifications and click on the "All Parameters" item.

- In the window that opens is looking for "Updates and Security" and click on it.

- Next, we find and press the "Restore" item.


- Click the "Overbelivery Now" button. Carefully, the computer will restart, save all the data and close the program.


The computer will offer us the selection of the download mode, which we described in detail in the "Use the Restart key" section. Next, simply select the item (activated by pressing the digital button on the keyboard) and go to the secure mode.

Using the setting distribution
If the system does not start, apply one of the above methods, naturally, will not be released. But on such a case, we have an option - you need to use the Windows 10 installation media. And that it will be - a DVD or flash drive is completely unimportant. Follow our instructions.
- First you need to get the same carrier. Do not download Windows 10 through torrent or on third-party resources. The image of "dozens" should be taken exclusively on the official website of Microsoft. We will help you with this: a little below can be downloaded a program that is in automatic mode Scars the image and create blood flash drive. After the carrier is ready, insert the flash drive into the computer's USB port or, respectively, the disk in the DVD and boot from it.


- This is the first stage windows installations Here we just need to click "Next."

- Now click on the inscription "System Restoring".


- Next, select the "Troubleshooting" item (navigation is carried out by arrows on the keyboard, select the Enter button).


- In the next step, select the "Command Line" tool.


- Enter the type operator in the black window: "BCDEDIT / SET (DEFAULT) SAFEBOOT MINIMAL" (do not forget to remove quotes) and press ENTER.


- Reboot your computer. You can use the mechanical reset button, it will not be harm. Our Windows 10 will start again, but in safe mode.
When the system is fixed, you can turn off the secure mode and return the load to the original state. To do this, again, in the command prompt, enter "BCDEDIT / DELETEVALUE (DEFAULT) SAFEBOOT" without quotes and press ENTER.
If the process is made from the command line under the running Windows, do not forget to start the utility on behalf of the administrator.
On this, our story about how to run the secure mode of Windows 10, comes to an end. All the methods described in this instruction, we checked on our PC and we worked each of them. Depending on the situation, the "iron" or the degree of damage of the system, everything can be different, but in any case, one of the ways we have told about, you will definitely help.
Video