 entrance
What to do if computer diagnostics are in progress. Diagnostics of the computer for malfunctions
As the owner of a computer with Windows 10, you have more than once become a witness of the fact that the "ten", although it is constantly being improved, is a rather crude operating system, and a lot of problems arise in it. Developers solve only the most common problems by introducing fixes into service packs or releasing out-of-order patches (fixes) to get rid of a specific error. So, for example, it was with. In the event of special cases relating only to a computer with certain hardware or software, Microsoft offers to use an integrated tool for troubleshooting.
Launching the Problem Detection Tool
Diagnostics of a computer with Windows 10 begins with launching the tool, which contains a mass of tools designed to find and fix errors that have occurred on the PC.
Note that Windows 10 includes about 20 tools designed to identify problems and then fix them.
The tools are launched through the "Control Panel".
- We go to the "Control Panel".
- Switch the type of visualization of elements to "Categories".
- Launch the Troubleshoot applet to open a window with a list of applications for troubleshooting your computer and fixing them.
The principle of operation of any component is as follows: it checks the current system settings and compares them with the default parameters. If a mismatch is detected, the user is notified of this, and he is invited to return Windows options 10 in the initial state or change it in some way automatically to fix the problem. This is how Microsoft diagnoses and fixes problems with starting software.
The composition of the means of identifying problems
The tools for finding and resolving conflicts are divided into several categories, many of which also include subcategories.

- Programs - This tool executes applications that have incompatibility issues when they start.

After starting the search for problems, the utility will scan the system and display a list of applications installed in it. In the window, you must select the problematic program and click "Next" to start diagnostics in order to identify the source of the conflict.

- Hardware and Sound - through the tools placed in this category, diagnostics of the hardware used on the Windows 10 computer is carried out.

The funds include:
- setting up the device - detecting difficulties in the operation or in the process of configuring a specific hardware component of the computer;
- sound - used when problems occur during playback / recording of sound or conversations on Skype and similar programs for Windows 10;
- network - diagnostics and configuration of networks, including wireless, and network devices;
- printer - getting rid of conflicts that arise during the printing process;
- Windows Media - search for the reasons causing complications with video and DVD playback;
- video playback - identifying reasons that prevent video files from being played;
- Background Transfer Service - Diagnose problems preventing background files from downloading.
- apps from the store - identifying factors that prevent apps with Windows Store function normally.
As you can see, the set of tools for troubleshooting and returning your computer to a state of normal functioning in Windows 10 is large. Another issue is their effectiveness. But here all responsibility rests on the shoulders of developers with more than 20 years of experience in creating operating systems.
In any case, these tools have repeatedly saved newbies from doing full reset or reinstall it completely.
To easily find the required application, all tools can be displayed in one window without sorting by category. The button "View all categories" is responsible for this.

Working with tools
To use the diagnostic tools, absolutely nothing is required from the user. The functioning of each element is accompanied by the launch of the wizard window with prompts, a couple of buttons and the presence of switches (checkbox, checkbox).

After identifying a problem, the only thing to do is to apply the recommended fix for the problem.

Be careful, the application will need administrator privileges to change some settings. Such functions are distinguished by the presence of a blue and yellow shield icon.

New opportunities
Windows 10 introduces new troubleshooting features that allow you to detect a problem even before starting your computer (in preboot mode).
To open a menu with a list of available tools, restart the computer while holding down with the Shift key... After rebooting, on the action selection screen, click "Troubleshooting".

There are two options available here: reset your PC (reset Windows 10) and advanced options.
The additional parameters contain tools that allow you to restore the performance of Windows 10 by:
- rollback to the previous state;
- using a system image;
- return to the previous build;
- launching tools to restore the boot "tens";
- using command line capabilities.

As you can see, Windows 10 differs not only in the presence of errors and problems, but also in a set of tools for eliminating them and returning the computer to a working state, sometimes requiring almost no activity and knowledge from the user.
(Visited 26,077 times, 2 visits today)
Elimination wizard Windows troubles is a built-in utility responsible for fixing malfunctions operating system... With this program, you can "fix" Windows Update, USB software errors, Wi-Fi adapter failures, and more.
Diagnosing problems in Windows 7
A utility responsible for finding and fixing errors in various components Windows systems, is built into the OS and is launched manually by the user when any bugs are found. There are several ways to go to the troubleshooting wizard:
The main window of the troubleshooting wizard is a list of categories, clicking on which launches the debugging tool for a specific element of the system. Collected here:
- tools for diagnostics and configuration of programs adapted for another version of Windows;
- utilities for configuring and using devices and printers;
- a wizard for troubleshooting sound recording and playback;
- tools for finding and fixing problems with the Internet;
- design settings;
- Windows Update troubleshooting utilities;
- programs to optimize energy consumption;
- tools for troubleshooting performance issues.
The "Computer Troubleshooter" utility is not just some small program for fixing bugs, but a complex system that includes the ability to fix each individual item.
 The main Troubleshooting window includes categories for which you can run debugging
 If you are interested in setting up or debugging a specific element, then especially for such cases, a button "View all categories" has been added to the left side of the main window. It changes the design of the utility's main window so that its components are not grouped by categories, but displayed in a list in order. This is more convenient if you know exactly what you want: you do not have to wander through the categories, wondering where exactly the desired debugger is located.
 View All Categories displays all items in the troubleshooting wizard as a list from which to select required element
 Double click on an item launches it and opens a program that scans the selected item and informs the user about any errors found. Before starting diagnostics, in the window that opens, you can check or uncheck the "Automatically apply fixes" checkbox - its presence means that if the program detects problems, it will fix them automatically. If the box is not checked, the utility will ask the user for permission to fix it or will not touch errors at all.
 Before running diagnostics and treatment, you can allow the program to automatically apply fixes
 After completing troubleshooting, the utility will give the user a report on its work, which will indicate which errors were found and which ones were fixed.
 When the utility analyzes and repairs the element, it will give the user a report on its work.
 Examples of using the program
It is recommended to use the "Troubleshooting Center" first of all when you find problems with one or another component of the system. The program is not perfect, but it allows you to fix errors in two clicks, which can be difficult to “cure” manually.
Windows Update problems
Windows Update is the subsystem responsible for downloading, installing, and uninstalling updates for the OS.
Failures in Windows Update will cause the system to stop updating, and this will negatively affect its performance. Most update errors can be fixed using the troubleshooting wizard.
To open the troubleshooting wizard to fix Windows Update errors, you need to call the "Troubleshoot with Windows Update" option from the wizard's main menu (how to go there, described above). Now you need to click "Next" and monitor the errors that the program detects.
 To troubleshoot Windows Update problems, select the appropriate utility from the list on the main menu of the wizard
 It also happens that the Windows Update problem has been resolved, but an unsuccessful update remains. In this case, you need to roll it back, and this is done in Windows 7 like this:

Video: How to Uninstall Windows 7 Update
Sound problems
Incorrect sound or complete absence of sound is a problem that can also be solved with the help of the wizard.
It should be remembered that if the problem is in the hardware itself, then the program will not help here in any way. The utility is not always able to solve the found problems, but successful diagnostics in any case gives a hint on how to fix the error.
The utility that you need to call from the wizard is called "Troubleshooting sound recording" if you have problems with recording sound, or "Troubleshooting sound playback" if playback does not work.
 Troubleshoot audio problems with the "Recording Troubleshooter" and "Audio Playback Troubleshooter"
 Troubleshoot USB problems
There is no standard preinstalled tool for solving USB problems in Windows. Despite this, Microsoft has released a set of Fix It (aka Easy Fix) utilities, which is something like an extended version of the standard troubleshooting wizard. Its features include a USB troubleshooting utility.
You can download the USB troubleshooter from Microsoft. The utility is loaded in .msi or.diagcab format: both are executable files and are launched by double-clicking the left mouse button.
- After running the file, allow it to install data on your computer. In some cases, an administrator login and password may be required.
 For Easy Fix to start, you need to grant it permission as administrator
 - In the window that opens, click "Next". If you want to pre-configure the utility so that it applies the fixes on its own or, on the contrary, asks for permission for certain actions, the familiar “Automatically apply fixes” checkbox is located under the “Advanced” button.
 Here you can configure the automatic application of changes and run the utility to troubleshoot problems
 - Wait a while while the utility searches for and fixes problems.
 Finding and fixing problems will take some time
 - Check out the report that Easy Fix will provide you after work. All errors and problems that the program has fixed will be listed there.
 After finishing the work, the utility will provide a report, where it will be indicated exactly what errors it found and what corrections it made.
Error code 43
Error 43 indicates that the "Device Manager" stopped the operation of a device due to a problem found in it. Initially, this error indicates a problem with the hardware configuration of the computer. In other words, if error 43 is issued by the mouse, it is likely that it is broken, not Windows.
However, in addition to hardware problems, error 43 can be caused by software glitches, most often in drivers. Not the fact that Easy Fix will help with them. Most likely, you will have to act with your own hands.
- Try restarting your computer first. Perhaps this is a single failure, and after a reboot everything will work.
- If restarting doesn't help, open Device Manager. To do this, press the key combination Win + X and select "Device Manager" from the menu that appears.
 To enter the "Device Manager", you need to select the appropriate option in the menu
 - If an error is reported by a device connected via USB, it is worth updating the USB port drivers. In the "Device Manager" select the " USB controllers»And right-click on one of the devices listed there. Select the Update Hardware Configuration or Update Drivers option.
 To update a device driver, right-click on it and select "Update Drivers"
 - When the system asks if you want to use the search for drivers on the Internet or specify an existing one, choose based on whether you have a driver file in your system. If there is, indicate the existing one and select it, and if not, start a search on the Internet. In some cases, it does not work perfectly, so the best way- If possible, find drivers on the Internet yourself.
 To update a driver, you either need to tell the system the path to it, or give it the opportunity to search for it on its own
 - Repeat the driver update one by one with all USB devices except virtual ones.
- If these steps did not help, search for the driver for the non-working device on the Internet by its name. The system cannot find this driver, since it does not recognize the device. The only way out is to search for yourself using the information indicated on the device or on its packaging.
- When the driver is found, install it (just run it).
- If this does not help, it is recommended to check the system for viruses, as well as clean the registry using one of the special programs(for example CCleaner). To do this, go to the "Registry" tab in the main program window and click "Search for problems".
 CCleaner has a Registry Cleanup tab that allows you to fix erroneous entries in the system registry.
If none of the above methods helped, most likely the problem is related to the hardware and cannot be fixed by software methods.
Video: how to fix error 43
Troubleshoot startup problems
It is not the wizard who deals with problems when starting the computer, but another utility, but we will analyze it as well. If your Windows 7 refuses to boot, this program is an indispensable helper. However, her help will only work if the problem is software. If the problem is not in Windows, but in the hardware, then the boot will not even get to the launch of this utility.

Video: how to troubleshoot Windows 7 startup errors
If the troubleshooter doesn't work
Troubleshooting Wizard - system program and if it doesn't work, then something serious has happened. The failure can be associated with update errors, unsuccessful changes to the system (this can be done, for example, by third-party programs), as well as hardware damage to the disk. And if nothing can be done about the latter, except for replacing the hard drive, then the rest is removable.
- First of all, try to remove Latest updates... How to do this is described in detail above.
- If uninstalling updates did not help, use the "Command Line". To do this, press Win + R and type in the "Run" window cmd command.
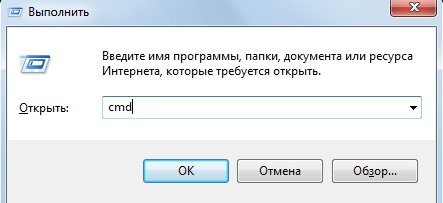 To open the "Command Prompt", press Win + R and in the "Run" window enter the command cmd
 - In the "Command Prompt" type the following commands:

- Reboot your computer.
- If the troubleshooter still won't turn on, then the problem is more serious. If you have backups (system backups that you can use to roll back the OS), it's time to use them. To do this, go to the path "Start" - "Control Panel" - "Recovery" and select the option "Start System Restore".
 The initial window of the utility prompts the user to choose a backup - recommended or another
 - The program itself will offer you the best backup for recovery. If you do not agree with it, select another backup from the list.
 From this list, you can select any backup and roll back your Windows to it
 - If you want to see what exactly will change in the system after the backup, click "Search for affected programs". A window will open where you will see a list of changes.
 The program will show which programs and files will be changed after rolling back to backup
 - In the last window, click "Finish" and wait for the system to roll back to the state at the time of the backup. It will take some time.
 To roll back the system to the backup, click "Finish" and wait a bit
 - If you accidentally select the wrong restore point, the backup can be canceled in the same "Start System Restore" utility. To do this, open it and select the "Undo System Restore" option, and Windows will return to the state it was in before the backup.
 To undo a failed system rollback, run the program again and select "Undo System Restore"
Troubleshooting programs
The built-in wizard is useful, of course, but not perfect. It does not fully cope with cleaning the registry or fixing most bugs. Fortunately for the user, there are many third-party programs that can be used to fix bugs and keep your computer running.
FixWin 10
Despite its name, this free program designed not only for Windows 10, but also for more early versions OS, including Windows 7. There are several tabs in the main window of the program, and all errors typical only for Windows 10 are placed in a separate one, and the rest concern everyone Windows versions.
 The main window of FixWin 10 contains information about your system; from here you can run the troubleshooting utilities
 To start the automatic error correction, you need to go to the tab of interest and find the error, the fix for which you want to find. Here you can also see how to solve such a problem manually.
 The FixWin10 tabs look like this: a description of the error and the "Repair" button, as well as help for solving the problem manually
 The main drawback of this program is the lack of Russian-language localization. So it is suitable for those users who more or less confidently know English.
You can download FixWin 10 from the official website of The Windows Club developers.
Video: how to work with FixWin 10
Anvisoft PC Plus
This program is similar to the previous one: it is free, easy to manage and covers English language... The interface is convenient and pleasant to the eye. The main window contains the most common problems, and clicking on the required error opens a menu with a "Fix" button. The utility downloads files for repair from the network, so an Internet connection is required for its operation.
 In the main window of the Anvisoft PC Plus program, you can select the error of interest, and a window will open where it can be repaired
 You can download the program from the Anvisoft website.
Video: Anvisoft PC Plus
Kaspersky Cleaner
A utility from the creators of the well-known antivirus is aimed at cleaning the computer. But it also has the tools to "cure" some of the problems. The program is in Russian, free and very easy to use: you start the search for errors, and then the utility does everything by itself.
 In Kaspersky Cleaner, you just need to run an error search, and the utility will find and fix everything itself.
 You can download this utility on the Kaspersky website for free.
Video: overview of the Kaspersky Cleaner utility
NetAdapter Repair All in One
Of all the programs presented, this one is the most difficult, but also the most advanced. It is designed primarily for "fixing" network errors: cleaning Hosts, SSL, DNS cache, managing adapters and network cards. There are many functions here, but it is recommended only experienced users who know what they are doing. The disadvantage of the program is the English-language interface.
 The main menu of NetAdapter Repair All in One contains a significant part of its functions, not counting the advanced
 The standard Windows 7 troubleshooter isn't perfect, but it can be a big help when you find errors. And if it doesn't do it, you can always use third-party programs.
First of all, if the error "The computer does not start correctly" occurs after you turn off the computer or after interrupting the Windows 10 update, but it is successfully corrected by pressing the "Restart" button, and then appears again, or in cases where the computer does not turn on the first time followed by automatic recovery(and again everything is fixed by rebooting), then all the actions described below with the command line are not for your situation, in your case the reasons may be as follows. Additional instructions with options for system startup problems and their solutions:.
If after turning on the computer or laptop you see a message that the computer is being diagnosed, and after that - blue screen with a message stating that "The computer did not start correctly" with a proposal to restart or go to advanced settings (the second variant of the same message - on the "Recovery" screen a message that Windows did not boot correctly), this usually indicates damage to any systemic Windows files 10: registry files and more.

The problem can manifest itself after a sudden shutdown when installing updates, installing an antivirus or cleaning the computer from viruses, cleaning the registry using cleaning programs, installing questionable programs.

And now about the ways to solve the problem "The computer is not started correctly". If it so happened that you had Windows 10 enabled automatic creation restore points, then first of all it is worth trying this option. This can be done as follows:

After pressing the cancel button, you will be taken to the blue screen again. Click on it "Troubleshoot".
Now, if you are not ready to take all of the following command-line recovery steps that will use the command line only, click Reset this computer to reset windows 10 (reinstallation), which can be done while saving your files (but not programs). If you are ready and want to try to return everything as it was - click " Extra options", And then -" Command line ".
On the command line, we will check the integrity of the system files in order and Windows components 10, we will try to fix them, as well as restore the registry from a backup. All of this together helps in most cases. Use the following commands in order:

There is a good chance that Windows 10 will start up after that. If not, you can undo all the changes made in the command line (which can be run in the same way as before or from the recovery disk) by returning the files from the backup we created:
- cd e: \ configbackup \
- copy * e: \ windows \ system32 \ config \(confirm overwriting files by pressing A and Enter).
Some bugs with standard Windows tools can be corrected with the built-in program in automatic mode... The troubleshooting wizard is present in all versions of the operating system, starting with Windows XP, so you can use it in Windows 7 without installing anything additional.
Why you need troubleshooting from Windows
This function is useful if any system function or the service will stop working, start, or start giving an error. By opening the troubleshooting wizard, you start the process of automatically scanning system files for broken items, conflicting programs, or incorrectly performing tasks. There is a chance that thanks to this process, the system will find the cause of the breakdown and fix it on its own, you will only need to confirm the beginning and end of the operation.
There are two main types of problem wizard:
If the wizard does not cope with the elimination of the problem, then you will have to solve it by other methods, looking for the cause and fixing it manually. There are times when, thanks to the diagnostics carried out, you will find out the cause of the problem, but it will not be eliminated.
How to start a process
There are two ways to run diagnostics: through the control panel of the computer and directly. The transition to the automatic elimination of problems associated with system startup will be discussed separately in the next paragraph "Examples of using the wizard".
Using the computer control panel
 Go to the Troubleshooting section
 Run the command control.exe / name Microsoft.Troubleshooting
 Go to the section "View all categories"
 List of what you can use for automatic elimination malfunctions
Directly
This method is best used if you need to fix any built-in or third party program... Find the file that launches the application, and right-click on it, and in the menu that opens, select "Fix compatibility problems". After that, diagnostics will begin, which will help you fix the problem or at least find the cause of the breakdown.
If, after pressing the power button, the PC does not make a sound, the fans do not spin, and the LED indicators do not light up, first of all, make an external inspection of the power source, namely, check if the power cable is securely connected to the outlet and connector in the unit, and whether the power supply switch is in the "On" position.
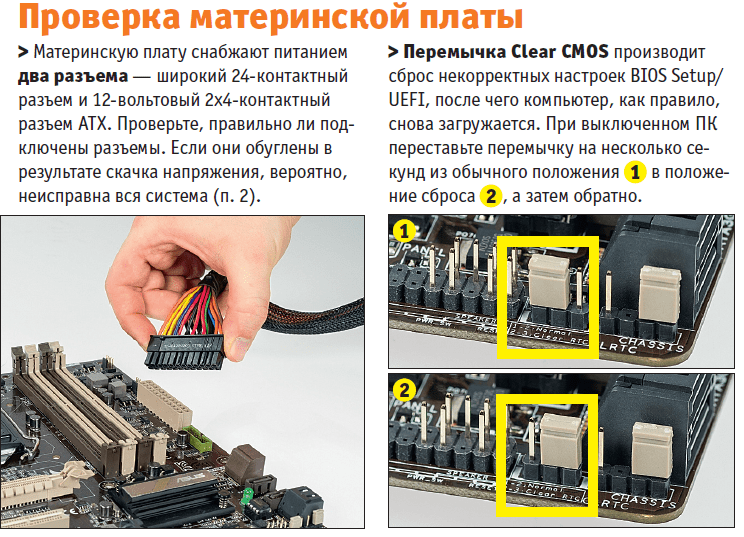
Next, check if the power wires in the motherboard connectors are loose. First, open the case cover and see if the cables from the power supply to the motherboard are properly connected. Disconnect the wide 24-pin connector and the 12-volt 4- or 8-pin processor auxiliary power connector and inspect them. In case of detection of burned contacts, the matter may be in a power surge or in a malfunction of the power supply. It is possible that this affected all components of the system, which may entail the purchase of a new computer.
Button malfunction.
Use a paper clip to short-circuit both power button pins on the motherboard to check if the power button on the computer is faulty.
If everything is ok on the power supply side, check if the power and reset buttons on the case are properly connected to the motherboard and if they have easy movement - the small two-pin connectors should be firmly connected to the pins. Disable the Reset button and try turning on the computer (if that works, then the reset button is faulty and should remain disabled).
If that doesn't work, unplug the power button. Further, if the system can be started by closing both contacts, for example, with a paper clip, then the power button is faulty. In this situation, connect the reset button and use it later as an ON / OFF switch. Otherwise, you will have to carry system unit to the workshop for diagnostics.
The PC is running, but the monitor remains off
If the coolers and LED indicators work, but the monitor does not display the image and it remains black, check its power supply, and also make sure that OSD menu Display settings are displayed by pressing the corresponding key. If not, then the monitor is defective - this can be verified by temporarily connecting another display (or TV using an HDMI cable).

If the OSD menu is displayed, switch the inputs using the Source button on the monitor or the corresponding menu item until the desired connected input is displayed. Then toggle the output modes while the PC is on by holding the Win key and pressing P twice - this allows you to switch to the next of the four modes. Wait a few seconds and switch a total of four times to check if the image is displayed in one of the modes. If these steps do not work, replace the monitor cable and try another available interface (such as HDMI or VGA instead of DVI) to rule out a faulty connector or cable.
Finally, the most time-consuming way is to check if installing or replacing a video card will help (for a start, it can be an old or borrowed video card for a while). If all these attempts are unsuccessful, there is probably some other hardware problem that you can diagnose by following these steps.
BIOS does not start / freezes
A blinking cursor on the screen when starting a PC or freezing during BIOS initialization can indicate various hardware problems. First of all, check if all connectors (for example, the CPU cooler) are properly connected to the motherboard and if all the coolers are working. Replace faulty ones if necessary. The speaker of the motherboard in certain cases issues important information as sound signals, the meaning of each of which is explained in the motherboard user manual. However, this requires that this small speaker is properly connected to the "Speaker" connector of the motherboard (check this or use a special POST card for diagnostics).
The described signs may indicate incorrect BIOS settings Setup - This issue can be easily fixed by performing a factory reset. Turn off the computer, unplug the power supply, open the case and locate the Clear CMOS jumper on the motherboard, which of three pins usually closes the first and second. Change its position for ten seconds so that it closes the second and third contacts, then return to its original position.
 After that, the motherboard, "forgetting" everything UEFI settings must start over. If you don't see this jumper, remove the motherboard battery for ten seconds and then replace it. If problems occur every time you unplug your computer, replace the battery.

The next suspect is RAM: check each module separately (if only one is installed, try inserting it in a different slot) and, if necessary, replace the faulty one.
 Then disconnect everything Hardware, which is not essential for the operation of a PC, from USB-, PCIe- and other computer connectors. If after that it starts, gradually plug everything back in - and try until you find the culprit.
If all else fails, it is likely that the motherboard and / or CPU damaged and you need to prepare to purchase new devices.
 Windows won't start
The computer goes through the BIOS initialization stage, but displays a message stating that boot disk not found? First, check if the SATA power cable and data cable of your hard disk or solid state drive... Then try connecting the drive with a different cable and into one of the other ports. If it does not appear in BIOS Setup / UEFI (to check, press "Del" when booting the computer, go to the "Advanced Chipset Features" section and or another similar one, and see if the disk is recognized on one of the SATA channels), try connecting the HDD across SATA interface or in a USB case to another computer. If this does not work, then the disk is damaged, and, most likely, only a professional service can recover the data for a fairly high price.
If the disk appears in BIOS Setup or is still readable on another computer, but is no longer bootable, then you must first start the recovery system and execute backup data due to the risk of errors file system or hardware failure. Then restore the operating system bootloader: boot the computer from the Windows installation media (insert a DVD or USB drive, after turning on press "F12" or a similar key, select the media in the boot menu). Run command line... Then enter: "bootrec / fixMBR" "Enter" "bootrec / fixBoot" "Enter". If that doesn't work, start the console again and type "bootrec / rebuildBCD", "Enter". If that doesn't work, your Windows is likely to be so badly damaged by file system or hard drive corruption that it needs to be reinstalled - best at new disc, because the old one after a failure will already be unreliable.
Can't log on to Windows
 Driver problems.
 If Windows won't start, try safe mode uninstall faulty drivers or unmount the corresponding hardware.
If Windows starts loading, but cannot finish it, you have two options: either take a long break (for example, large Windows updates may take several tens of minutes, depending on the system, to complete all operations on reboot), or, even if after an hour, nothing happens or the problem is not related to Windows updates, boot into safe mode. This mode is offered as an option after a sudden power outage. In other cases, immediately after starting, press "F8" (in Windows 10 - "Shift + F8"). If problems with updates interfere with starting, Windows will discard them, after which the system should boot into normal mode... In addition, in this mode, you can update or remove software and the drivers whose installation likely caused the problem.
In other cases, run the System Configuration tool in safe mode, on the Services tab, activate the Do not display Microsoft services»And uncheck all other displayed services.
Now disable all startup programs in the Startup tab (Windows 7) or in the Task Manager on the Startup tab (Windows 8 and 10). If that doesn't help, extract everything unnecessary devices... As a last measure, before starting the reinstallation, run the command line as administrator in safe mode (enter “cmd” in the Start menu search field, right-click on “cmd.exe” and select “Run as administrator”) and enter "sfc / scannow" - this will check all system files and, if necessary, replace them with original ones.
We change the power supply and the motherboard
If all attempts are unsuccessful, then most likely the reason is a damaged power supply or motherboard. If the block is already five years old, then buying a new one from a trusted manufacturer is a good idea at any time. Replacing it does not cause any particular difficulties: we disconnect all power cables, unscrew four screws and remove the power supply. Install the new one in the reverse order.

The next step is a new motherboard. Usually a model with the same socket as the old one is inexpensive and you can continue to use all the other components. But you have to completely disassemble and reassemble the computer. If the device is more than five years old, it may make sense to immediately install motherboard, CPU and memory of the latest generation. Such an overhaul will be the surest solution to all PC problems.
Photo: manufacturing companies; CHIP Studios, Kai Hendry / Flickr.com