 entrance
Packing files in esd format. ESD system folder, can it be deleted
Chief Technology Writer
Someone sent you by e-mail ESD file and you don't know how to open it? Maybe you have found a ESD file on your computer and wondering what it's for? Windows might tell you that you can't open it, or in the worst case scenario, you might encounter an ESD file related error message.
Before you can open an ESD file, you'll need to figure out what kind of file the ESD file extension belongs to.
Tip: Incorrect ESD file association errors can be a symptom of other underlying issues within your Windows operating system... These invalid entries can also produce associated symptoms such as slow Windows startups, computer freezes, and other PC performance issues. Therefore, it highly recommended that you scan your Windows registry for invalid file associations and other issues related to a fragmented registry.
Answer:
ESD files are Uncommon Files primarily associated with ExpertScan Survey Document (AutoData Systems).
Additional types of files may also be using the ESD file extension. If you are aware of any other file formats that use the ESD file extension, please contact us so that we can update our information accordingly.
How to open your ESD file:
Fastest and easy way Opening your ESD file is by double-clicking it. In this case, Windows itself will choose the necessary program to open your ESD file.
In case your ESD file won't open, it is very likely that your PC does not have the required application program to view or edit files with ESD extensions.
If your PC opens the ESD file, but it's the wrong application, you'll need to change your file association settings. windows registry... In other words, Windows is associating ESD file extensions with the wrong program.
Install Optional Products - FileViewPro (Solvusoft) | | | |
ESD File Analysis Tool ™
Unsure about which type of ESD file you have? Want to get precise information about a file, its creator and how you can open it?
Now you can instantly get all the information you need about your ESD file!
The revolutionary ESD File Analysis Tool ™ scans, analyzes and reports detailed information about the ESD file. Our (patent pending) algorithm will quickly parse the file and, within seconds, provide detailed information in a clear, easy-to-read format. †
In just a few seconds, you will know for sure the type of your ESD file, the application associated with the file, the name of the user who created the file, the file's protection status, and other useful information.
To start a free file analysis, simply drag and drop your ESD file inside the dotted line below, or click View My Computer and select the file. The ESD file analysis report will be shown below, right in the browser window.
![]()
Drag and drop ESD file here to start analysis
View my computer "
Please also check my file for viruses
Your file is being analyzed ... please wait.
Which could be downloaded on the official Microsoft website a year ago, there was an operating system image file called install.wim ... The install.wim file is a disk image that contains the operating system files in a compressed state. During Windows installations all files are unzipped from the install.wim image to disk (C :), by and large, this is the main stage of installing the operating system on our computer. There is also a tool called DISM , with which you can integrate drivers and updates into the install.wim file, enable and disable various components of the operating system, restore the integrity of Windows system files, etc. But recently, in all distributions of Windows 8.1, Windows 10, instead of the install.wim file, there is an operating system image file install.esd ... What kind of beast is this, we will analyze in today's article.
1. What is install.esd and install.wim file
2. What is the difference between the install.esd file and the install.wim file
3. Does Microsoft have tools to convert install.esd to install.wim or look for third-party software?
4. Is it possible to use the install.wim file instead of install.esd in the Windows 10 distribution after conversion, or will it be necessary to convert the install.wim file to install.esd in reverse?
What is the install.esd file in install.wim
Greetings to all! The install.esd and install.wim files located in the distribution (ISO image) of Windows 10 are archives that contain the files of the Windows 8.1 or Windows 10 operating system in a compressed state, and DISM is a tool for working with these archives ...
.Wim or .esd archives can contain one or several other archives (releases) of operating systems (Professional, Home, etc.). Archives located inside Wim or Esd files are called - Images. Any Image in the archive is always assigned an index 1, 2, 3, 4 ...
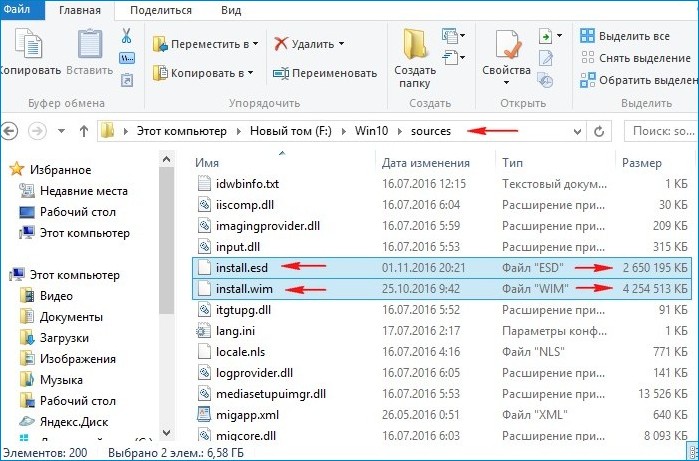
For example, we have downloaded Windows distribution 10 and connected it to virtual disk drive(E :), go to the "sources" folder of the distribution kit and see the file-archive install.esd,
to find out which Images are inside the archive, enter the command at the command line:
DISM / Get-WimInfo /WimFile:E:\sources\install.esd
where E: \ sources \, this is the path to the install.esd file
As you can see, in the archive install.esd is fourWindows Image with indexes: 1, 2, 3, 4.
Image Information: E: \ sources \ install.esd
Index: 1
Name: Windows 10 Pro
Description: Windows 10 Pro
Size (Bytes): 14 244 778 516
Index: 2
Name: Windows 10 Home
Description: Windows 10 Home
Size (Bytes): 14,040 329 647
Index: 3
Name: Windows 10 Home Single Language
Description: Windows 10 Home Single Language
Size (Bytes): 14,047,031,800
Index: 4
Name: Windows 10 Education
Description: Windows 10 Education
Size (Bytes): 13 988 924 495

How the install.esd file differs from the install.wim file
It is important to know that when creating a new archive of the Windows 8.1, 10 operating system, a WIM archive file (install.wim) is always created, an Image is created in the archive (for example, Windows 10 Pro) and index 1 is assigned to it. Then, using the DISM tool to archive other Images are added. The added second image will be assigned index 2, the next added image will be assigned 3, and so on. Created images can have three types of compression:
/ compress: none(without compression)
/ compress: fast(fast compression)
/ compress: maximum(maximum compression), if you do not specify the / compress parameter when creating an image, then the compression will be Fast (fast compression).
Microsoft in 2014 developed another type of compression Recovery(maximum maximum)
This type of compression compresses Windows files into the archive even stronger, as a result the file install.esd weighssmaller install.wim file by 30%.
Only 3 DISM options work with the recovery compression type:
DISM / Export-Image ...... / compress: recovery
DISM / apply-image.
DISM / Get-WimInfo
To make it easier to work with archives, an archive with images compressed in Recovery is usually given the extension
ESD ... The esd extension is desirable, but not required. It is wrong to assume that if the archive has esd resolution, then compression can only be recovery, just as if the archive has wim resolution, then compression can only be fast, max and none, I have come across wim files with recovery compression several times. Dism works not by extension, but by compression - you can put ESD permission when creating an image and DISM will create an image with "fast" compression.I made a small video on this topichttps://yadi.sk/i/B_8mfOjfxhqSkHopefully, you now understand how the install.esd file differs from the install.wim file. Both files: install.esd and install.wim are archives with Windows files, and they differ in the type of compression. Fthe file archive - install.esd is compressed more and weighs less.
It is also important to know that when creating a new archive of the Windows 8.1, 10 operating system, the compression type - / compress: recovery is not supported. You can compress in recovery only the already created WIM image, for example, enter the command in the command line:
DISM / Export-Image /SourceImageFile:F:\Win10\sources\install.wim / SourceIndex: 1 /DestinationImageFile:F:\Win10\sources\install.esd / Compress: recovery
with this command we compress the recovery file install.wim located at F: \ Win10 \ sources into the install.esd file located at F: \ Win10 \ sources. As a result, the install.esd file appears in the "sources" folder next to the install.wim file. Both files contain compressed files Windows, but the install.esd file is smaller. Changing the type of compression is commonly referred to as a conversion.

Unfortunately, you cannot convert an ESD archive to a WIM archive using the DISM / Export-Image option.
archive ESD must first be unzipped and then re-zipped to wim file by compression fast or maximum.
About a week ago, I decided to check for updates for the Windows 10 Pro operating system installed on my laptop. Because, automatic update and most of the spyware and traffic-consuming utilities and programs are disabled for me, then to check and install updates, I used third party utility.
After running the check, I happily discovered a new "Feature update to Windows 10, version 1703", but which unfortunately was quite large 3.77 GB, and therefore I had to postpone the automatic download and installation using the utility Windows Update MiniTool.

Let me explain why I didn’t use the utility, but started “bothering” with all this conversion and decryption.
In our country, within my tariff plan on your internet connection, there are traffic restrictions. That is why, I decided to copy only the links for downloading the update, and download the file itself at work where the traffic is not limited.
After downloading the update, I found a strange extension for the "esd" file, as in the picture above. After looking for a solution on the net, and having tried different options, I settled on “decrypter”.
Decrypter - This is an automatic script (command set) that converts (encrypts and decrypts) the original ESD file from Microsoft to decrypted ISO / WIM / ESD formats.
So, step-by-step instruction to convert the original "esd" file to the standard ISO format.
1. Download and unzip the decrypter.zip file into a folder named “esd” (for example) on the C: \ partition.
2. Move the “esd” file into a folder called “esd”.

3. Run the command line as administrator by right-clicking on the decrypt.cmd file
4. In the menu that appears command line, pay attention to point 5, if you have the item “Decrypt ESD file only”, then your file is encrypted, enter the number 5.

5. After decryption, select “Create Full ISO with Compressed install.esd” by entering the number 2.
The conversion process will start and will be displayed.
6. Upon completion of the process (“Done”), press any key to exit and close the command line.
Generated file ISO format, under the new name, you will find in the (esd) folder from which the “decrypt.cmd” script was run.
P.S Opening the received ISO file, in File Explorer, I have easily upgraded Windows 10 Pro to new version, .
Or $ Windows. ~ BT, $ Windows. ~ WS. It turns out that the ESD folder also stores various temporary files that can restore the system if, for example, a critical error has occurred. But the question comes up, is it possible to delete the ESD folder? I want to say that yes, you can. The folder stores recovery files, which weigh a lot and, if you do not have a lot of space on your hard disk, then you should delete it.
Advice! I suggest that at first you do not delete this folder, as well as Windows.old and others, since if you are only recently using Windows 10, then you can test it for now. If everything suits you, you can delete all unnecessary garbage. I recommend doing this by staff Windows tools Disk Cleanup.
So, if you have administrator rights, then go to the utility Disk Cleanup, you can enter it in the search box.
Now, in our field "Disks" need to choose system disk, usually it is (C :). Click OK.

We are waiting for the system to estimate the disk space that can be freed.

The following window will appear, in which you must click the button "Clear system files» ... We are again waiting for the disk size to be estimated.


We confirm actions by pressing a button "Delete files" and wait for the operation to be completed.
Once the temporary files are removed you can do some more. To do this, in the Disk Cleanup utility, go to the tab "Additionally" and where the point is System Restore and Shadow Copies push "Clear"... It is advisable to delete all control points, and leave the last one, so that you can return in case of something.

Looking for an answer to the question, where did the space on the C drive go? Windows systems 8.1 and 10, at the root of this disk, many find an "ESD" folder weighing more than 3 GB. What is this folder and is it possible to delete it without causing it operating system harm?
Folder ESD at the root of the C drive appears, as a rule, after a global system update. For example, if you upgraded from Windows 8.1 to Windows 10 or from Windows 10 to Windows 10, but in the Anniversary Update edition. Also, the ESD folder can be found after applying the lightweight method reinstall Windows using the Refresh Windows utility. Another example is updating the system using the Media Creation Tool to restore the integrity of system files.
The ESD folder contains a distribution kit of Windows 8.1 or 10, but the distribution kit is defective, but limited, which usually includes only one edition of the system, suitable for updating the current system. In the process of a global update Windows utilities Update Assistant, Media Creation Tool and Refresh Windows download temporary installation files from Microsoft servers to disk from your computer, some of which are the contents of the ESD folder. The temporary installation files are also downloaded to two other folders on the C drive - $ Windows. ~ BT and $ Windows. ~ WS... Their specifics and methods of removal have already been described on the site in this article.
For the update process, the system downloads the installation files, but after the operation is completed, it is in no hurry to delete them. And these files continue to occupy disk space in some cases as dead weight. Why? From installation files located in the ESD, $ Windows. ~ BT and $ Windows. ~ WS folders, the system does not get rid of, because they can be used to restore it. But if Windows is stable, and recovery is unlikely to become necessary, or if the ability to rollback is provided in advance a backup copy by using third party program, these are the same cases when the ESD folder is a dead weight cluttering up the C drive. Accordingly, under such conditions, it makes sense to get rid of this folder. You can get rid of it with the usual Del key.