 entrance
Hyper v driver for the guest system. Backup and restore a virtual machine
It was originally a component of Windows server versions. On desktops, Microsoft's virtualization technology was implemented in Windows 8. A distinctive feature of Hyper-V is its maximum integration into the operating system, which determines its conflict-free operation. The program creates virtual machines of two types (generations). The second generation provides good performance gains, but is only compatible with 64-bit versions of Windows 8.1 and newer, and server systems no older Windows Server 2012. The new virtual machine supports the option to resize the virtual hard disk. Full interaction between the physical computer and the virtual machine is realized through the use of the standard remote desktop function.
Hyper-V advantages and disadvantages
High performance, flexible configuration of resource consumption (since the virtual machine directly accesses hardware resources);
+ the virtual machine does not stop working in the background;
+ fast work of the virtual hard disk in the proprietary VHDX format
- by default, the guest OS does not work with flash cards and USB drives, does not play sound;
- the clipboard is one-way by default (from the physical computer to the guest OS);
- installation of the 2nd generation virtual machine is performed only from the network or through an ISO image.
Key features
- allocating memory and hard disk space for the virtual guest operating system;
- Internet access from the created virtual OS;
- fast startup and shutdown of the virtual machine;
- there is an option to install as a Linux guest OS;
- creating a local network between systems in a virtual machine;
- recording checkpoints that fix the state of the OS, which is installed virtually;
- copying and restoring virtual OS;
- transfer of a virtual HDD from one computer to another.
Ever since Microsoft was introduced to PC users in 2008 trial version HYPER V, Computer techologies managed to step far ahead. Meanwhile, no matter what innovations the modern world may bring, this hardware virtualization system, developed on the basis of a hypervisor, cannot do without today. True, today on Windows 7, you can install both the HYPER V SERVER and the HYPER V MANAGER component, which makes it somewhat easier to use it when debugging a network.
Nevertheless, practice shows that the installation of HYPER V often causes confusion, especially in those cases when a beginner or a user who is not familiar with the features of such Microsoft systems and the basics of configuring it for networking. In this case, it turns out that it is simply impossible to leave unanswered the question of how to install and configure HYPERV MANAGER and HYPER V SERVER on a computer running Windows 7.
Option # 1: Install and debug the HYPER-V server
It's no secret that today Microsoft's HYPER V SERVER system is presented in several assemblies, each of which has its own advantages and disadvantages. In particular, not so long ago, the release of windows server 2012 r2 hyper v became available to Internet users. However, the most popular option is still Microsoft version HVS 2008 R2 with Core setup.
In addition to the HYPER-V base, it does not provide for additional extensions, which, however, is not a minus, but a plus, considering that this ensures optimal consumption of hosting resources with the highest possible performance indicators. The installation and debugging process consists of several stages.
І stage - preparation of the computer
At the preparatory stage, you need to do 3 basic steps:
- download and burn a bootable drive with the HYPER V SERVER 2008R2 image. As a basis, you can take the same free distribution from the Microsoft website. It will do just fine;
- check if the processor supports hardware virtualization;
- set the parameters for starting the computer from an external drive.
ІІ stage - installation of the system on Windows 7
After completing the preparations, we connect the USB flash drive / disk with the HYPER V SERVER 2008 R2 image to the computer and boot from it. In the window that appears, select English as the working language, change the time format to Russian and click the Next button:

Next, click the Install now button, and then, after reading the license, we confirm the acceptance of the terms of the agreement on use of Microsoft HVS 2008 R2. After that, select Custom ("Full") as the installation option and proceed to the "Hard disk partitioning" step:

Here, the principle of action is the same as when installing / reinstalling Windows: formatting HDD and then we split it into 2 sections. The first one will be reserved for the placement of the hypervisor (the amount of memory is at least 15 GB); the second - for containers of virtual machines in the network (5 GB of memory will be enough). After completing the breakdown, click Next and wait until the data is copied and the computer is restarted.
ІІІ stage - determination of basic parameters
After the installation of HYPER V SERVER 2008R2 is complete and the restart is complete, the program will prompt you to set the network administrator password. The default requirement is a 6-digit password with 1 capital letter and 1 digit (special character). After this step, two windows with consoles should appear on the screen - the standard command line and the options (control) console on a blue background:

At this point, we will have to work with the HVS 2008 R2 Options Console:

First, select step 8, mark the required network adapter, and then write down the ip-address, default gateway and subnet mask. After saving the settings, go to the main menu, select item 7, drive in the English letter E for, and then the number "2" - connect without restrictions on clients. Then we return to the main menu again, select item 9 and similarly set the date and time for the server on the network.
Stage IV - debugging additional parameters
For the correct operation of HVS 2008 R2 on the network, you must also set the server name and set up the workgroup. To do this, select item 1 in the menu, drive in the letter W and assign a name to the workgroup (it must match the name of the network administrator's PC). Then we select item 2, specify the network name of the server (for example, HVS-2008) and save the changes by restarting the system. Next, we set other parameters for remote control. To do this, we connect remotely to the PC, select item 4 and alternately execute the commands from subparagraphs 1 and 2 until reboot.
Now download the package of tools RSAT developed by Microsoft, and we unload from it in Windows 7 the program data of the HYPER-V manager, designed for administering virtual machines. After that, all that remains is to set parameters for users and install the necessary services on the PC.
Option number 2: Preparing the HYPER-V manager
To connect to the network instead of HVS 2008 R2, you can also use the HYPER-V manager. It is easier to install, although the base for it is limited only to the assembly of Windows 7 Professional and higher. One way or another, the procedure is as follows:

Today we will learn how to install and configure the hyper-v server hypervisor from Microsoft, as well as some pitfalls and ways to avoid them.
The reason for writing this article was the material of this post. This post is more like a cheat sheet if you have already worked with this hypervisor. A beginner will have to face a bunch of nuances and dig up a lot of forums in search of answers to non-standard questions.
For beginners, the article will describe in as much detail as possible all the actions and their meaning, so that they have the opportunity to start experimenting and come up with something of their own. For the more savvy, the article is divided into logical blocks and sub-blocks so that you can quickly find the information you need.
Description
MS hyper-v server is a stripped-down version of MS server 2008 R2 in Core mode (i.e., in fact, graphical interface missing) with the hyper-v role installed and nothing more. According to Wikipedia, hyper-v server is distributed free of charge, which, coupled with convenient management and integration with MS products, makes it a very attractive hypervisor. In addition, it has fairly high performance indicators, which means that the resources of the host machine will be spent on the operation of the services we need.
Installation
Before starting the installation, you need to make sure that your processor supports Intel VT-x or AMD-V hardware virtualization technologies.
First, you need to download the hyper-v server 2008 R2 distribution from the Microsoft website (you do not need to register). Next, burn the image to a DVD or make an installation flash drive. Insert the disk / flash drive and boot from it.
Hyper-v server - choosing the language of the installation wizard
The installation window prompts us to select the language of the operating system. We choose English, further in the article it will be explained why exactly it.

Hyper-v server - select OS language and keyboard layout
We chose English as the language, and it is better to choose Russian as the time format, so that later you do not have to worry about setting up in the command line.

Hyper-v server - choosing the type of installation
We select the full installation (Custom).

Hyper-v server - configuring hard disk parameters
At this stage, the wizard offers to configure the parameters of hard disk partitions. Best to create 2 logical drives... The first is to install the hypervisor itself, 15 GB is enough for it. The second is for storing containers of virtual machines (VM). Thus, it will be much more convenient to manage, import and migrate VMs.
We press "Next" and we can rest for a while. During the installation process, the computer will restart several times.
Customization
Basic setup and remote access
After rebooting, the hyper-v server will prompt us to set an administrator password. Since by default in group policy ms windows 2008 server r2 there is a requirement for password complexity, you will have to come up with a password with a length of at least 6 characters, always containing a capital letter and a special character or number (for example "Password1").
As you can see in the screenshots below, the management console is in Russian, although English was selected during the installation, most likely this is from the fact that the Russian distribution kit was downloaded from the official Microsoft website. This will not negatively affect the operation and configuration of the server. If your console is in English, you can do it by analogy, all the settings will be easy to understand.

Hyper-v server - management interface
After loading the working environment, the OS offers us 2 control consoles. Standard command console cmd and a console with pre-installed options. First of all, we need to set a static IP address and configure remote control server. In the control console, select item 8.

Hyper-v server - network adapters
The list will list the network adapters. Select the desired one and enter its index. Next, select "1 - set the ip-address of the network adapter". We enter "S" - which means a static ip-address. For example, let's set the parameters:
IP address - 192.168.1.100 subnet mask - 255.255.255.0 default gateway 192.168.1.1 After applying the parameters, we will return to the submenu, where the previously made settings will be listed. If everything is correct, we return to the main menu. Now let's set up remote access. We select item 7, then turn on the remote desktop by entering the English "E". When asked about limiting connections from rdp clients of older versions, select "2" - connect from any clients.
In the main menu, select item 9, and set the current date and time on the server.
Server network name and workgroup
Now let's set up a working group. For the hyper-v server to work, we will not include it in the domain, which complicates the configuration somewhat, but for experiments this is ideal. When testing and validating various configurations, it is best to isolate the test machines from the target network.
We select item 1, then "join the working group" by entering "W". Next, set the name working group, for example "test". It is very important that the name of the workgroup on the hyper-v server and the PC from which we plan to manage it match. After that we return to the main menu.
It is advisable to set the network name of the server, select item 2 and enter the name, for example "hyper-srv". To apply the parameters, you need to reboot, we agree with the OS proposal.
Further, all settings (such as computer name, workgroup, users, ip-address, etc.) will be used as those described during the installation process. If you have specified your parameters, do not forget to use them.
After rebooting, we can connect to the server using the remote desktop client. Select start -> execute, enter: mstsc In the first field, set the ip-address (in my case 192.168.1.100), connect. The server will request authorization data, enter the username "hyper-srv \ Administrator" and the password "Password1".
So, we are connected, now you need to configure additional remote control parameters. We go to point 4. Now, in order, we select sub-points 1, 2 and wait for the end of the setting. After completion, the OS will ask you to reboot again. After completing these settings, we will be able to connect to the server using the mmc console and the hyper-v server manager from the Remote Server Administration Tools (RSAT) package. This will be described in more detail later in the text.
Installing RSAT and hyper-v manager
For comfortable remote server management (creating / deleting / importing / configuring VMs, adding / removing equipment, managing users / group policies, etc.), we need to install RSAT on our PC. We will install it on windows 7. First of all, download it from here. In this package, we need the component "Hyper-v Dispatcher" for the mmc console - this is actually the main tool for managing future VMs.
Subsequent settings will need to be made both on the server (SRV for short) and on our control PC (CC).
Configuring users
The first step is to create a user on whose behalf we will manage. Usernames and passwords must match for UK and SRV!
On the SRV - in the control console, select item 3 (adding a local administrator). Set the name "admin" and the password for it "Qwerty1". Let's check if it was added successfully, in the cmd console, enter: net user admin This command will show us that it is in the “Administrators” and “Users” groups.
On the UK - launch the cmd console on behalf of the administrator and enter the command: net user admin Qwerty1 / add add it to the administrators group: net localgroup Administrators admin / add for the English version enter: net localgroup Administrators admin / add Check the results again with: net user admin
There is an excellent utility “HVRemote” written by one of the Microsoft employees for configuring users and security groups.
Download the utility and copy the "HVremote.wsf" file to the server. Remember at the very beginning, it was mentioned that you need to select English for the OS? So, for the "HVremote.wsf" script to work correctly, it is necessary that security groups and users are named in English.
A small digression: as it was written earlier, there is no graphical interface in the hyper-v server. This is not entirely true, Microsoft simply cut everything related to Explorer to the maximum, but this does not prevent us from launching applications that have graphical windows. For example, you can copy the program “ total commander"And run it from the console.

Hyper-v server - launching applications
Let's continue on to SRV - open the cmd console, go to the folder with the "HVremote.wsf" file (in the article, the file is saved to the root of the C drive :). We execute the command: cscript hvremote.wsf / add: domain \ account where domain is the name of your server (domain), account is the name account For driving. In our case, the command will look like this: cscript hvremote.wsf / add: hyper-srv \ admin

Hyper-v server - script execution
As a result, you should have something like the screenshot. The script added the user to the required groups and assigned him rights.
On the UC side, you need to execute the following commands cscript hvremote.wsf / anondcom: grant cscript hvremote.wsf / mmc: enable
For the Remote Computer Management Console snap-ins to work, you must create exception rules in the server firewall. The first step is to create a rule that allows you to manage logical drives:
Netsh advfirewall firewall set rule group = "Remote Volume Management" new enable = yes If you get an error like "Group cannot be specified with other identification conditions" - try retyping the command manually instead of copying / pasting. Successful command execution result: Updated 3 rule (s). Ok. Next, let us enable remote control of the firewall netsh advfirewall firewall set rule group = "Windows Firewall Remote Management" new enable = yes The result of a successful command execution: Updated 2 rule (s). Ok. Allow access to any console snap-ins mmc netsh advfirewall firewall set rule group = "Remote Administration" new enable = yes Result of successful command execution: Updated 3 rule (s). Ok. Let us use "Windows Management Instrumentation (WMI)" with the following command netsh advfirewall firewall set rule group = "windows management instrumentation (wmi)" new enable = yes Result of successful command execution: Updated 4 rule (s). Ok. Allow the icmp protocol: netsh firewall set icmpsetting 8 Allow access to shared files and folders: netsh firewall set service type = fileandprint scope = subnet If for some reason you cannot connect to the server, try disabling the firewall with the command netsh firewall set opmode disable You may need to create additional access rules.
Now we can use the mmc snap-ins to manage the server (managing services, users, policies, etc.) and most importantly the hyper-v manager. Let's open it up: launch the mmc console -> file -> add or remove snap-in -> hyper-v manager. Select the Action menu -> connect to server -> another computer. Enter the network name of your server (hyper-srv) in the field and connect.

Hyper-v server - VM control manager
That's all, we have successfully installed and configured our hyper-v server. Now you can safely deploy virtual machines and various services.
Wikipedia - Hyper-v server Useful Console CommandsAmong the three leaders in the software market for virtualization of operating systems - VMware, VirtualBox and Hyper-V - the latter hypervisor takes a special place. This special place is due to the fact that Hyper-V is a standard component of Windows server systems and some versions of Windows for desktop PCs. Lagging behind VMware Workstation and VirtualBox in functionality, cross-platform and partly in ease of use, Hyper-V, nevertheless, is not without its advantages. And the main one is the higher performance of the guest OS.
Below we will talk about activating Hyper-V in Windows 10 and creating a virtual machine using this hypervisor.
1. Hyper-V - standard hypervisor from Microsoft
Windows 10 inherited the standard Hyper-V component from versions of Windows 8 and 8.1, and in them the hypervisor migrated from Windows Server. Both Windows 8.1 and Windows 10 offer optional Hyper-V Pro and Enterprise editions. The hypervisor works only in 64-bit systems.
For a long time, Hyper-V did not support any other guest OS other than Windows. However, relatively recently, Microsoft took care of the hypervisor to support the Linux guest OS. And today, using Hyper-V, you can test some Linux distributions, in particular, the popular Ubuntu.
2. Requirements for Hyper-V operation
Minimum volume random access memory physical computer for Hyper-V operation - 4 GB.
The computer processor must support SLAT technology (Intel EPT or AMD RVI). Almost all modern processors meet this requirement.
Another processor requirement, also provided by many modern models- support for hardware virtualization technology and, accordingly, its active state in the BIOS. In BIOS motherboards for Intel processors such technology (depending on the version) can be called differently - Intel-VT, Intel Virtualization Technology, Intel VT-x, Vanderpool, or Virtualization Extensions. Have AMD technology hardware virtualization is called AMD-V or SVM (Secure Virtual Machines). For example, in AMI BIOS version 17.9, the AMD processor hardware virtualization feature can be found under Cell Menu - CPU Feature - SVM Support.

Have AMD processors hardware virtualization is usually enabled by default. Does it support specific model processor hardware virtualization, this point can be found on the sites Intel companies and AMD.
3. Activating and starting Hyper-V
Hyper-V bundled with Windows 10 Pro and Enterprise is optional. Initially, the standard hypervisor is disabled. It is included in the "Programs and Features" section of the Control Panel. The fastest way to get there is through an in-system search.

We start "Enabling and disabling system components."

In the small window that appears, tick off all the sub-items of the Hyper-V item. Click "Ok".

The system will apply the changes for a couple of seconds and ask for a reboot. After rebooting, we are looking for a shortcut to launch the Hyper-V Manager. Hyper-V Manager shortcut can be immediately pinned to home Windows screen 10 by finding it in the Start Menu Administration Tools.

You can also access the Hyper-V Manager shortcut using an in-system search.

Launch Hyper-V Manager.
4. Configuring network access
In Hyper-V Manager, the network is configured in a separate step, and first you need to create a virtual switch - an option that provides access to the network. We click on the name of the physical computer, and on the right side of the window, select "Virtual switch manager ...".

The wizard for creating a virtual switch will start, where the first step is to select the type of network. There are three of them:
- External - this type uses network card or wifi adapter physical computer and connects the virtual machine to the same network as the physical computer. Accordingly, it is a type of network that allows a virtual machine to access the Internet;
- Internal - This type provides a network between a physical computer and virtual machines Hyper-V, but does not provide them with Internet access;
- Private - this type allows you to create a network between Hyper-V virtual machines, but this network will not have a physical computer, nor will there be an Internet connection.
In our case, the virtual machine needs access to the Internet, so let's choose the first type - an external network. Click "Create virtual switch".

In the properties window of the virtual switch, give it a name, it can be any name, for example, "Network card 1". You can add a note to the virtual switch if needed. If the physical computer has both a network card and a Wi-Fi adapter on board, the specific device through which the virtual machine will connect to the network can be selected from the drop-down list in the "Connection type" column. After making the settings, click "Apply" at the bottom of the window.

5. Creating a virtual machine
Now you can start directly creating a virtual machine. On the left side of the Hyper-V window, the selection should still be on the name of the physical computer. In the upper right corner, click "Create", then - respectively, "Virtual Machine".

In the welcome window of the launched wizard, click "Next".

Give the virtual machine a name; you can also change its location on the physical computer disk by specifying the desired disk partition and desired folder with the browse button. Click "Next".

One of the relatively new features of Hyper-V is virtual machine generation selection. In our case, generation 2 is selected.

What does it mean? Generation 1 are virtual machines that support 32-bit and 64-bit Windows systems. Generation 1 compatible with previous versions Hyper-V.
Generation 2 - new format virtual machines with UEFI-based firmware. These virtual machines support a number of new features and can provide small performance gains. On virtual machines of generation 2, only 64-bit are installed as guest OS Windows versions 8.1 and 10, as well as server Windows Server 2012, Server 2012 R2 and Server 2016.
The UEFI platform provides another requirement for using generation 2 virtual machines - bootable media UEFI. This point needs to be clarified by downloading the ISO image with the Windows distribution from third-party sources on the Internet. But it is still better to download Windows distributions from official Microsoft sources. So, the Media Creation Tool utility, which downloads Windows 8.1 distributions from the Microsoft website and creates a bootable ISO image that supports the UEFI environment.
In the case of installing Windows 10 as a guest OS, this is the way to obtain an ISO image of the system and is recommended. Windows 10 provides an installation process with lazy input. In our case, Windows 8.1 will be installed as a guest OS, and its official distribution, obtained using the Media Creation Tool utility, requires entering the product key during the installation process. The TechNet Trial Center site will help provide support for the UEFI environment and take advantage of the free opportunity to test Windows 8.1. On this site you can download the English edition of 64-bit Windows 8.1 Enterprise and test the system for free for 3 months. The problem with the lack of support for the Russian language after installing the system can be solved separately by installing language pack and setting Russian as the main language of the system.

We return to the wizard for creating a virtual machine. In the memory allocation window, we leave the preset parameters if the physical computer has no more than 4 GB of RAM. If it is more than 4 GB, you can increase the amount allocated when the virtual machine starts. For guest windows The XP indicator of RAM can, on the contrary, be reduced to 512 MB. Click "Next".

In the network settings window, select the previously created virtual switch from the drop-down list. Click "Next".

In the window for connecting the virtual hard disk, we give the virtual machine a name, specify the location on the disk of the physical computer, and specify the size. These are the creation options new hard disk. The second item of this step of the wizard is used when the computer already has a virtual hard disk, in particular, with the installed guest OS. When choosing a generation 2 virtual machine, the file of such a virtual hard disk must be in VHDX format (not VHD), and the guest OS must support the environment UEFI boot... Click "Next".

If in the previous step of the wizard you selected the item to create a new virtual hard disk, the next step is to specify the path to the Windows distribution kit. Generation 2 virtual machines no longer support booting from a physical CD / DVD drive. The sources for downloading the distribution of the guest OS can only be the network and the ISO image. In our case, this is an ISO image. Click "Next".

The final stage of the wizard - click "Finish".

6. Connecting a virtual machine
After creating the virtual machine, return to the Hyper-V Manager window. Now you need to connect it. To do this, there is the "Connect" command, among other commands of the context menu invoked on the virtual machine. The Connect command is also present on the right side of the Hyper-V Manager window. To connect, you can also double-click the left mouse button on the preview window of the selected virtual machine.

In the connection window that opens, click the green start button.


The normal process will follow Windows installations 8.1, as it would happen on a physical computer.

As soon as copying the installation files starts, you can close the window for connecting to the virtual machine and do other things.

Closing the connection window will free up some resources of the physical computer to perform other tasks, while the virtual machine will continue to run in the background. Its performance will be displayed in Hyper-V Manager.

You can connect to a virtual machine as needed to perform actions in it.
That's it - Windows 8.1 is installed. You can turn off, pause, save the virtual machine, or reset its state using commands in the Hyper-V manager and the buttons on the top panel of the connection window.

7. Boot priority
In order not to waste time on the boot from CD / DVD window when starting the virtual machine in the future, you need to open the parameters window in its off state and remove the path to the ISO file with the distribution kit. This is done in the DVD drive's hardware settings tab of the virtual machine.

Alternative option- raise the hard disk in the boot priority above the DVD drive (but not above the "bootmgfw.efi" file). This is done in the "Firmware" tab of the hardware settings.

In both cases, the changes made are saved with the "Apply" button below.
8. Bypassing Hyper-V connection window restrictions
Virtual machine performance is at the heart of the Hyper-V hypervisor, not functionality. Unlike their competitors - VMware and VirtualBox - Hyper-V virtual machines do not work with connected flash drives, do not play sound, and interaction with a physical computer is carried out only by pasting text copied into the main OS inside the guest OS. This is the price of performance for Hyper-V virtual machines. But this is if you work with the usual Hyper-V connection window.
Full integration of a physical computer and a virtual machine can be obtained using the standard Remote Desktop Connection utility.

This utility allows you to flexibly configure connection settings, in particular, to make available inside the virtual machine not only those connected to physical computer USB drives, but also individual hard drive partitions.

Connecting to a virtual machine in this way will provide audio playback and two-way file transfer in the guest OS.
Have a great day!
Hyper-V is a hypervisor-based virtual machine from Microsoft with hardware virtualization support for 64-bit systems. Previously, the hypervisor was only used on Microsoft server operating systems.
Microsoft Hyper-V works only on 64 bit Windows operating systems, in Pro (Professional) and Enterprise (Enterprise) editions, in Windows 8, Windows 8.1, Windows 10 operating systems, as well as in server operating systems (Windows Server).
In the editions of the specified operating systems, the Hyper-V component is present, which is disabled by default. The user can turn on the Hyper-V virtual machine without installing third-party virtualization software (such as VirtualBox) on their computer.
Hyper-V hypervisor
Virtual Hypervisor (Hyper-V) allows you to create a virtual machine for installing a guest operating system. Using a virtual guest operating system, you can get acquainted with the work in the new operating system, test the settings, experiment, install unfamiliar programs, etc. All these actions will not affect the operation and settings of the real operating system installed on the computer.
The hypervisor was originally created for server operating systems, so working in a Hyper-V virtual machine has some limitations: there is no support sound cards and burning CD / DVD discs, the application has limited visual settings in comparison with competitors, there is no way to directly copy or paste files between the real and the guest systems, etc.
For testing, this is not the most important thing, therefore, the more ascetic settings of Hyper-V, for some users, will be more to their liking than similar settings from more advanced competitors.
Keep in mind that when the real (host) and guest operating systems are running simultaneously, the resources of one computer are consumed, so you should not try working in a virtual machine on weak computer... While working in a virtual OS, do not use resource-intensive applications on a real computer in order not to slow down the computer.
This article will cover the installation and configuration of Hyper-V in the Windows 10 operating system. In Windows 8.1 or Windows 8, the settings are made in a similar way.
Installing Hyper-V
First you need to enable the Hyper-V component. Enter the "Control Panel", then "Programs and Features", click on "Turn Windows features on or off."
In the window " Windows components"Check the box next to" Hyper-V ", and then click on the" OK "button.
After finding the required files and applying the changes, you must restart your computer.
In the "Start" menu, in the "Tools Windows administration”, You will see the classic Hyper-V Manager application. Run the program on your computer.

In the application window, click on the computer name, a column with a list of commands that are available from the "Actions" menu will open on the right.

Now you can set up your internet connection.
Click on "Virtual Switch Manager". In the next window, in the "Create virtual switch" section, select the "External" switch type, and then click on the "Create virtual switch" button.

Further in the paragraph " External network»Create a name for the virtual switch, then from the list of available network adapters, select the adapter used to connect to the Internet on your computer. After selecting the settings, click on the "OK" button.

In the warning window that opens, agree to apply the changes to the computer.
Create a Hyper-V virtual machine
To start the process of creating a virtual machine, follow the path: menu "Action", "Create", "Virtual machine ...". Next, the virtual machine creation wizard will open.
In the first window "Getting Started", click on the "Next" button. In the next window "Specify a name and location", give a friendly name for the created virtual machine (I called it "Windows 7 × 64"), and select a location to save it.
By default, virtual machine files are saved on the C drive in the ProgramData folder:
C: \ ProgramData \ Microsoft \ Windows \ Hyper-V \
On my computer, virtual machines are not saved on the system, but on another disk in a special folder ("Virtual Machines"). Therefore, if you want to save the virtual machine in a folder other than the default, check the box next to "Save virtual machine in a different location", and then select the folder to save. Create a folder for storing virtual machine files in advance.

In the Specify Generation window, Generation 1 is selected by default, which will work for most situations. Generation 2 does not boot from all images, it is essentially a UEFI virtual machine.

In the "Allocate Memory" window, you must select the amount of memory to allocate for this virtual machine. I have allocated 2 GB of memory from my computer out of 8 GB.

In the next "Network Settings" window, select the previously created network adapter (virtual switch).

The "Connect virtual hard disk" window will display information about the name of the virtual machine, its location on the hard disk, the amount of disk space allocated for the virtual machine (127 GB was offered by default, I chose 50 GB).

In the Installation Options window, you can choose whether to install the operating system later, or choose your preferred installation option.
To install the OS, select Install an operating system from a bootable CD or DVD. Here select "Physical CD or DVD" to install the system from the disc placed in optical drive, or select "Image file (.iso)" to install the operating system directly from the ISO image of the OS that is located on the computer.
Using the "Browse ..." button, I selected an image of the Windows 7 Ultimate SP1 x64 operating system located on an external hard drive that is currently connected to my computer.

The Completing the New Virtual Machine Wizard window displays the configuration of the created virtual machine. Click on the "Finish" button to complete the creation of the VM.

After applying the settings, the created virtual machine will appear in the Hyper-V Manager window, and its settings will be displayed.
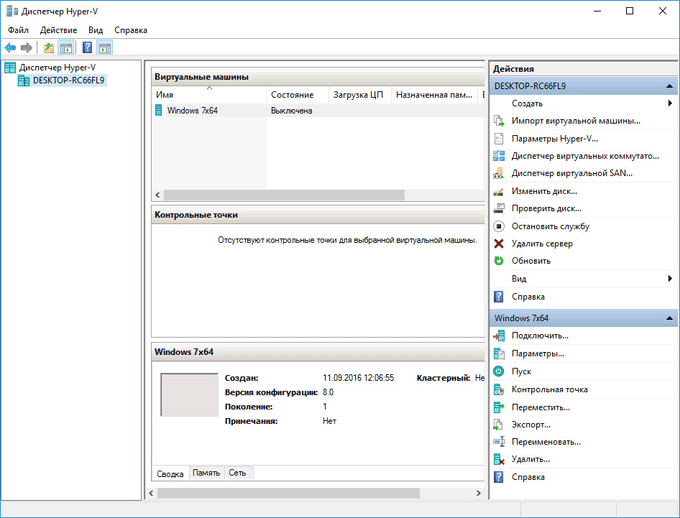
To start the installation process, select the virtual machine, in context menu select "Connect ...".
In the window that opens, go to the "Action" menu, select the "Start" command, or just click on the green "Start" button.

After the installation of the operating system is complete, the guest OS is ready to go. In this image, you can see that my (host) computer is running Windows 10 and the window is running a Hyper-V virtual machine running Windows 7.

In a virtual machine, you can take snapshots of the virtual system (checkpoints) in order to preserve the state of the operating system for a specified period of time.
You can create a checkpoint from the application window. You can manage checkpoints (restore the state of a virtual machine, delete unnecessary points) from the Checkpoints section in Hyper-V Manager.
File sharing in Hyper-V
Drag-and-drop and file copying between physical and virtual operating systems does not work in a Hyper-V virtual machine as it is implemented in VMware Workstation or in VirtualBox. The exchange of data between the guest and the systems installed on the PC can be realized using shared network folders.
Build and configure on a real operating system shared folder to access the shared folder from the virtual system. Then create and configure a shared folder on the virtual machine to access the shared folder from the real system. Read how to do this.
After completing the settings, you can exchange data over the network by transferring files from the computer to a shared folder on the virtual machine, or in reverse order, from the virtual machine to the shared folder located in the operating system on the computer.
Conclusions of the article
Microsoft's Hyper-V virtual machine is embedded in Pro and Enterprise editions on 64 bit operating systems Windows 10, Windows 8.1, Windows 8. After installing and configuring the Hyper-V hypervisor, create and install a virtual machine with a guest operating system to test the software, which does not affect the underlying operating system installed on the computer.