 entrance
Connecting DIR 320. Wi-Fi Wireless Network
In this instruction, it is shown in detail and describe how to configure the Wi-Fi router D-Link DIR-320 for the Internet Beeline and Rostelecom.
After steps, consider the following points:
- How to connect the DIR-320 to the Internet and computer to configure
- How to configure L2TP connection for Internet Beeline and PPPoE for Rostelecom
- How to set up a wi-fi password and wireless name
- Setting up IPTV television (Digital TV Beeline and Rostelecom).
So, all that may be needed to configure this wireless router here, it remains only to read carefully.
How to connect a router
I will start with how to connect a Wi-Fi router to configure it, as there are problems here.
Rear D-Link DIR-320, not counting the power and pair of buttons, there are five ports: 4 LAN and 1 Internet. It is to the last connector that you need to connect the cable of your Internet provider.
I also note that the configuration itself will be easier if you execute it from that computer, which is connected to the router wires: Connect one of the LAN ports on the device with the connector network card on the computer.
And last two points:
- When configuring Beeline, Rostelecom or " High-speed connection»The computer must be broken. And after you configure, too, start it - the router itself will connect to the Internet.
- If you fail to go to the router settings, as described below.
So, now you can proceed to the most configuration.
Login to the web interface settings

To enter the D-Link DIR-320 settings, run the browser and enter in the address bar 192.168.0.1, you will need to see the login and password request. Standard login and password if you did not change them earlier - admin. (If the password does not fit, you will "throw out" again to the password entry page. Perhaps it has been changed. Then you can reset the router to the factory settings by pressing and holding the RESET button 15-20 seconds).
After the correct entry, you will find yourself on main page with basic information about the device. Click "Advanced Settings" at the bottom of the page.

Setting up D-Link DIR-320 for Beeline
To configure the connection, in the "Network" item, select "WAN", a list of connections will open. At the bottom of the list, click "Add" and set the following parameters Internet connection Beeline:
- Connection Type - L2TP + Dynamic IP
- Login, password - your data for logging in the Internet you got from Bilain
- VPN server address - tp.internet.beeline.ru

The remaining settings are not necessary. Click "Save", after which the page with a list of connections will open again, and the top will be a single notification, click on it and click "Save".

Now, if you refresh the page, you will need to see that the newly created connection has become in the "connected" state, which means that the Internet is configured correctly and you can proceed to setting up a Wi-Fi network. Do not forget, the Beeline connection on the computer should be broken.
On the Advanced Settings page in the Network item, click "WAN". A list of connections will open, where only one thing is to click on it, and on the next page, click "Delete". You will return to the empty list of connections. Click "Add" and enter the following parameters for the Internet from Rostelecom:
- Connection Type - PPPoE
- Username and password - data for logging in the Internet, which provided you Rostelecom

The remaining parameters can be not changed, click "Save". You will return to the list of connections. Please note that at the top of the DIR-320 settings page, "Light bulb" is lit, click on it and select "Save".
A minute later, refresh the page. If you see that the connection status has changed to "connected", then you all have done correctly and the Internet is already there, you can go to the Wi-Fi setting. Let me remind you that the Rostelecom connection on the computer itself must be disabled.
Setting up a Wi-FiCi
In order to configure the parameters wireless Wi-Finetworks on the DIR-320, on a page with advanced settings in Wi-Fi, click "Basic Settings", on the page you can specify your wireless network name (SSID) instead of the standard DIR-320.
Then save these settings and return to the "Wi-Fi" item, now you should select "Security Settings". Here is the password for Wi-Fi. Recommended settings:
- Network Authentication - WPA2-PSK
- PSK encryption key (password) is at least 8 characters, without Russian letters.
Save the settings, do not forget to also click "Save" from above at the change indicator (light bulbs). In general, the configuration of the DIR-320 is completed.
Tuning TV.
In order to configure digital television Beeline or Rostelecom, on the main page of the router settings, select "IPTV Setup Wizard", specify the port in it, where the prefix is \u200b\u200bconnected and save the settings. Connect the TV console to the selected LAN port.
In this article we will consider the topic of how to set up a router D link dir. 320. Router Dir 320 is in third place in popularity among long-standing routers, so it is often advised in stores. Many people have questions about setting up this model. In this article we will pass in detail instructions for setting wiFi Router D Link Dir 320. We will look at all types of Internet connections on the example of Beeline Provider. The most important thing, before doing something with the router, read the instructions to the end.
Setting up a network card on Windows 7 and XP
Before starting the setting of any router, you need to make a network card settings, the D LINK DIR 320 router is also related. In the long-standing router, the default IP address distribution is automatically distributed. Therefore, we need to install an ip address automatically in our network drive.
Installing an IP address automatically on Windows XP
Moving to "Start", we find the "control panel". After switching to "Panel UPR." We will find the "Network Connections" icon, which turn on it in it and in the next window with the right mouse button on the "Connection software" icon local network", Select the item" Properties "from the list. In the window that appears in the list with checkmarks, select the "Internet Protocol (TCP / IP)" item and click the Properties button. Then check whether the points are installed in the points where the words are present automatically, if not, we set and press the "OK" button. See Fig below.
Installing an IP address automatically on Windows 7
We go to the start, in the search bar (which is located at the bottom of the start window) type the word "network". From the results list, select "View network connections". Then in the window that opened by the window twice the "Connection on the LAN" icon. We will find the "Properties" button and click on it. Now in the list with checkmarks we find the "Internet version 4" protocol and make a double click on it. Now put points to points where words are indicated automatically and click "OK". See their. below.
Solving problems when connected by router D Link DIR 320
After setting up a network card, you need to check if you received the IP address. To do this, you need to return to the "LAN connection" click on it twice and in the window that opens, select the item:
- On Windows XP - at the top of the window will be the section "Details"
- On Windows 7 - somewhere in the middle there will be a "Details ..." button
There you will see the IP address, it should look about so 192.168.0.Hhh, where xxx is any digit example: 101 or 3. If the IP address occurs, the IP address will be 169.xxxxx. Xxx. I will not go into details because of what it happened, I will explain how to solve the problem. You need to specify the correct IP addresses in the settings of the network card. We will need to return to the point:
- On Windows XP - Properties: Internet Protocol (TCP / IP)
- On Windows 7 - Properties: Internet Protocol Version 4 (TCP / IPv4)
And specify the following settings:
- IP - 192.168.0.101
- Subnet mask - 255.255.255.0
- Main Gateway - 192.168.0.1
- DNS - 192.168.0.1
Then click "OK" and the router should connect to your network card.
Replacing the old firmware D LINK DIR 320 on topical
After connecting the router to the computer, you should update the firmware to the current in order to have no problems with connecting the Internet and WiFi in the future. It will also allow you to learn how to do it right away so that in the future you can easily change the firmware of the router D Link DIR 320, and for other models of the family of long. To begin with, you will need to download last version firmware. At http://ftp.dlink.ru/pub/router/dir-320_nru/firmware/ (for DIR-320NRU) and http://ftp.dlink.ru/pub/router/dir-320/ (for dir -320) There will be a file with the last version of the firmware of the DIR 320 router.
Download it to the computer before you turn off the Internet to set the router.
Entrance to Router DIR DIR 320
For any firmware there is a standard login to the router setting interface. Opening any browser is gaining in address line 192.168.0.1, after clicking "Enter" you will be asked about authorization. You will need to enter a username (username) and password. There are only two options.
- For the very first firmware of the router, the login will be Admin, and leave the string with a password empty.
- For more than new firmware login and password, Admin and Admin.
If your router was purchased very long ago, then you have one of the first firmware 1.0.1. She looks like SM.Ris. below.
As you can understand from the picture, after logging in to the router settings, go to the "Maintenance" tab, and then in the menu section on the left "Firmware Update", click the "Overview" button and select a file with a new firmware. After selecting, press the "Apply" button, then wait for the installation.
With newer firmware, let's understand since:
- If your firmware has a similar view with the first option in the figure, on the left menu, select the "System" item, then "Update By" Next, click "Review" and choose new firmware.
- In the second version, we first click on "configure manually", then also select the "system" - "update of software". Choose a new firmware and install.
- And the last third option. Click "Extended Settings". Then in the "System" block on the button forward, and select "Update by".
I want to immediately warn that after you click on the "Apply" button, the browser can hang and you will have the impression that you have done something wrong. Do not take anything within 4 -7 minutes. Then reiterate the address of the router (192.168.0.1) in the browser.
After installing the new "software", you can go to the most important - configuring the Internet and WiFi on the router.
Internet Routher Settings D LINK DIR 320
Configuring the Internet in the new versions of the firmware is quite simple and does not differ from other models of the company long. therefore basic setting and such types of connectivity, like "PPPOE", "Dynamic IP", "Static IP", I advise you to consider "" for those who need a setting for Rostelecom. In this article, I will talk about setting up a connection with Beeline Provider.
Setting the router D Link Dir 320 Beeline
If you have read an article that I suggested above, you know where you need to go to configure the Internet. If not, I will briefly describe:
- After entering the configuration interface, select "Extended Settings".
- Then in the "Network" column - WAN. And click the "Add" button
- After we make such settings
To work with the Beeline Provider in the connection type, select L2TP + Dynamic IP, this is the most important thing. In the Connection Name field, you can enter what you want, for example, MyBeeline. The field name of the user and password are also very important, here you need to enter the data that you have provided when the installer is connected (if you lost them - find out in those support). Address VPN Server Companies Beeline TP.internet.beeline.ru. After entering the data, press the Save button. Then at the top you will also see the Save button, click on it. Configuring the ROTEER D LINK DIR 320 for Beeline is completed and if all settings you have entered correctly, the Internet must already work. For clarity, see the drawing from below.
Setting up Wi Fi Dir 320
After configuring the Internet, you should configure and wiFi Network on the router. In order to make it we need to return to "Extended Settings" and in the WiFi block to select " General settings" Here we are only interested in the "SSID" setting - this is the name of the network, i.e. then the name that will be visible in the list wireless connections. Select the name that you like and click Edit.
Also worth setting up safety so that harmful neighbors are indulge. In the same block, proceed by the "Security Settings" link. Now here we are interested in two items:
- "Network Authentication:" - We definitely choose "WPA-PSK2". Then you can accurately be sure of your network security.
- "PSK encryption key" is a password for connecting to your network. You need to enter at least 8 characters.
After entering all the data we click "change".
All, the router setting is completed. But this is not all the possibilities of this router. In various articles, all sorts of possibilities of this router are indicated. To find them enter in search string From above "320" and you will get all the articles in which the Router Dir 320 is.
Recommended for watching video: Setting up D-Link DIR-320
.
Ports - 1 WAN and 4 LAN. The first type of WAN port is used to connect to global Network (Wide Area Network) - In our case, this port is used to connect the cable incoming from the provider. Connect the cable to it, which is included in the apartment. LAN - used to connect computers you have in the apartment. Connect to them using conventional network cables (patch cords) computers that must access the Internet. The Dir 320 router has a built-in administrative interface for configuration, simply speaking - a special web page going to which the router can be configured. To do this, use any computer connected to the LAN port on the router.
The parameters of the new router by default in the DIR models are usually listed on a special sticker at the bottom of the case - usually it is IP - 192.168.0.1, the username is admin, the password is an empty field, but there may be other values. Specify these parameters on the sticker or in the user manual. If your router is not new and has already been used by someone - find the point about the procedure for resetting parameters to factory settings, usually a special reset button is used on the back of the housing that you need to press something sharp and keep for a few seconds. .
Note - A new router after connecting to the network automatically assigns to all computers connected to LAN-ports network settings, Therefore, check that no IP addresses were specified in the network card settings, all values \u200b\u200bmust be set to "receive automatically".
Configuring a computer for connecting to the DIR-320 router
- Connect the DIR-320 router into the outlet.
- We connect the computer's network card with a router with a router, connect to any free LAN1-LAN4 port.
- Connect the Internet cable to the Internet / LAN port.
- We go into the properties of the connection on the local network.
Select the "Internet protocol (TCP / IP) and click" Properties ".

In the "Properties", we note the parameters "Get automatically" and "Get the address of the DNS server automatically"

We view automatically received settings.

Setting up the DIR 320 router for Triolan provider
After you learned the parameters of your router (IP address, login and password) - open the browser and enter 192.168.0.1 in the address bar. If everything is right - you will appear before you invitors - enter the login and password. We enter the system under the following parameters:
- Login: admin.
- Password: I do not enter anything (empty).
Click on "Internet Connection Setup Wizard".
In the next window, click "Next".
Install your password, then click "Next".
We define your time zone (Ukraine - GMT + 02: 00). NTP Server Used: ntp1.dlink.com, click "Next".

Select the connection type "Static IP Address Connection".
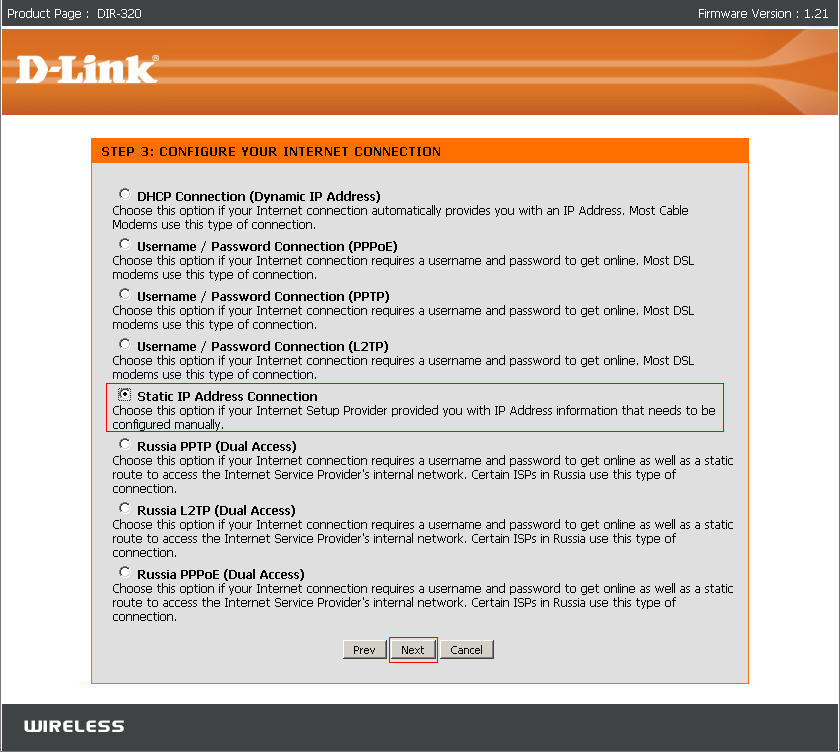
DNS addresses Indicate the following (for all Triatan provider subscribers):
DNS 1: 109.86.2.2
DNS 2: 109.86.2.21

We see a notification of the completion of the setting, click "Connect".

Checking if the Internet works if so, then you did everything right!
Setting up WiFi on DIR 320 router
It is very important to understand that proper setting Security wireless network meets the restriction of access to your account Internet and guards your money. If the wireless access point is configured incorrectly, third parties can connect to it and use the Internet at your account.
Note - correctly setting wireless module and protecting your own accounting information - the task of the subscriber, the provider is not responsible for the safety of the Subscriber's funds in this case. The minimum level of the security settings of the wireless module - the encryption level is not lower than WPA /. Using WEP or OpenSystem is not categorically recommended.
To configure a DIR 320 router, press the "System" menu button, then "Wireless Setup", then select "Manual Wireless Connection Setup"

Wireless settings
- WIFI PROTECTED SETUP (WCN2.0) - disable
- Enable Wireless - Enable
- Wireless Network Name (SSID) - anyone convenient for you Wireless Network, for example HOME
- Enable Auto Channel Selection - Enable
- WMM Enable - Disable
- Enable Hidden Wireless - Disable
- Security Mode - WPA / WPA2
- Cipher Type - TKIP
- PSK / EAP - PSK
- Network Key - any secret key of your network (min 8 characters, English letters and numbers)
Click "Save Settings" - settings will be saved.
After making any changes, you must restart the router so that they entered into force. To do this, click the "Reboot" button on the left menu.
Video Instructions for setting the D-Link DIR-320 router for VPN (PPTP) connections
Setting up VPN connections on the D-Link DIR-320 router

Settings Dynamic PPOE
- MY Internet Connection IS - (UserName / Password)
- Dynamic Pppoe - chosen
- User Name - Your Login for Internet Access
- Password - Your Password for Internet Access
- SERVICE NAME - HOME
- RETYPEPASSWORD - Repeated your password to access the Internet
Click "Save Settings" - settings will be saved. After making any changes, you must restart the router so that they entered into force. To do this, click the "Reboot" button in the left menu.
To check the correctness of installations and reconnect PPPOE, press the "STATUS" button in the top menu.

On this page, you can use the "Connect", "Disconnect" buttons to initiate connection or disconnecting the connection.
The current connection status is displayed in the column on the left and one of the router LEDs.
You can download here.
In this manual, we will consider detailed setting Router D-Link DIR-320 / NRU (Rev. B1), which, compared to the DIR-320, at the end of 2011, a web interface was changed and supported support for the Wi-Fi standard 802.11n. At this finalization, it was not over, now Dir 320 has learned to work with 3G modems directly from the box without any flashing ...
In this manual, we will look at the detailed setting of the D-Link DIR-320 / NRU router (rev. B1), which, compared to the DIR-320, at the end of 2011, was changed by the web interface and supported Wi-Fi support standard 802.11n. It did not end on this refinement, now Dir 320 has learned to work with 3G modems directly from the box without any flashing.
It should be noted that at the end of 2011, D-Link has updated the web interface in all other routers for home and small office. Instead of black and orange (see Fig. 1), web interface D-link \\ 'OS has become poorer in color ratio: now the menu items were the colors of the sea wave, and the background is ordinary white (see Fig. 2).

Fig. 1 Previous VEB Interface "Dallenkov"
How to configure the D-Link router with the previous firmware (in orange tones), you can view software.

Fig. 2 New Web Interface
The color on the D-link router box was changed, now the box also became white with a sea wave color on the sides, as well as black on top and bottom (see Fig. 3):

In this manual for configuring the DIR-320 / NRU, we will look at how to configure this router in DHCP mode, as well as in the PPTP (VPN) mode of the client. Our manual on setting up d-LINK router DIR-320 NRU can be used for other models from a line of longs, which have a similar web interface and functionality:
. D-Link DIR-300 (VER. B5)
. D-Link DIR-615 (Ver. E4)
. D-Link DIR-655 (Ver. B1)
. And other models "Longs", which we could not mention.
Well ... We will assume that you turned out to be one of the D-link \\ 'oh with the new web interface, you got it out of the cardboard box along with the power adapter and the power cable. On the front side of the router you will find LED indicators, which in the process of work talk about the "behavior" of the router in this moment time (about the operation of its interfaces). On the rear panel, to the right of the antenna you will find 5 network connectors: 4 of them with the LAN inscription are needed to connect internal cables from home PCs, and in a lone connector with an Internet inscription connects network cable From the Internet provider (this interface from routers is called WAN). To the right of the WAN interface is a USB connector for connecting a 3G modem from a wireless Internet provider, and then the RESET button is reset to reset the router settings when necessary.
To the 4th LAN ports of the DIR-320, you can connect up to 4 PCs or laptops over a network cable. By the way, one of these blue cables (the usual patch of Cord) is already included with the router, so you can use it to configure. If you need to connect more than 4 pc to the router on the cable, then you can resolve the port capacity deficit using an unmanaged network switch (switches) that you connect to one of the LAN ports of the router. As a result, from one port you will get a few more (depending on the switchboard capacitance you buy).
We reviewed the basic information about the possibilities of our router, you can now go to configure it. But first, you need to connect the router to a computer or to a laptop, after which we will get access to the web interface of our router.
Connecting the D-Link DIR-320 / NRU router in Windows 7 and XP
Before setting up our D-Link DIR-320, you must perform a number of preparatory activities - to find a contract from your Internet provider (perhaps from there you will need data on IP parameters and connection information with the provider); Next, connect the blue network cable of any LAN interface of the router with a network card on a PC or a laptop from which you will configure, well, and connect the power adapter to your router. As for the cable from the provider, it must be connected to the interface in the Internet (WAN). If you have the Internet home available using ADSL or DOXIS technology, then in the WAN connector of the router, you should connect a network cable that comes from the modem.
Now you should translate TCP / IP settings on your PC to the client DHCP mode ( automatic receipt IP addresses). Below we will look at how to do this on the example of Windows XP and Windows 7.
Connecting the D-Link DIR-320 / NRU router in Windows XP:
Start - Control Panel - Network Connections - Local Network Connection - Properties - Internet Protocol (TCP / IP) - Next, see Fig. four

Connecting a D-Link DIR-320 / NRU router in Windows 7:
Start - Dick View Network - Choose at the top in search results - View network connections - Connection over the local network - Properties - Internet Protocol version 4 - Next, see Fig. five

By default, all D-link \\ 'and issue an IP address from the range of 192.168.0.1/24 into the internal network. Therefore, after 10-20 seconds, your PC or a laptop should receive the IP address from the router. It will look like 192.168.0.101 or 192.168.0.102. In Windows XP, track the receipt of the IP address from the router, by opening the connection status on the local network. (see Fig. 6)

The inscription about the fact that the network card is assigned by DHCP, means that the router successfully issued a computer to the LAN interface internal IP address. If this does not occur or appears the IP address of the view - 169. ***. ***. ***, I do not exclude problems with the work of the client DHCP on your computer. Most often this can be caused by the work of firewalls (firewalls), but there are other reasons ... In this case, we can advise to register the necessary IP addresses in the network card settings manually. To do this, it will be enough to specify the following IP parameters on your PC or laptop:
. IP - 192.168.0.101
. Subnet mask - 255.255.255.0
. Main Gateway - 192.168.0.1
. DNS - 192.168.0.1
We assume that you have completed the connection of the router to system block Computer. We proceed directly to setting up our router.
Configuring the D-Link DIR-320 / NRU router (Hardware Rev. B1)
Customize D-Link DIR-320 We will be through the web interface. For this you need in any computer browser (Opera, Internet Explorer., Mozilla, Chrome) in the address bar Go to the address: http://192.168.0.1 (usually this address is all D-link \\ 'and have by default). You will see a greeting of the router on the screen of your computer (see Fig. 7)

To enter the VEB interface d-link \\ ', you will need to enter the username and password, and then click on the input. By default, the username is Admin, password - admin. After entering the credentials, you will see a pop-up message from the router (see Fig. 8)

In this DIR-320 message, it requires a default password to change the default password, which will continue to be used to enter the router. You only have to click on OK and set a new password in the next window (see Fig. 9)

Here you need to enter new password And its confirmation, after which it remains only to click on the Save button. Next, the router again suggest authorized, but already with a new password (see Fig. 10). Well, nothing remains how to enter credentials again ...

Enter the username and password, then click on the entrance. Next, you will be taken to the main menu of the D-Link DIR-320 (B1) router, where you will see information about the device (see Fig. 11)

This is what the new web interface in D-link \\ 's. The author of this manual did not really like the interface in terms of appearance and ease of use, but there was more functionally in new firmware. Important: Now to save the configuration after any change settings (!) You must press the Save button in the upper right corner each time.
Firmware update at the D-Link DIR-320 / NRU router
Now we recommend make sure that the latest version of the firmware is installed in the Dir-320 / NRU router! For inexperienced users, we will explain: the firmware is the internal router software. In the new versions of the firmware, errors are usually corrected, and sometimes an additional functionality is added. You can find out the current firmware version directly in the main menu (see Fig. 11). You will find the firmware version in the Device Information field. In our concrete case We are dealing with Version 1.2.94.
Now you need to make sure - is there no firmware on the manufacturer's website. To do this, you must click on the link above fTP server. manufacturer and see - updates firmware for DIR-320 / NRU (see Fig. 12). We see on the site just one file with the same version that is already installed in our router (judging by the file name). This means that at the moment there are no firmware updates. But we will still drive it to your computer and move to that PC from which you set up your router to show how you can update on your router as part of this manual.

For the absence of new versions in this particular case, we will establish the same version to show the essence of the flashing process. You install yourself more new versionAs soon as it appears on the manufacturer's website. We recommend to look at the FTP server for a long time in 3 months and check availability!
So, we turn to the firmware update procedure in the D-Link router. You can do this in the System - Update software (see Fig. 13)

You need to inform the router where the file with the firmware is located. To do this, click the Select file button and in windows Explorer Get to the file with firmware for DIR-320 / NRU, click on the Open button, and then update.
After that, the router will start updating its firmware, you only have to wait for the end of the process at this moment.
Attention!!! In during the next 3 minutes, do not turn off the power of the wireless router and do not interrupt the process of flashing by any other actions!
In the update process software You will see an operation progress indicator on the screen (see Fig. 14)

After some time, the router will fill a new firmware into its subsoil, will reboot and suggest to perform re-authorization (see Fig. 10). Note that the router after flashing will reset all its previous settings. Enter the username and password (Admin and Admin), after which once again click on the input. The router will again ask to change the default password, but we all have already passed in Fig. 8-10.
If everything happened as described above, you can take our congratulations - you have successfully updated the firmware of your D-Link DIR-320 / NRU! If the router did not give the authorization windows, and repeated attempts to go to 192.168.0.1 5 minutes after the start of the firmware update, do not succeed, then with a router, most likely happened by PE. Restart it through the interruption of the power and in the absence of a response contact service center Manufacturer!
Now it is time to make sure that the router is updated by that firmware that we poured into it. This information will be listed in the main menu D-Link DIR-320 / NRU (see Fig. 15)

Here we see that version 1.2.94 is installed over time of assembly of August 3, 2011. Before that, we had an assembly of May 13, 2011 (see Fig. 11). With update, the firmware is completed, now let's go to the immediate configuration of our D-Link DIR-320 / NRU.
Connection with Internet connection in D-Link DIR-320 / NRU
Now it's time to configure the connection of the router with the Internet provider. In D-Link DIR-320 NRU, this can be done in P. Connections - WAN (see Fig. 16)

As we have already been warned above, in this manual we will show how to configure the D-Link DIR-320 NRU router using DHCP and PPTP VPN protocols. If you have access to the Internet available on another protocol, here it will be necessary to contact technical support for configuration clarification.
To begin with, we will perform the setting of the DIR-320 NRU in DHCP mode
To do this, click on the WAN interface line (Fig. 16), then the window of its detailed settings appears in front of the network / connection window (see Fig. 17)

In the DHCP mode (automatic receipt of IP parameters from the provider) no special difficulties with d-LINK setup DIR-320 / NRU should not arise. To do this, in the Connection Type field, you must leave the option in the IPOE position.
In the Mac field, you can apply to your value for the physical address of the router (by WAN interface). This may be quite by the way when the provider implemented the MAC address to the IP address of the clients on the network. Since each network device It has its own unique MAC address, this option allows you to avoid calls to the provider when replacing the network equipment connected according to the last mile (for example, the equipment is replaced from the network card to the router). You can make an address that is identical to the mass address of your computer on which you worked before installing the router. If you wish to use a router with a "non-" mass address network, then fill in this option. If you want to register the Mac address of the router, you will have to make a call to your provider and tell it the MAS address, which can be found on the bottom of the router (six pairs of digging).
Next, leave the checkboxes on the n. Get the IP address automatically and get the address of the DNS server automatically. It will force the router to automatically pick up the settings from the DHCP server of the Internet provider.
More options we will not change here, in DHCP mode everything will work and so 😉
It remains only to click on the Save button.
And then do not forget to click on the Save button already in the next window in Fig. 18 so that after rebooting the router "Do not forget" settings.

Now is the time to check the performance of the settings. It is possible to do this in p. Status - Network Statistics (see Fig. 19)

Here in the WAN field you can see the information that the DHCP router client successfully received the necessary IP parameters from the provider. In fact, you can already work on the Internet from the computer, which you have connected to the LAN interface router dir.-320 / NRU.
Now do the DIR-320 NRU router setting in PPTP VPN mode
The VPN protocol is often used by house providers to provide Internet access. Configuring the D-Link DIR-320 NRU router in PPTP mode is performed in the already familiar n. Connections (see Fig. 20). To connect via PPTP or L2TP, you need to create a new interface. (Note: To begin with, we still need to configure the router to work on a WAN interface with an IPOE connection type. If your provider has a diagram for DHCP on the local network is not implemented, then you will probably have to first configure the Wan IPoe in Static IP mode).

In this menu, we need to create another interface for connecting via PPTP. To do this, click the Add button, after which the menu will open on the screen to configure the new interface (see Figure 21).

To configure the router to work on a VPN connection, you must set the connection type to PPTP position. (Note: If your provider provides L2TP access, this protocol is selected in the same menu).
Next, consider the rest of the necessary options for configuring the DIR-320 / NRU in PPTP mode [from above-down]:
wANPPTSNameType - Allows you to set a way to specify the VPN server address: as a domain name or in the form of an IP address. If the provider recommends setting the server address in the form of a domain name, you select the URL version, if in the form of an IP address, then an IP version. (Tip: Look at your contract with the provider and find how it is recommended to specify the address of the VPN of the Welder. You can still contact technical support for clarification);
Server Address - This indicates the above-mentioned version of the VPN server. Or in the form of a domain name, or in the form of IP - depending on the WANPPTPSNameType option;
PPP Username - In this option, login is entered for authorization with a VPN server. It can be found in his contract with the provider.
Password is a password for connecting to a VPN server provider (see your contract).
Password confirmation - Here you will need to re-enter a password for authentication on a VPN server to eliminate the error when typing;
Encryption - here is activated encryption data transmitted via VPN. Usually providers encryption VPN. The tunnel does not apply, so we leave the option - without encryption.
Authentication Algorithm - Here you can select the type of authentication that the VPN server provider supports. Per for more information You can contact technical support. But you can choose the AUTO version, then the router itself will try to choose a compatible authentication option.
More in this menu, no options can be touched. After clicking on the Save Tunnel button to the VPN provider server, the provider must be successfully established.
Check whether the VPN session rose, you can in the connection menu (see Fig. 22). To move the traffic via VPN, be sure to set the default gateway label opposite the PPTP connection and save the settings through the button in the upper right corner!

The inscription that the PPTP type is in a state connected indicates successful actions on your part. If the inscription is not connected, then an error was made somewhere in the previous stages ...
Routing (Routing) Setup for Local Resource Access
Next step when setting up d-Link routers In PPTP VPN mode, the routing table is usually filling. This procedure is necessary to simultaneously access local provider's network resources with a VPN connections installed. Actually, if you are not very interested in local resources, you can skip this stage. For those who are going to further enjoy local services such as FTP or DC ++, customize routing will have to. Do it in the DIR-320 / NRU you can additionally - routing (see Fig. 23)

This menu is a table for static routes. Static routes that are needed in your particular case, you can find out in technical support His provider.
To create a new local route in the D-Link DIR-320 / NRU you need to click on the Add button, then a window will appear to create a new routing rule (see Fig. 24).

Here in the Destination Network field, specify the destination area of \u200b\u200bthis route.
In the destination mask field, specify the subnet mask for a specific route.
In the Gateway field, you should specify the address of your local gateway (you can learn from my contract or you could look at the local network connection status on the computer that before installing the router was connected to the provider cable).
In the metric field, you can put one unit. This value sets the priority for this specific routing rule.
In the field via the interface, you can leave the option, then the D-Link DIR-320 / NRU router itself determines - on which interface it is more expedient to use this route.
To create the rule, you can only click on the Save button.
In such a free way, you should be applied to the routing table all the necessary rules. As a result, local traffic will go precisely the directions that you indicated in your rules.
You can see in Fig. 25 (just do not forget that the address of the local gateway in each case is individual!

After enhancing all the necessary routes, it remains to save the router parameters by pressing the Save button. On this routing setting in the D-Link DIR-320 / NRU router, it can be finished.
Setting up Wi-Fi connections to D-Link DIR-320 / NRU
D-Link DIR-320 / NRU router, unlike its predecessor - DIR-320, supports more speed wi-Fi Standard communication, which allows you to transmit data on a wireless network at a speed - up to 150 Mbps when using the appropriate Wi-Fi Equipment From the client side (the adapter is suitable !!! D-LINK DWA-140 !!!). Setting up a Wi-Fi Wi-Fi network in the new D-link \\ 'Ah DIR series is made in Wi-Fi - General settings (see Fig. 26)

Here you can completely turn off the Wi-Fi module in your router. Then the router will turn from wireless in wired. Next, we will turn to the Basic Settings item in which you can specify the name of the network and select the wireless communication standard (see Fig. 27):

Hide access point - disables the network identifier (SSID) distribution, it allows you to hide your network from Windows devices, speaking a safety device. True, in this case you will have to create a profile to connect to a wireless network manually.
SSID - Wireless Network Name (Network ID). Under this title, the network will be visible in wireless Wi-Fi clients.
Country - All Russians can be left a version of Russian Federation.
Channel is a compulsory selection of a channel for wireless communication. We do not recommend dealing with channel number 6, since most Wi-Fi equipment works by default on this channel (few users change it). Ideally, we recommend to stop your choice on channel 1 or channel 12 to minimize the probability of interference with neighbors networks.
Wireless mode - Here you can select the 802.11g or 802.11n wireless communication mode, and maybe even outdated 802.11b or a combination thereof. In mixed mode of operation (802.11 b / g / n Mixed), keep in mind that the total speed of the network when connecting diverse customers will be asked to the level of the slowest client.
A little lower, you can set the maximum number of customers that will connect to the router.
Next you can click on changing and you can go to the encryption setting on the network.
Wireless network encryption is configured in security settings (see Fig. 28)

In the Network Authentication option, you can choose an encryption algorithm in a wireless network. We recommend to stop your choice on the most versatile version of WPA-PSK / WPA2-PSK Mixed - it will provide support for most modern Wi-Fi equipment.
In the PSK encryption key field, you specify a password to your wireless Wi-Fi network. We recommend here to use a password from 8 to 10 characters with a length consisting of capital and lowercase letters, special characters and numbers. This minimizes the likelihood of password selection by intruders.
In the WPA-encryption option, you can choose an algorithm for WPA encryption. TKIP is a less crypto-resistant option compared to AES, but some wireless clients may not work with AES. We recommend putting a TKIP + AES option, then you will provide compatibility with most Wi-Fi customers.
The WPA key update period can be left by default.
Next, it remains only to click on the Edit button.
I would like to say a few words about one option in additional wireless settings (see Fig. 29)

Here the TX option is responsible for the radiation of the wireless antenna. You can experimentally reduce it to such a level when it will be enough to cover the apartment / room, and it will not be too much to look outside the apartment. This will reduce the likelihood of hacking a wireless network from your neighbors-hackers :) And on health it will affect the better, especially if you smoke 😉
On this setting of wireless Wi-Fi network in D-Link DIR-320 / NRU, it can be completed. To use Wi-Fi at home you will be quite sufficiently considered above manipulations.
Now you can include your laptop and connect it to the Wi-Fi network.
Forwarding ports for DC and Torrent in D-Link DIR-320 NRU
Setting up port forwarding (port forwarding or port forwarding) must be done if you plan to use in the home network of the program and devices that require unsatisfied access to them from the local network of the provider or external Internet. For example, it may be necessary in the case of access to home IP Web Camera or when working with Torrent or DC ++ file sharing services. The principle of forwarding ports is as follows: You independently report the DIR-320 / NRU router, which type of unstended traffic from the outside the router should be transferred to a specific IP address of the home network.
Consider the ports of ports in D-Link DIR-320 NRU for DC and UTorrent:
Configure Port Forwarding in the D-Link router in P. Firewall - Virtual servers (see Fig. 30). New rules are created after clicking on the Add button.

In this menu, the long-standing router you can create the necessary rules for port forwarding. And these rules can be created as based on ready templatesand for certain traffic.
Consider lower how to block ports in the D-Link DIR-320NRU router for the DC ++ file sharing program (see Fig. 31):

In the DC connection settings, you will need to activate the Firewall Connection Mode with manual ports. For a file sharing inside the provider's network in the Outdoor / WAN IP field, enter an intrahetic ip address that the provider under the contract is issued. If you are supposed to work with DC ++ on the external Internet, then in the Outdoor / WAN IP field, you will need to enter your dedicated / external IP address (for more detailed information Contact your provider).
In the ports field: TCP and UDP you need to enter port values \u200b\u200bfor which you plan to further work your DC client. We recommend that you choose port values \u200b\u200bthat are easy to remember, but these ports are not busy with the system.
After that, let us return in the port forwarding menu in our D-LINK Dir-320Nru (see Fig. 30), click the Add button to create a new rule (see Fig. 32):

Since our redirect rule does not fall under any template, then we leave the Custom option.
Next, in the Name field, specify the name of our first ruler of the redirection (come up with your own way).
The interface option will be left in the WAN position.
In the Protocol field, exhibit the TCP / UDP version, since the DC client uses both types of traffic. In all strokes with ports, we point out the same value - 11111, which corresponds to the value of ports in our DC client. Here are a little explanory - the router according to this rule Puts the TCP and UDP traffic from the external port to the inner. The options of the router allow several ports in one rule at once (for example, from 11111 to 11115), but in our case it is not required, so the initial and final port in our example coincide.
In the Internal IP field, you must specify the value of the internal IP address of the computer in your local network to which the router needs to forward traffic. You can find out the internal IP address in the local network connection status on this computer (see Fig. 6). Its value must accurately coincide with the value in the rules for forwarding the ports of our router.
Next, click on changing, after which the router retains the rule in its memory.
Now consider in D-Link DIR-320 / NRU forwarding ports for UTorrent. Open the UTorrent settings on the compound parameters and give them to the following form (see Fig. 33):

The DIR-320 router, like many of his "300th" counterparts, actively displaces more modern DIR-6XX. It has a limited radius of Wi-Fi coating and highly trimmed speed characteristics. But for small cottages, apartments and DIR-300 offices - an adequate solution.
Description and parameters of the router D-Link DIR-320
The DIR-320 router is not much different from his fellows, for example, DIR-300: the same ports and connections from the back, the front panel front.
Extremely informative DIR-320 indication panel
One Wi-Fi antenna indicates a limited coverage area: the router can cover the area of \u200b\u200btwo three-bedroom apartments in a house of reinforced concrete or two neighboring floors in both directions.
DIR-320 "Dilvanism" can be increased only by using a special narrow (for detachable) antenna (for example, to cover the corridor or assembly hall).
From behind there is a USB port for external disks and printers. There are 5 LAN ports, one of them is designed for the provider cable.
One Wi-Fi antenna and modest multi-megabit
There is also a power connector and a reset button of the router settings protected from randomly pressed. The antenna is fixed on Wi-Fi radios near the USB port.
Table: DIR-320 router characteristics
| Parameter | Value or its tolerance |
| CPU | Broadcom BCM5354 (240 MHz) |
| RAM | 32 MB |
| Flash disc | 4 MB |
| Standard, Range and Wi-Fi Speed | 802.11bgu Mixed (2.4 GHz), up to 54 Mbps |
| Standard I. bandwidth Ethernet | 802.1X, LAN / WAN speed up to 100 Mbps |
| Wi-Fi Radio System Protection | any encryption (up to WPA-2) |
| USB port, its functions | connecting network drives and printers, connection 3G / 4G modem (third-party firmware) |
| Router hardware management | reset button of settings, disconnected power, WPS button |
| Network protocols and functions | static / Dynamic IP / DNS, PPPoE / PPTP (with DualAccess), L2TP, DHCP Server, Mac Filter, NAT, SPI, Network Screen |
| Other | guest wi-Fi network (Support for up to 2 simultaneously working SSIDs) |
In general, the DIR-320, despite the order of obsolete speed, is still able to solve a significant majority of tasks that arise before the user, somehow: high-speed wireless Internet On the PON / 3G / 4G based on Wi-Fi at a speed of up to 50 Mbps, comfortable work with disks and PCs connected via DIR-320 to a single network.
The first inclusion and verification of the connection with DIR-320
First, make sure that the IP settings in the PC from which you configure the connection to the router are correct. As an example - verification with using windows 10.

With any, even incomplete changes, at least one of the IP addresses, you should restart Windows.
The router also tries to connect to the network using default settings - as a rule, it is accessible with dynamic IP. Also included open Wi-Fi network named in DIR-320_ format<концовка_MAC-адреса>" If there is no connection to the Internet, and you do not plan to make your traffic available to everyone around - it's time to do the configuration of the DIR-320 seriously.
Extended setting DIR-320
As an example, various options for the DIR-320 web interface (up to four). It is not a problem to reflash the router by anyone like, if it is compatible with the DIR-320.
Change Admin Password on DIR-320
First of all, connect yourself by changing the DIR-320 password on your DIR-320 on your own.

DIR-320 will restart. To further configure the router, log in again by the installed password.
Setting up LAN and DHCP on DIR-320
Do not rush to connect the provider cable to the WAN jack - before you go online, configure the local network, somehow: LAN functionality, DHCP, Wi-Fi functions, etc. This will allow you not to repeat the same actions twice.

The DIR-320 router will restart with new IP settings. Your PC or laptop from which the settings are made will reconnect automatically to the router.
Wi-Fi setting on DIR-320
Wi-Fi makes it possible to connect to the router not only PCs and laptops, but also smartphones and tablets.
More and more people refuse home PCs, preferring to use tablets and smartphones even to solve business issues. Your humble servant writes articles from a Windows tablet to which a common keyboard and a mouse running on Bluetooth are relying; 4G-access is allowed through one of the D-Link Dir routers.
Make the following.

The router will restart with new Wi-Fi settings. Connect to all PCs and gadgets by entering just set password WPA-2 from your network.
Setting up PPPoE connection on the DIR-320 router
PPPoE - a high-speed connection protocol with a login and password authorization. PPPoE communication is used both in cable and fiber optic and in cellular networks.

The router will automatically enter the network (after a possible restart).
Setting L2TP communication on the DIR-320 router
It will be suitable for setting up from the DIR-620 model - it is identical to the 320th.

The router reconnects to the L2TP network with the specified settings.
Setting up PPTP communication with a provider on DIR-320
PPTP, like L2TP, is a variety of VPN encryption. Facilitates Internet censorship in a particular country - for example, if access to the P2P protocol (BitTorrent, EDONKEY, DirectConnect (++) and similar services of peergaging networks are closed. Roughly speaking, if the provider closed torrents - and the desire to download something volumetric from the torrent tracker is left.

The DIR-320 will enter the network using the PPTP connection.
Setting up static IP on DIR-320 router
If you are connected to the "Static IP" service, you will need the corresponding setting on the DIR-320 router. This service allows you to access your local network from the Internet (from any place), for example, to organize video surveillance for your office or an enterprise from home.
As an example, the updated D-Link interface.
- Give the "Network - Connection" command and select WAN profile, click the Add button.
Create a new profile in the DIR-320 settings
- In the main settings, select the IPOE protocol and 5th (physical) port, check the MAC address (if specified in the contract - it must match) and enter the MTU value, smaller 1450.
Specifying port and Mac for Static IP
- In additional settings, specify the main IP received from the provider, as well as the DNS address.
Assignment of the IP Gateway and DNS addresses
- In secondary settings, enable the NAT, IMGP function and network screen, click the Save button.
Turning on additional features Static IP, including for IPTV
- Click the "Save" button again - already in the connection profile selection menu.
Check and save the STATIC IP profile in DIR-320
The DIR-320 router will be released using static IP issued by the provider.
Video: Internet configuration on DIR-320
Setting up IP television on the DIR-320 router
IPTV service is supported by all providers supporting an ultrahigh-speed Internet connection to the fiber optic cable. Technology (G) PON allows you to get a speed of 35-300 Mbps (tariffs for ultra-speed unlimited Internet In 2017-2018).
- On the router it is desirable to include a composite protocol, for example, PPTP with dual access (in already familiar connection settings).
Not all DIR-320 web interfaces are limited to the choice of LAN ports for IPTV
- Check the familiar LAN and DHCP settings.
- Give the command "Optional - Additional settings"And turn on (or check the presence)" UPNP "(the function facilitates the configuration of the devices in a pending one-to-peer network)," Ping polling on the WAN network.
Enabling advanced IPTV functions
- Check out the availability of the WAN port autotlow mode in the router, also include the "Multi-Threadable Broadcast" functions and "Superior Wireless Mode". The latter is needed if the IPTV prefix has uSB port For connecting external module Wi-Fi or built-in wi-Fi adapter. Click the Save Settings button.
- Check that you enabled the RTSP protocol, by giving the "Advanced Settings - Network Screen and DMZ" command.
Completion of IPTV settings on DIR-320
- Click the Save Settings button in this window.
The router is ready to work with IPTV service.
The RTSP protocol is one of the multimedia broadcasting protocols on the network. Many players work on it - from Windows Media Player. In Windows to the RealPlayer program, applied on smartphones Nokia. running Symbian. It is similar to the main HTTP protocol - now it uses it, along with the IGMP protocol, the service "IP-television" (earlier, RTSP was used in Mobile TV from MegaFon, who worked back in 2G / EDGE networks).
Connect the IPTV console to any of the router LAN ports, turn on the monitor. The list of available TV channels should be displayed on the screen, select any of them.
Ports of ports through the DIR-320 router
Routher ports are needed, for example, when you distribute torrents, or install game Server On the local network.
The latter used to be widely used in the Internet cafe, where there were network games one of the services. Through the PC "Admin" or the LAN router, a port program was carried out.
As an example, the updated D-LINK web interface. Make the following.
- Switch to Advanced Settings and allow the "Firewall - Virtual Servers" command.
Select Advanced Settings for DIR-320 Ports
- Add a new profile virtual Server Dir.
Click the Add New Settings button.
- Assign the initial and end port that set the range of "Problem" values.
You will have a new profile responsible for the ports
The router will restart with new settings. Selected ports will be open to all PCs and gadgets connected to the Internet.
Configuring the repeater on the DIR-300 router
Full operation in repeater mode on DIR-3XX routers is not possible without a third-party firmware (OpenWRT, DD-WRT programs and their analogues). But set up a router as a "client with a Wi-Fi distributor" can be.
As an example, the classic B-LINK web interface, widely used during the peak period of the popularity of DIR-3XX routers. The sequence of actions is true for some DIR-6XX models.

The DIR-320 router will restart in the bridge mode, connect to another router, the parameters of which it is configured, and will be released on its Internet Wi-Fi.
The repeater mode allows you to create a relay network Wi-Fi of any length and topology. You can significantly save on the laying "Twisted Couple" and Wolves, organizing the Wi-Fi radio access to the use of directed antennas and heights that dominate the surrounding area.
Reset, save, preload settings and restart DIR-320
To reset the DIR-320 settings to the factory, not only the reset button, located behind, but also the submenu of the appropriate settings. In the updated web interface, give the "Settings - System - Configuration" command.
Use all these DIR-320 settings control buttons
To reset the settings, the "Factory Settings" button serves. To save the current settings, use the appropriate button. Equally, how to restart the router there is a "Reload" button.
To save the fully current configuration in separate file, click " Backup copy"And select a place to save the file. To preload previously saved configuration, use the Overview button with the file path indication panel, from which this copy of the settings will be downloaded to the DIR-320.
DIR-320 firmware update
Unlike the current routers in which the update wizard itself downloads and sets the latest firmware version, the DIR-3XX series devices use the old method - loading over the "wire" in advance of the downloaded firmware file.

The firmware will be loaded into the router's memory. When restarting the DIR-320 will update its firmware. Perhaps the functional of the router will expand - functions will be available that did not have before, for example, an improved and more understandable configuration of the DIR-320 in the repeater mode.
Video: Updating Firmware DIR-320 on Side Ledeproject