 entrance
Update for cleaning winsxs windows 7. WinSxS what is this Windows folder, how to clean it? Why is it constantly increasing
Many users are perceived almost as a standard of "fluidity" and a tendency to gradually litter with unnecessary files. Unfortunately, there is some truth in such beliefs.
That is why the popularity of various kinds of optimization programs, which allow keeping the population of this garbage under relative control, does not diminish in any way. But some users have little of their functionality, and therefore they decide to take matters into their own hands. The results can be disastrous.
For example, they often delete the WinSxS directory. What kind of folder is this, why deleting it can affect the performance of your system by no means the most the best way? Let's find the answer to this question in our article.
What it is?
To understand why it is so important, it would be a good idea to first figure out its purpose. First you need to go back a little, telling about the history of Windows OS. The fact is that the release of the notorious Windows XP has become a truly significant event: the line of 9x systems was completely closed, after which NT varieties became the main ones.
But the problem is that many of the functions that were in demand in older versions are needed for one reason or another in new systems. As a rule, this is due to compatibility issues, for which the same Internet Explorer old bugs from old versions were carefully transferred.

So, the WinSxS directory has become a repository of such ancient elements. What is this folder? Is it just a systemic "dump"? No, it's not that simple.
Modifying Description Files
When the OS came out Windows Vista, profound changes took place in the core of the system, which did not appear outwardly in any way. So, earlier all the components were described by INF files, while in Whist the practice “binary file + XML” was first introduced. This bundle contains almost everything from registry keys to system settings.
All these bundles are stored in WinSxS. What kind of folder is this, in simpler terms? It can be called an important system store, which contains all the information about the system. In fact, this directory is a miniature OS. Now it is clear what the consequences will be caused by its removal?
Most often, after such a barbaric step, the system will not work at all. And if by some miracle some of its functions remain, then it will still be impossible to fully work on it.
Can it be cleaned?
Oddly enough, but such an operation is quite acceptable. Over time, the size of this folder begins to grow rapidly. This is due to the fact that new connections arise between the system components, and some of them are already outdated.
Do not forget that the system is constantly changing and improving: for example, when you install updates, not only new, but also old versions appear in the folder system files... This is done to make it possible to rollback to the old view of the system.

Simply put, as a result of maintenance and customization, the volume of this directory will continually grow until one day it exceeds all reasonable limits. But before cleaning WinSxS, there are a few simple rules to remember.
Firstly, only system utilities from Microsoft itself should be used for its "sanitation". Secondly, manual change its components are unacceptable, since the consequences of such "creativity" will be unpredictable. Thirdly, if you do not understand the meaning of this cleaning, and the size allows, it is better to completely abandon such an idea. You will definitely not increase the performance, but you can earn problems in abundance.
How is cleaning done?
We have already said that before cleaning WinSxS, you need to use the services of a special utility. It is hidden in the depths of the system, and therefore ordinary users do not even suspect about its existence. It is called DISM, and currently its eighth version is included in Windows.
For the utility to start, you need to have administrator rights. To start it in this mode, perform the following operations: click on the "Start" button, and in the menu that opens, find the search string. Enter the word "CMD" into it, press the "Enter" button.

A list of found elements will appear in the right part of the window, among which there will be a file of the same name. Right-click on it, and in the drop-down context menu select "Run as Administrator".
First, we find out if the cleaning operation is really necessary at a particular moment. To do this, you need to use the following command: "Dism.exe / Online / Cleanup-Image / AnalyzeComponentStore".
After that, several incomprehensible lines will appear, the meaning of which we will now explain. So, after the line “Component Store
The second line shows the real size of all components, which should be guided by. Finally, the very last value is the number of those system files that have been replaced with new ones, and therefore they can be removed painlessly.

The first way
It is the most simple and effective. So, to make the Windows 7 WinSxS folder smaller, run a command prompt in administrative mode. Enter the following command into it: "Dism.exe / Online / Cleanup-Image / StartComponentCleanup". A little time will pass, after which the system will inform you about the completion of the operation.
Attention! If you performed the operation using the first method, then all other actions can be omitted, since they will no longer make sense.
Second way
Run the emulator again command line in the "Administrator" mode. Enter the command "cleanmgr" into it, then press the "Enter" key. The utility will start. In the latest versions of Windows, it can even determine the size of old files system updates that can be painlessly removed from the OS.
The third way
This method is intended to remove all old versions of components that are no longer needed. It is extremely useful for computer owners who have been running the same version of Windows for several years.
Important! If you follow our advice, you will not be able to roll back the update. The warning is all the more important because recently Windows 7 users suffered a series of system failures associated with the unsuccessful KB2859537 patch. However, if everything is fine with your OS, then the WinSxS folder (we will tell you how to reduce it) may be revised.
This operation is performed by the command "Dism.exe / Online / Cleanup-Image / StartComponentCleanup / ResetBase". The gain in the amount of free disk space will directly depend on the total number of updates that you have installed since the installation of the system itself. It happens that the size of the freed space is measured in gigabytes.

Should I clean it?
So, after all of the above, you may well be in some difficulty. And this is understandable: on the one hand, the gain in the amount of freed up space attracts, but on the other ... What will you do if some update file turns out to be problematic?
If there is a corresponding WinSxS file, then there is nothing to worry about. But when it is not there, in some cases only reinstalling the system can help. So before this operation, we strongly advise you to decide whether you really need this bit of free space. Moreover, as you know, in Windows 8 WinSxS is partially optimized systemic means so don't worry too much about her.
The size of modern hard drives personal computers can reach several terabytes, which is good news, but whatever one may say, they cannot stretch. And when there is little disk space left, the idea of what to do next and where to put the content begins to worry the user more and more.
With the custom section, everything is simple. In the end, some of the files can be moved to some removable media. But what about the system partition? Alternatively, you can delete restore points, which is generally not recommended, as well as unused programs. The latter does not suit all users, and besides, the program to be removed should take up a lot of disk space.
In general, the logic is as follows - the larger the program, the more useful it is.

There is another way - to clear the "temporary" WinSxS system folder located in the Windows directory. If you have been using an operating system for a long time, you will probably find that its size is several gigabytes. There were users whose WinSxS weighed two dozen gigabytes. Removing the "junk" accumulated in WinSxS is also an option, but you need to approach it with extreme caution.
Clearing this system directory is not the same as getting rid of the contents of the TEMP folder. Why this is so, first, let's find out what the WinSxS folder is and what it is for in general.

WinSxS what is this folder
The WinSxS folder first appeared in Windows Vista and contained configuration information operating system and its components. In subsequent versions of Windows, the purpose of the WinSxS folder, by and large, has not changed.
Yes, it has been optimized, but the files it contains are still of considerable value to the system, and therefore deleting them with crooked hands can lead to sad consequences. The contents of the WinSxS directory are represented by old system update components that store information for system recovery config files as well as hard symbolic links or Hard Links.
Despite the seeming uselessness, the old update components can even be very useful. If problems arise during the next Windows update, you can always roll back to older versions and thereby restore the normal operation of the system.
Now it's not hard to understand the reasons why the WinSxS folder takes up so much space on your hard drive. Its growth is directly proportional to the frequency of updates. Old system components are archived and copied to the WinSxS directory, which actually leads to its increase. In reality, however, its size rarely exceeds 15 GB. Besides file managers including Explorer, you are tricked into oversizing the WinSxS folder by about 40 percent.
That 40 percent is symbolic link files that do not contain actual data, but only refer to them. The "real" files can be located in other system directories, for example, in Windows, ProgramData, etc. Firstly, removing links to the size of WinSxS will not affect in any way, and secondly, this can again lead to problems.
If you are Windows user 8, it's also worth considering whether there is any point in cleaning up this folder at all. The fact is that, unlike Windows 7 in the eighth version, the cleaning of "extra" files is performed automatically according to the specified settings of the task scheduler.
Cleaning up winsxs
Thus, it makes sense to clean up the WinSxS folder only in two cases. Either the WinSxS folder has really taken on "rampant" sizes, which is more typical for the seventh Windows versions, or you value each gigabyte so much that you are ready to risk the performance of your system. There are several ways to clean up the WinSxS directory. The easiest, but not the most effective method is to use the system utility cleanmgr, also known as Disk Cleanup. To run it, in the Run box, enter the command cleanmgr and press enter. Do you recognize?


Winsxs cleaner - DISM
Another way is much more efficient. This time we'll use the DISM console utility. We will remove all update versions without waiting for the scheduled operation. To do this, run the following command in a command line running as administrator:

DISM.exe / online / Cleanup-Image / StartComponentCleanup

For removing archive files generated during the service pack installation process is answered by another command. To do this, enter the following line on the command line:

Attention! After running this command, you will not be able to remove the already installed service packs and revert to their old versions. By the way, you will receive such a message (as in the screenshot) if there is nothing to delete.
You can also uninstall old versions for each component. To do this, use this command:
DISM.exe / online / Cleanup-Image / StartComponentCleanup / ResetBase

The consequences will be exactly the same as in the case of using the command DISM.exe / online / Cleanup-Image / SPSuperseded .

What else can you do to clean up the WinSxS folder. The latest versions of Windows have this useful function how to enable / disable system components on demand. If you open Control Panel and then go to the "Programs and Features" section, you will understand what it is about. Some of these components, even if not checked, are still present on the disc. You do not need to connect to the Update Center to download them, you can install them directly from the disk. So, they are located in the WinSxS folder.
If the component files take up a lot of disk space, you can delete them. To do this, we will again use the already familiar DISM utility. Launch the console and enter the following command:
DISM.exe / Online / English / Get-Features / Format: Table

This will display a list of components, as well as their state. Enabled - enabled, Disabled - disabled. To remove a component from the system, use the following command:
DISM.exe / Online / Disable-Feature / featurename: NAME / Remove
Keyword NAME here means the name of the component. For example, we need to remove the Microsoft-Hyper-V-All module.

DISM.exe / Online / Disable-Feature / featurename: Microsoft-Hyper-V-All / Remove
Now if you run the Get-Features command again, you will see that the component status has changed to "Disabled with Payload Removed" which means "disabled with removal of useful files."
Outcome:
As you can see, there is nothing difficult about this. We have tested all the options described above, and found them quite effective and efficient. But the most important thing is that our actions did not lead to any negative consequences for the operating system.
Anything that remains in the WinSxS folder should not be deleted. And one moment. Do not use random utilities found on the Internet to clean up this folder.
Experience has shown that the use of such "cleaners" often led to a complete reinstallation of the system. Also, pay attention to the fact that in none of the well-known optimizers you will find functions for cleaning the WinSxS directory.
Many are faced with the problem of lack of free hard disk space. Especially often the disk on which the operating system itself is installed becomes clogged. This is due to the fact that there are a lot of folders on it, which the system itself fills with the information it needs. This problem It is also relevant for Windows 7. You can clean up system folders from unnecessary garbage either manually or using special programs.
Windows 7 system folders: the need to clean up and the possible consequences
Each of the system folders has its own purpose and stores information of a certain kind. Before clearing the disk, carefully read what function this or that folder is responsible for, otherwise you may lose important data or severely harm the operating system, which will lead to its breakdown:
Video: what files can be deleted on the system drive
What not to do when cleaning up system folders
Please read the specifics of the above folders carefully. Before clearing one of them, consider if its contents will be useful to you in the future. Some folders, like Windows or System32, shouldn't be touched at all. And don't try to clean up folders by simply deleting their contents. This will lead to the fact that the remnants of them will remain in the computer's memory, which in the future will begin to litter and overload the system. There are only a few folders that you can clean up manually:
Do not under any circumstances delete the folders themselves, this will lead to critical errors in the operation of the system, you only need to erase their contents. Also, before clearing system folders, make sure you can free up memory by other methods, for example, by uninstalling third-party applications and games.
Methods for cleaning up Windows 7 system folders
If you do decide to clear HDD from accumulated third-party files, it is easiest to use the built-in Windows functions... There are two initial options - standard and advanced cleaning.
Standard cleaning
By using the standard cleaning method, you will get rid of following files and folders:
To spend standard cleaning hard disk, follow these steps:
 Opening the properties of the system disk
 Go to the "General" section
 Select the files you want to delete
 Click the "Clear" button in the "System Restore and Shadow Copy" section
Extended cleaning
Using the advanced cleaning option, you will delete the following folders and files:
To perform Advanced Disk Cleanup, follow these steps:
 Run "Command Line" as administrator
 We register the cleanmgr command
 Select the disk on which to perform cleaning
 Selecting the files to be deleted
Video: how to clean a disk using Windows
Disk cleanup using third-party programs
Before proceeding with manual cleaning of each folder separately, you should use the special third party programs created for automatic search and cleaning the disk from unnecessary files:
 Download the CCleaner app
 Go to the "Cleaning" section
 Selecting the sections to clear
 Press the button "Analysis"
 Before deleting files, you can view their details
Video: Deleting System Files Using CCleaner
Features of cleaning individual system folders
If the previous cleaning methods did not solve your problem or you need to clean one of the folders selectively, then find it in the sections below and follow the instructions.
But many folders are hidden by default so that the user doesn't accidentally damage them. To display hidden folders v general list do the following:
 Opening the explorer
 Expand the "Service" menu
 Go to the section "Folder options"
 Go to the "View" section
 Changing the parameters of hidden folders
Winsxs
Cleaning the Winsxs folder on Windows 7 is done through a standard disk cleanup. This method has already been described above. Before starting the cleanup, you are presented with a list of files that you can delete. Check the section "Files of the backup copy of the update package" in it.
 We mark the "Files of the backup copy of the update package"
Video: how to empty the Winsxs folder in Windows 7
System Volume Information
To clear the System Volume Information folder, you must first access it:
 Open the properties of the System Volume Information folder
 Go to the "Security" tab
 Press the button "Change"
 Click the "Add" button
 We register the username
 We issue full access to folder
 Go to computer properties
 Go to the "System Protection" section
 Press the button "Configure"
We successively press the buttons "Apply", OK.
DriversStore
To delete outdated drivers from a repository called DriversStore, do the following:
 Opening the command line
 We register the command pnputil.exe –e
 We register and execute the command
Installer
The Installer folder may contain files necessary for the system or programs, but there is a special third party application PatchCleaner, which will automatically determine what can be removed from the content:
 PatchCleaner searches for obsolete update files and allows you to move them to another media or completely remove them
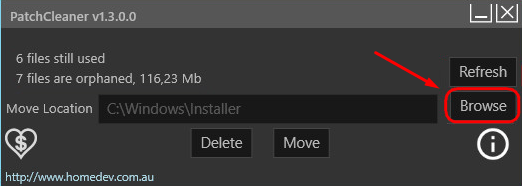 Click the Browse button
 Specify the path to the Installer folder
 Press the Delete button
 We confirm the action by clicking on the Yes button
Pagefile.sys
If you are sure that the computer can handle the required tasks without the Pagefile.sys paging file, you can remove it by following these steps:
 Go to the section "Additional system parameters"
 Press the button "Options"
 Click the "Change" button in the "Advanced" tab
 Setting the required parameters
 Restart your computer
Folders with history, cache and browser cookies
Browser files can take up a lot of disk space. The easiest and safest way to remove them is through the settings of the browser itself:  We mark the files. which need to be removed from the browser history
 We set the parameter "For all time" and clear the history
Disk cleanup problems
If after you have removed any files from system folder, there were errors or the computer began to slow down, there is only one thing to do - to perform a system restore. This could have happened due to incorrect disk cleaning or deletion required files... System recovery is only possible if the computer has restore points:
 We start the computer in safe mode
 Open the "System Restore" application
 Press the button "Next"
 Choosing a restore point
Video: Windows 7 Recovery
What to do if there is no "Clean up system files" button
If you try to free up disk space after standard method cleaning, you are faced with the absence of the "Clean up system files" button, which means that you have disabled UAC (User Account Control), and the program starts immediately with the ability to clean up system files. That is, pressing the "Clear system files" button gives you administrator rights and, along with them, the ability to edit and clear system folders. But if UAC is disabled, then you have access to changing system files immediately and you do not need to press any additional buttons.
 If the button "Clean up system files" is missing, User Account Control is disabled
If you want to clean up disk space or are sure that a part of the virus has survived in the system files, then the operating system itself has a standard and extended disk cleanup function for this case. You can also use third-party programs or clear each folder separately. But do not delete everything, otherwise it will lead to a breakdown of the computer, and the only way out is to roll back the system to the last restore point.
Many users, when the windows winsxs folder was found on the computer, wondered what it was for.
Often, the data in it is large enough, so users want to delete it to save disk space.
Can this be done, and if so, how?
Definition
What is this folder, what is it for and what files does it contain? Can you clean it completely? After all, it is impossible to do this by pressing the Delete button as usual.
This folder contains backups all operating system files. It is difficult to overestimate the importance of such a folder, since it is from this folder that, in case of malfunctions, the system performs its own elimination and restoration. The data that is stored in it is the data before the installation of the last update.
That is, every time the user makes a system update, data about file updates is written to the discussed folder. These files themselves are saved there in their original form. Thanks to this phenomenon, it is possible to delete the changes made.
This saves the last valid copy of the material. That is, before installing the update for the first time, the data about the original version is saved. But when installing the second update - the data after the first update (if it worked properly).
That is, it is important to keep in mind that only the latest update option can be deleted using this folder. You will not be able to "roll back" the program to the original version. This can only be done by reinstalling.
By the way, with this functionality and under this name, this folder is available only in operating rooms. Windows systems 7, 8, 8.1, 10. Moreover, in latest version operating system, this folder also contains the files required to reinstall the entire operating system. That is, it is from it that the data for automatic recovery Windows.
Every time, after updating Windows, information about the files being changed is saved in this folder, so that, if necessary, it would be possible to roll back the changes made.
The essence of the problem and features of its solution
If the computer is actively used and updates are installed regularly, the folder can fill up very quickly. Moreover, its weight can become very significant - several gigabytes. It starts to take up a lot of disk space and the user may want to delete it.
Should I do it? That's a moot point. If after latest updates the computer is working fine, all programs have been checked and no bugs have been found in them, then a "rollback" of the system is not needed and the folder can be deleted.
But if there are difficulties and problems in the updated programs, then you should not clear the data store. And also, you do not need to do this until you are convinced that absolutely all updated programs are working properly. Otherwise, errors may appear in the future, and you will have to reinstall the program, since it will be impossible to restore it.
You can clear the folder using the tools preinstalled in the operating system. Download special utilities it is not necessary for this. Thus, if the computer is working fine. Then you can proceed to this procedure.
It is very important to remember that it is forbidden to delete such a folder or even files from it in the usual way. That is, by default, the system will not allow the user to do this. However, if you install special utilities and ask for special permissions (similar to TrustedInstaller), you can still uninstall it.
If it is removed in this way, the operating system will no longer boot. This is due to the fact that any files from this folder are almost always used when downloading. If you have deleted the directory completely, the system will not find the required file at some point and will not boot.
How to reduce the size of the WinSxS folder in Windows. How to clean winsxs.
Why is the WinSxS folder growing? Every time, after updating Windows, information about the files being changed is saved to this folder, so that, if necessary, it would be possible to roll back the changes made.
Cleaning up using the command line
Deleting files and cleaning the folder using the algorithm below is safe for your computer. They will not do significant harm. So in this case only unnecessary backups are deleted, but not the system files for loading.
- Log in to the system under the name of the Computer Administrator;
- Run the Run function - you need to hold down the Win + R buttons on the keyboard at the same time;
- A small Run window will open, equipped with an input field;
- Write the combination msconfig in it;
- Press Enter on the keyboard or Run in the box with the input line:
- In Windows 10, you can click on the Start button and write the command line phrase, as a result the same window will open;
- A window with a black background will open, this is the Command Line window;
<Рис. 1 Командная строка>
- In the input field, enter the combination Dism.exe / online / cleanup-image / AnalyzeComponentStore;
- Press Enter;
- The command starts analysis of the data store, that is, the directory that you want to clear;
- A notification will appear on a black background that the storage needs to be cleaned (this always happens);
- Enter the exe / online / cleanup-image / StartComponentCleanup combination in the input field;
- Press the Enter button on your keyboard;
- Now the system of automatic cleaning of the desired storage from all unnecessary ones has started. backup files, while all the necessary boot data is saved;
- As soon as the process is completed, the system will notify about it.
<Рис. 2 Очистка завершена>
You can now exit the Command Prompt application and restart your computer. Check the contents of the folder. Now its "weight" should be much lower, since all possible unnecessary files left.
An interesting characteristic of this approach is that it cannot be used too often. Otherwise, it may slightly increase in "weight" if there are no backup copies of updates in it. That is, it is necessary to carry out cleaning only when the content of the directory is very significant (the content volume within 7 GB is considered normal and does not have a negative effect on the operation of the system).
Cleaning with a utility
Clearing this directory in this version of the operating system has some peculiarities. In order to make it, you need to install the update KB2852386. It is optional, because many users do not have it, but it is it that adds the necessary function to the utility for cleaning the disk.
Downloading the update
How do you install such an update? Proceed according to the following algorithm:
- Open the control panel;
- Go to the System Updates item (you can do this by simply finding such an item through the search engine in Explorer, you can also find it through the search in the Start menu);
- Having opened the System Update Center in one way or another, click on the Search for updates button which is available in the window that opens;
- Wait a little while the search is complete;
<Рис. 3 Центр обновлений>
- Click on the Optional updates item;
- Scroll the list to the side to see the endings in the names of the updates (this is where their numerical and alphabetic designations are located);
- Find the update with the corresponding number;
<Рис. 4 Выбор обновлений>
- Click on it and install the update;
- As soon as the system notifies you of the end of the download and installation, close all windows.
After that, you need to restart your computer. Now the changes have taken effect and you can proceed to deleting unnecessary data from the catalog.
Cleaning in Windows 7
After the computer has been restarted, unnecessary data from the storage can be deleted using special cleaning programs. hard disk... It is through it that all operations with the system files in this OS are done.
Do the following:
- Open the program to clean up the hard disk (to start it, use the search in the Start menu);
- Find the button Clean up system files, click on it;
- A small menu will open, in which you need to click on the Updates cleaning section (depending on the features of the system, this item may have a different name - Updates backup files);
<Рис. 5 Работа в Windows 7>
- Press the OK button and wait until the uninstallation is completed, which will notify you of the system.
Restart your computer and check the properties of the WinSxS folder. Its volume should be very significantly reduced, sometimes almost by half.
Cleaning in Windows 8, 8.1
In these versions of the operating system, the cleaning utility is included in the standard, required installation, service pack. That is, you do not need to download anything extra. Use the following instructions to clear the data store:
- Open the start menu;
- Start typing the "disk cleanup" combination;
- As soon as the corresponding utility appears in the list of search results, launch it by clicking the mouse button;
- Find the System Files Cleanup section in the window that opens;
- Click on it and in the list that opens, select the Cleaning of operating system updates section;
<Рис. 6 Манипуляции в Виндовс 8>
- Wait until the OS notifies the user that cleaning is complete, and then restart the device for the changes to take effect.
As in the previous cases, after checking the properties of the folder, it will become obvious that the number of files in it has significantly decreased.
Features of Windows 8.1
Exclusively in this operating system, there is another way to clean this system folder. He, like the very first described method, assumes the use of the command line. Proceed according to the following instructions:
- Log into the system under account Administrator (otherwise the method will not work);
- Start the Command Prompt using one of the methods described above, or by simultaneously pressing the Win and X keys;
- In the menu that opens, find the Command line (administrator) item and click on it;
- In the Command line input field, write the combination dism.exe / Online / Cleanup-Image / StartComponentCleanup / ResetBase;
- If you print the combination dism.exe / Online / Cleanup-Image / AnalyzeComponentStore, you can find out how many megabytes it occupies the "problem" directory, that is, how much it has;
<Рис. 7 Работа в Виндовс 8.1>
- Then press the Enter button on your keyboard.
The cleaning program has started. Since as soon as it ends, that is, all files will be deleted, the disappearance of which will not damage the system, the Command Prompt window will notify you of the end of cleaning. Now you can close this window and restart your computer.
After checking the properties of the directory, it turns out that its weight has decreased significantly. This method is completely safe. But, like the first method, it is not worth using it too often, since this can even lead to an increase in the weight of such a data archive.
Automatic deletion
To prevent the storage capacity from growing uncontrollably, it is recommended to configure the self-cleaning function of unnecessary documents, files and data in it. To configure this feature, you need the operating system's task scheduler.
Search for the Task Scheduler application using the Start menu search engine. Run the application. In the list on the right side of the window, select the Create section simple task.
<Рис. 8 Автоматическая очистка>
Generate the StartComponentCleanup task in the Microsoft \ Windows \ Servicing branch. Set the time period as desired, but not too often. Click OK and restart the device for the changes to take effect.
<Рис. 9 Создание задачи>
Clearing the #WinSxS folder
Most frequent question on Windows 10: How to # clean the WinSxS folder. The fact is that in the process of updating the component, Windows does not remove previous versions... This is necessary so that, if necessary, it would be possible to roll back the updated components. This fills up the disc quickly and needs to be cleaned periodically. In no case should you delete the WinSxS folder! In the video, I'm talking about two ways to clean the Windows WinSxS folder.
Many users, while optimizing the amount of disk space that Windows 7 occupies, are surprised to find that the winsxs folder has a huge size, which, moreover, grows over time. Naturally, they are faced with the questions of what it is for, whether it can be removed. According to the OS developers, this folder contains information about all updates installed on the system. This explains the growth of its size - the older Windows, the more updates were installed in it. But the answer to the question about its removal and cleaning is not so simple and requires clarification.
Removing and cleaning winsxs
We immediately answer the question, can this folder be deleted? No! This will inevitably cause unstable Windows work 7 or even its collapse with the impossibility of recovery. Attempts to manually clean it by deleting files to the trash or using various third-party cleaning utilities like CCleaner will lead to the same effect. It is unlikely that any of the users, let alone disk cleaning programs, know which files from this folder can be deleted to reduce its size, and which cannot. The fact is that among the files of this folder there are fresh updates, and there are also obsolete ones, which became unnecessary for the system and were subsequently replaced with newer ones. These files take up a lot of space and could be gotten rid of, but there is no way to distinguish them from the required updates.
How to properly empty a folder
In October 2013, Microsoft released the KB2852386 update (optional), which was intended to solve the problem with neatly cleaning the winsxs folder. Therefore, those users who are going to competently clean this folder are strongly advised to install it if it is not already installed. But only for the installation and operation of this update, it is required that ServicePak1 (SP1) be installed in Windows 7. The update is functional on both 32-bit Windows and 64-bit.
Installing update KB2852386
It is not advisable to download this update using one of the browsers. The best way install it - use staff funds Windows. To do this, in the Control Panel, open the "Windows Update" section.
In this window, you need to click on optional ads, in response to this, a list of them will be displayed. In it you need to find KB2852386, mark it with a checkbox and click the "Install updates" button. Then you need to wait for the update process to complete and reboot.
The winsxs cleaning process
When the KB2852386 update is installed, the process of removing outdated updates is performed as follows. We call Explorer by clicking on "Computer", in the explorer window, right-click on the system disk and select "Properties" in the context menu that appears. In the properties window, open the "General" tab and click on the "Disk Cleanup" button. 
In addition, disk cleanup can be performed from the command line, if you run the system utility cleanmgr from it in administrator mode and set the system disk. In either case, the process of scanning the system disk will start to detect folders and files that can be removed from the disk without harming the functioning of the system. 
Upon completion of the scan, a list of objects will be displayed that can be deleted and thereby reduce the amount of the occupied part of the system disk. The user should mark those objects that he is going to delete, and click the "OK" button. It is necessary to mark the item "Cleaning Windows updates". If there are no outdated updates in the winsxs folder, then this item will not be in the list of deleted ones. 
By clicking "OK", the cleaning utility will start the process of deleting the selected objects. It can take quite a long time. After completing it, you should restart your computer.
Using DISM
This utility appeared in Windows distributions starting from 8. But according to information from the Internet, it can be used in the seven. You just need to download and install it. What is its functionality? And here you can delete temporary files, logs, cache, compress the installed system with an indication of the compression ratio, disable and delete unnecessary services and, of course, uninstalling updates. But first you need to download it and place it in the Windows \ System32 folder.
The utility runs in command line mode as administrator. Before starting cleaning, you should analyze the folder and find out if it needs to be cleaned. The command format of this utility does not differ in variety and looks like:
Dism.exe / Online / Cleanup-Image / command option
Further we will omit full format command and provide only the option of the command being described. In any case, the utility responds with a window with the result of the command, in which the line "operation completed successfully" appears.
Analysis of the contents of the winsxs folder is performed using the option
/ AnalyzeComponentStore
after executing this command, we get an analysis report: 
From it you can see that you can painlessly clean backups and disabled components, cache and temporary data, saving a little over 1 GB on this. The report contains the line "It is recommended to clean the component store: Yes", which means that you can run the cleanup command.
To do this, execute the command with the option
/ StartComponentCleanup
It starts the process of deleting unnecessary files, and at its end a screen is displayed with a message about the successful completion of the deletion. 
The process of cleaning up the directory can be continued by issuing the command to delete the archived files that were created during the updates. The option for this command is:
Removal of obsolete versions of system components can be performed using the command with the option
/ StartComponentCleanup / ResetBase
Now let's turn to correcting the list of installed OS components. Of course, this is usually done using the "Enable or Disable Windows components"From the Programs and Features section of Control Panel. However, even if a component is not marked as to be deleted in the list provided by Windows, it may still be present in the winsxs folder. To see full list components stored in this folder, you need to execute the command by specifying the option
/ Online / English / Get-Features / Format: Table
Selecting components from the resulting table that the user does not need, he can erase them in winsxs and reduce its size using the command, the options of which are as follows
/ Online / Disable-Feature / featurename: name / Remove
where name is the name of the component to be removed.
Do I need to clean the folder at all?
If you look at things soberly, then you can answer this question like this:
- Periodically, even for a very long time installed system- No. Attempts to save several gigabytes of disk space with modern volumes hard drives will not lead to anything, except for wasting time, wear and tear of the disk and the deprivation of the ability to roll back unnecessary updates. It should also be borne in mind that many file managers, including Explorer, overestimate its size by about 40%.
- If the 7 was installed less than 2 years ago, then the size of this folder is unlikely to exceed 2-3 GB and there is no need to clean it.
- It's another matter when the remaining free volume of the system disk is so small that it leads to brakes during operation. In this case, these very freed up several gigabytes can give an increase in performance.